• Buy me a beer
  • Introduction
    • 0.0.1 Warning
    • 0.1 Layout reference
      • 0.1.1 Highlight:
      • 0.1.2 Examples:
      • 0.1.3 Extra info:
      • 0.1.4 External links
    • 0.2 Copyright and permissions
  • 1 Weather
    • 1.1 Weather forecasts
      • 1.1.1 Sources of forecasts
      • 1.1.2 Understanding forecasts
    • 1.2 Wind
      • 1.2.1 Wind strength
      • 1.2.2 Effects of land on wind
      • 1.2.3 Sea and land breezes
      • 1.2.4 Anabatic and katabatic winds
      • 1.2.5 Wind, waves and tide
      • 1.2.6 Accounting for wind
    • 1.3 Other considerations
      • 1.3.1 Visibility
      • 1.3.2 Fog
      • 1.3.3 Thunderstorms
      • 1.3.4 River levels
    • 1.4 Synoptic charts
      • 1.4.1 Isobars and wind
      • 1.4.2 Low pressure
      • 1.4.3 High pressure
    • 1.5 Some meteorology
      • 1.5.1 Air masses
      • 1.5.2 Global circulation
      • 1.5.3 Depressions
      • 1.5.4 Depressions in practice
    • 1.6 Environmental clues
      • 1.6.1 Wind direction
      • 1.6.2 Clouds
    • 1.7 Maritime forecasts
    • 1.8 Weather and trip planning
      • 1.8.1 Deciding where, and if, to go
      • 1.8.2 Checking actual conditions
  • 2 Tides
    • 2.1 Introducing tides
      • 2.1.1 The moon
      • 2.1.2 The Sun - neaps and springs
      • 2.1.3 Meteorological effects
    • 2.2 Tide tables
    • 2.3 Predicting high and low water
    • 2.4 Tidal range
    • 2.5 Tidal streams
    • 2.6 Behavior of tidal streams
      • 2.6.1 Races and overfalls
    • 2.7 Tidal diamonds
    • 2.8 Tidal stream atlases
    • 2.9 Pilots and guidebooks
    • 2.10 Predicting speeds of tidal streams
    • 2.11 Variation of flow through the tidal cycle
      • 2.11.1 50/90 rule
      • 2.11.2 Rule of thirds
    • 2.12 Formal navigation for short crossings
  • 3 Surf and Swell
    • 3.0.1 The life story of a wave
    • 3.0.2 Terminology
    • 3.1 Wind waves
      • 3.1.1 Wind forming waves
      • 3.1.2 Fetch
      • 3.1.3 Time to drop off
    • 3.2 Ground swell
      • 3.2.1 What is swell?
      • 3.2.2 Swell propagation
      • 3.2.3 Sets
    • 3.3 Waves and topography
      • 3.3.1 Waves in shallow water
      • 3.3.2 Refraction and focusing
      • 3.3.3 Diffraction
      • 3.3.4 Reflection
      • 3.3.5 Reefs and boomers
    • 3.4 Wind, waves and tidal streams
      • 3.4.1 Wind and waves against tide
    • 3.5 Surf
      • 3.5.1 Waves and beaches
      • 3.5.2 Surf height
      • 3.5.3 Surf zone features
    • 3.6 Swell and surf forecasts
  • 4 Navigation
    • 4.1 Maps and Charts
      • 4.1.1 Comparing maps and charts
      • 4.1.2 Which to use?
      • 4.1.3 Obtaining maps and charts
    • 4.2 Specifying position
    • 4.3 Latitude and longitude
    • 4.4 The units of the sea
      • 4.4.1 Distances and speeds
    • 4.5 The compass
    • 4.6 Reading charts
    • 4.7 Navigational marks
    • 4.8 Practicalities
      • 4.8.1 On the water
      • 4.8.2 On dry land
    • 4.9 Coastal pilotage
      • 4.9.1 Distance, speed and time
      • 4.9.2 Dead reckoning
      • 4.9.3 Compass use for coastal pilotage
    • 4.10 Signs of tidal flow
    • 4.11 Transits
    • 4.12 Fixes
    • 4.13 Low visibility navigation
      • 4.13.1 Short legs
      • 4.13.2 Aiming off
      • 4.13.3 Attack points
  • 5 Open water navigation
    • 5.1 Chartwork
      • 5.1.1 Measuring bearings
      • 5.1.2 Marking vectors
    • 5.2 Long crossings
      • 5.2.1 Option1: Multiple 1 hour vectors
      • 5.2.2 Option 2: Vectors over several hours
      • 5.2.3 Introduction to multiple hour vector method
    • 5.3 Choosing when to make the crossing
    • 5.4 Finding tidal stream data for long crossings
    • 5.5 Plotting tidal streams
    • 5.6 Finding the course to steer
    • 5.7 Determining estimated positions
    • 5.8 Navigating in open water
      • 5.8.1 Dead reckoning
      • 5.8.2 Fixes and cross bearings
      • 5.8.3 Distance off
      • 5.8.4 GPS

Notes on Sea Kayak Navigation and Tidal Planning

4.7 Navigational marks

To assist the navigation of ships, navigational marks such as lighthouses, buoys and beacons are placed around the coastline. Because kayaks can operate in very shallow water, these aren’t useful to us in the way that they were intended for large vessels. However, they do provide useful landmarks if you’re carrying the nautical chart. A basic understanding of what the main buoys mean will help you understand where larger vessels are likely to go and thus help you avoid them.

Lateral marks are used to mark the edges of shipping channels – for example into and out of a harbor. As a big ship enters a harbor, red can-shaped port-hand buoys will be on the left, whilst green conical starboard-hand buoys will be on the right.

A mnemonic to remember this is “no more cans of red port left”.

Lateral marks - green starboard mark to the left of the image, red port mark to the right of the image

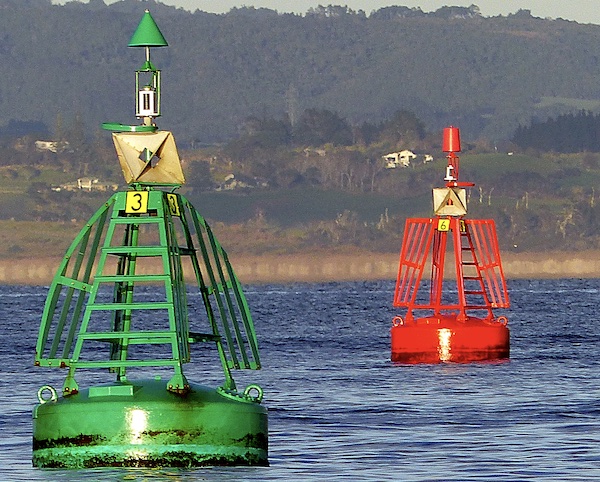
This is the system known as ‘IALA A’, used in the UK and many other parts of the world. Some areas, notably the US, use ‘IALA B’, in which the colors of the buoys, but not the shapes, are reversed.

Cardinal marks indicate the presence of hazards – normally shallows that big vessels would rather avoid. A cardinal mark indicates the direction from the mark in which safe water can be found. For example, safe deep water will be found to the north of a north cardinal buoy, with the hazard lying to the south. The marks are differentiated by the orientation of two cones at the top as well as the sequence of black and yellow colors on the buoy, as shown in the diagram.

Diagram showing how cardinal marks are positioned relative to a danger.

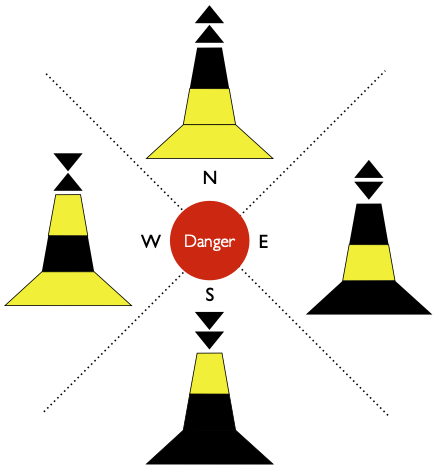
Because cardinal marks indicate shallow areas, they can sometimes be posts attached to the seabed rather than floating buoys.

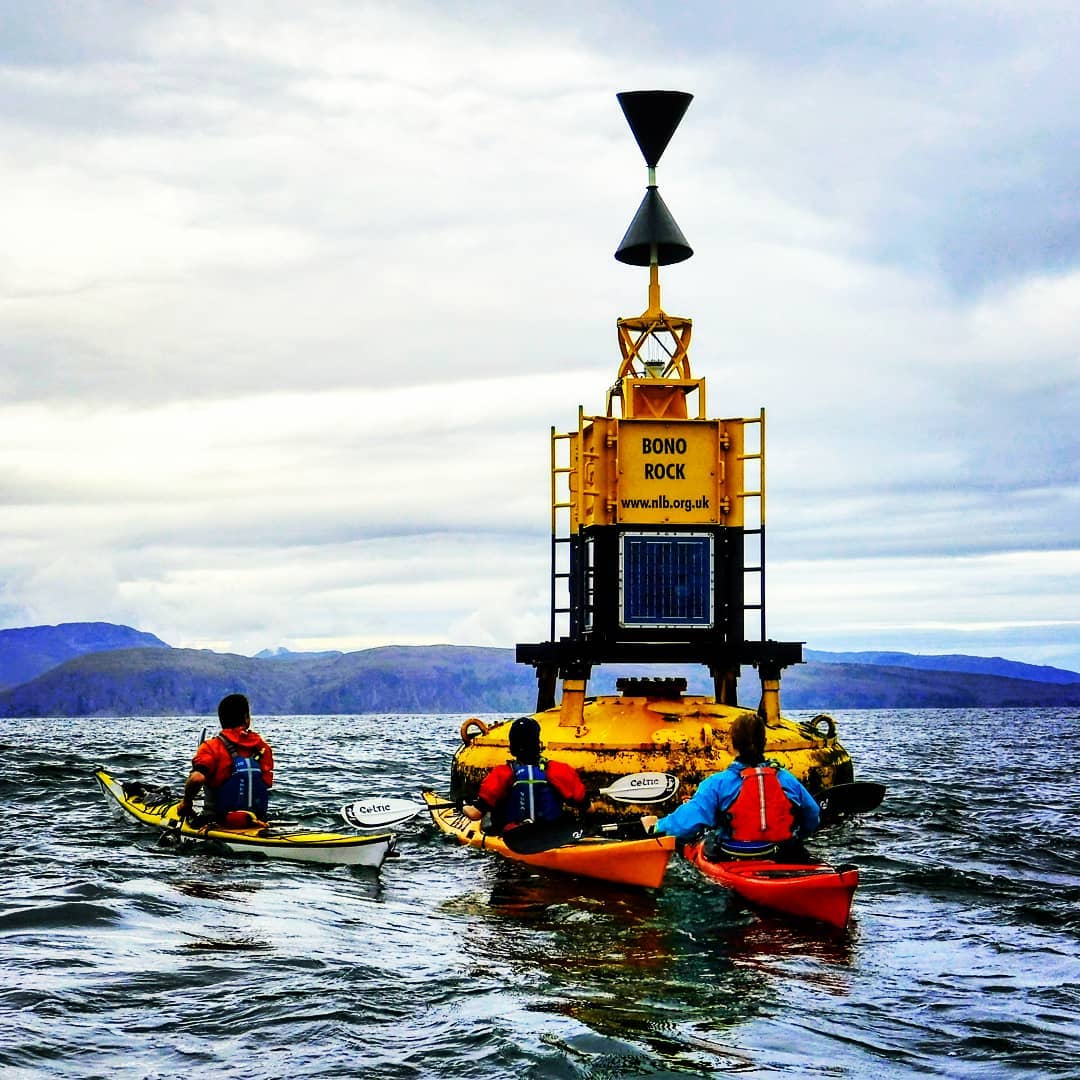
The buoy in the image below is an west cardinal mark, indicating shallows to the east.

Bono Rock west cardinal buoy. The buoy marks the western extent of the Bogha Nuadh and Bogha Ghair reefs, south-west of Easdale in the Inner Hebrides. The eastern extent of the shallows is marked by the Bogha Ghair east cardinal buoy.

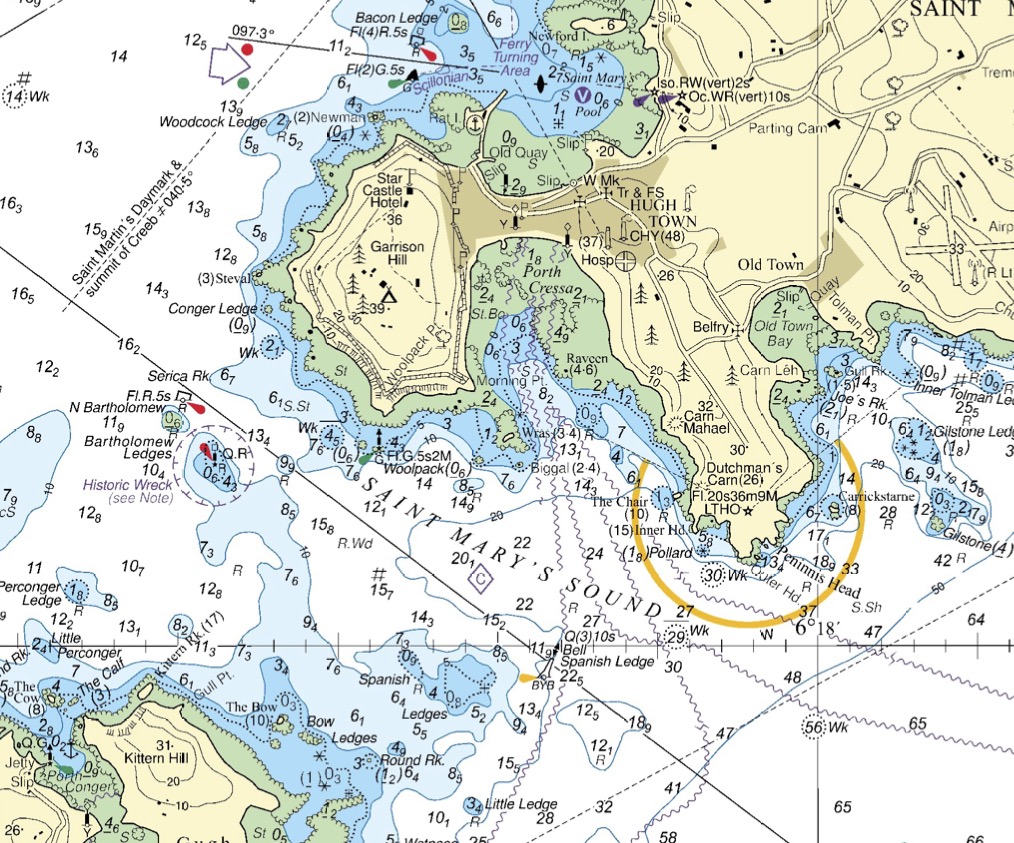
The chart extract below shows an example of how navigational marks might be positioned:

Southern approach to St. Mary’s in the Scillies - this is the route taken by larger vessels, including the ferry, at low water The route is marked by a a series of solid and dashed lines. An east cardnal ‘Spanish Ledge’ marks the shallows of Spanish Ledges to the west - large vessels will keep east of this buoy. Further to the northwest, a green post (‘Woolpack’) and a red post and buoy (‘N Bartholomew’) mark the edges of a narrow channel with rocks either side. Sea kayakers might choose to avoid large vessels by keeping out of this channel. To the north east, two more lateral marks (including ‘Bacon Ledge’) mark the narrow channel into Hugh Town harbor. Note the area with green and red spots printed just north of Woodcock Ledge on the map. This indicates the ‘direction of buoyage’ - i.e. which side of the channel has red marks and which has green marks.

As sea kayakers, the hazards (e.g. shallows) indicated by lateral and cardinal buoys aren’t an issue for us. It’s often better to go the ‘wrong’ side to keep out the way of big vessels.

For example, imagine that we’re crossing Saint Mary’s Sound (see chart above) from Kittern Rock to the western corner of Garrison Hill. We’ll use bearings and transits to keep on course, but the red post and buoy that mark the Bartholomew ledges will be useful landmarks along our way.

As we get close to the post and buoy, we notice the ‘Scillonian’ - a 68 meter long ferry - coming around the headland of Garrison Hill. It looks like it’ll head to our right.

However, consulting the chart, we notice that the main shipping channel passes to the north-east of the Bartholomew ledges buoy - we can see the course marked with a line on the chart, and we know that the channel must go between the red Bartholomew ledges buoy and the green ‘Woolpack’ mark.

It is possible, but unlikely, that the ferry will go the south-west of the Bartholomew ledges. However, it certainly won’t go through the middle of the very shallow ledges marked by the red buoy and post. The safest place to be is close to these lateral marks - ideally between the N Bartholomew buoy and the post.

So, we paddle the short distance across to the N Bartholomew buoy and pause our crossing, taking advantage of a slight eddy forming over the shallows so we don’t need to paddle too hard into the tidal stream to hold our position. We watch the Scillonian turn. For a scary moment it points directly towards us, but it keeps turning, and soon passes to the east of us.

Chart © Crown Copyright and/or database rights. NOT FOR NAVIGATION. Reproduced by permission of the Controller of Her Majesty’s Stationery Office and the UK Hydrographic Office (www.GOV.uk/UKHO)