1.3 R and RStudio Basics
R is not a point-and-click software package. It is a programming language. As such, to use R you will type and run code in a Console window. Output will be viewed in the Console and/or Plot window. RStudio provides a convenient way to write and store your R code in script files. RStudio does have some point-and-click options, as well, but best practice is to write your R code in a script file and save it. That allows you to include comments describing your code, see exactly what code you ran, reproduce the exact same results later, and update your code to produce different results.
When you open RStudio, you will see 4 panes, each with multiple tabs.
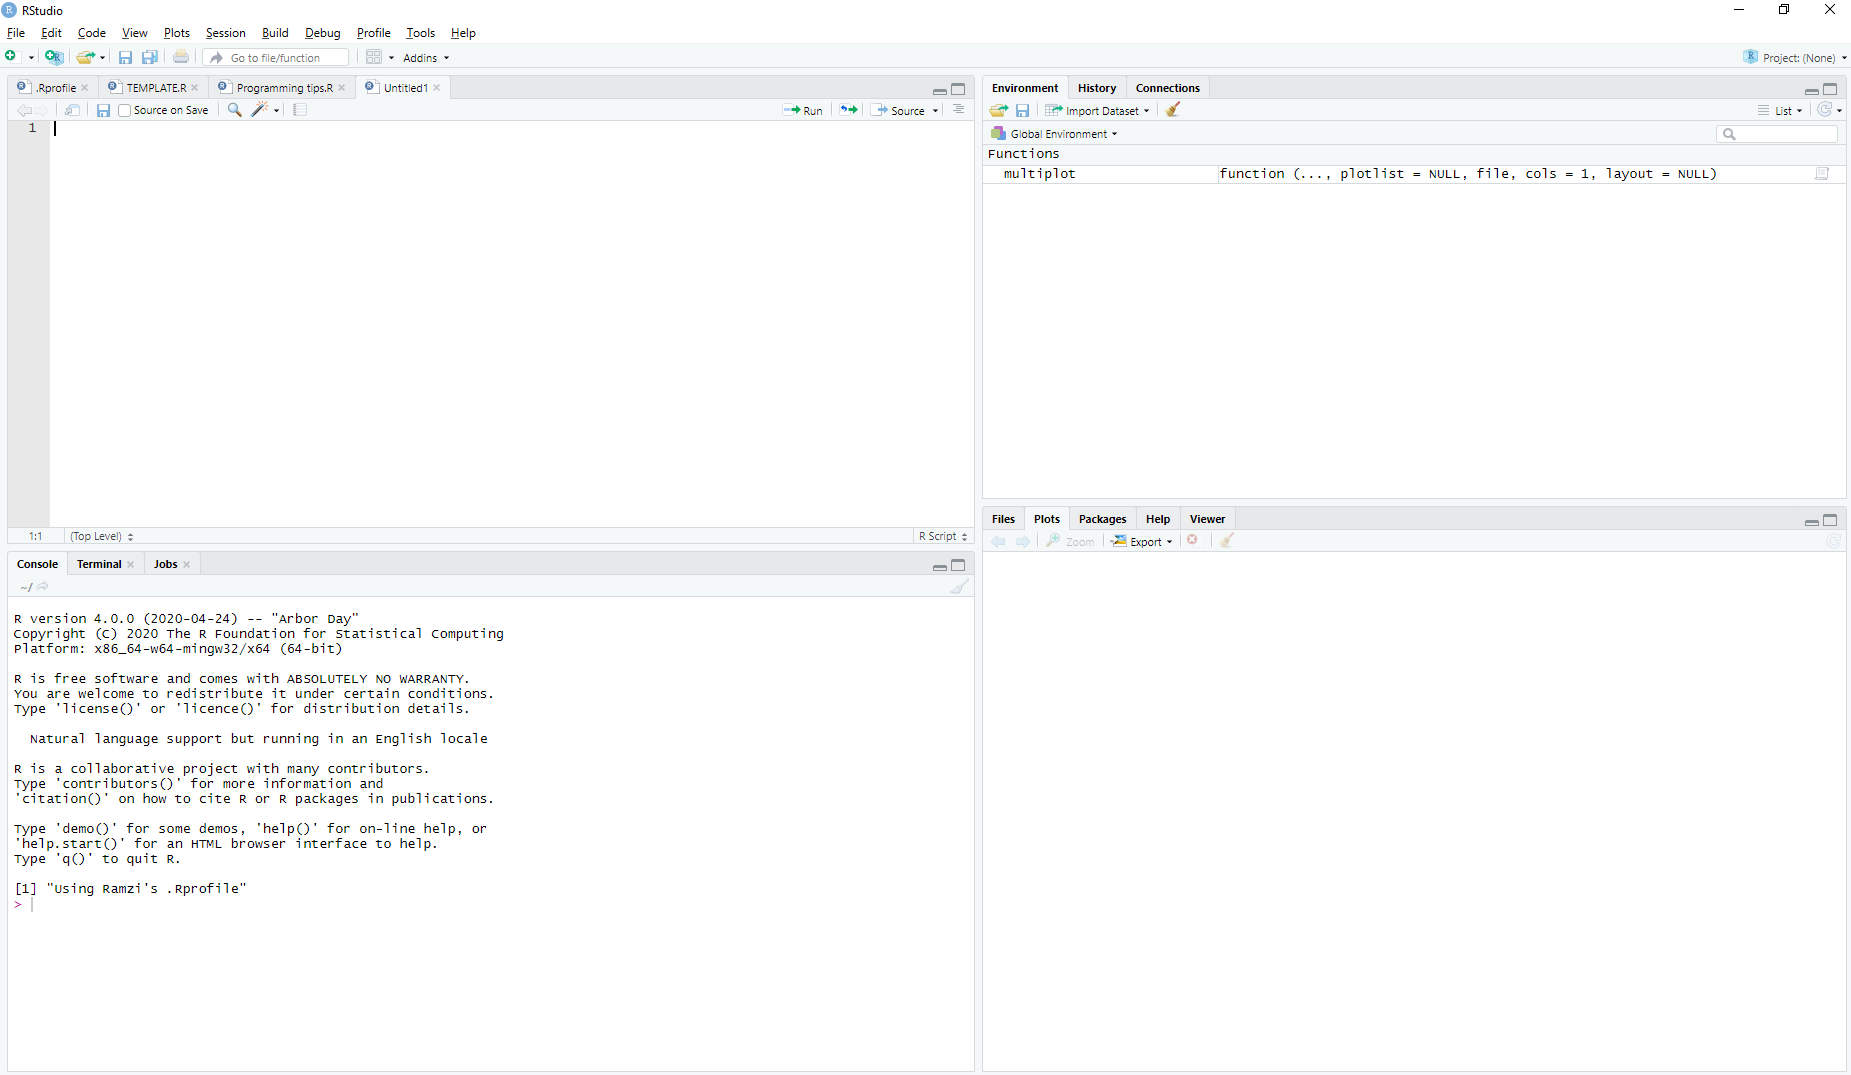
The upper left panel in the screenshot has some R script files in tabs, yours may just have a single blank script file, or may not even be showing. If you do not have the upper left script panel at all, do the following to open a new R Script file:

Start by making sure you have the following tabs selected:
- Upper left: A script file
- Upper right: Environment (this will list any objects you create)
- Lower left: Console (this is where you can type R code to run)
- Lower right: Plots (this is where graphics you create will appear)
NOTE: For this chapter, you can simply type in the script editor and run code from there or type directly into the Console. However, in general, I recommend saving your code in a script so you can refer to it later. The code you save, along with any comments you write to keep track of what you are learning, can serve as the foundation for your very own R toolbox – a master script file or files that contain code you use often, or tips and tricks you do not want to forget.
1.3.1 Running R code
You can enter code directly into the Console and then press “Enter” on your keyboard to run code. For example, type the following in the Console and press Enter.
## [1] 3If your code is in a script file, then you have a few different options for running the code.
- Click “Run” from the toolbar to run the line your cursor is currently on, or the set of lines that are currently highlighted (use your mouse to click and drag to highlight multiple lines).
- Pressing “Ctrl Enter” (Command Enter on a Mac) on your keyboard accomplishes the same as “Run”.

1.3.2 Some definitions
An object is a piece of information that is stored in R’s environment and can be viewed, referenced, or manipulated in some way. What is stored in the object is its value.
Examples of values that can be stored in an object include:
- A single number
- Multiple numbers
- Text
- A dataset made up of rows of cases and columns of variables
- The output from fitting a linear regression model
- And much more!
A few more definitions:
- Base R refers to the R operations and functions that are included with the base R installation.
- A package is an extension to base R that can be downloaded to provide additional functions.
- The
tidyverseis a set of R packages which provide, among other things, convenient methods for managing data (Wickham et al. 2019; Wickham 2023b).
NOTE: In this book, we will start by learning how to carry out data management tasks using base R, but there will also be examples that use the tidyverse. You really need to know base R, but knowing how to also use the tidyverse can make many tasks much easier.
DO: Read the following sections and try out the example code for yourself in R.
1.3.3 Assigning a value to an object
Let’s get started writing and running some code! When you see a line in monospace shaded in gray like the following,
then you can type or copy and paste that code into the R console or R script to run it.
Assign the value 5 to the object x:
To see the value assigned to an object, just enter the name of the object.
## [1] 5The output window will diplays the following
which means that x is an object with a single element that has the value 5.
NOTE: You can use either the arrow operator <- or the equal sign = to assign a value to an object. The equal sign is easier to type, but many R programmers recommend saving = for function arguments (discussed later) and the arrow for assignment. The keyboard shortcut for <- is Alt - (minus sign).
1.3.5 Navigating a script file with headings in R Studio
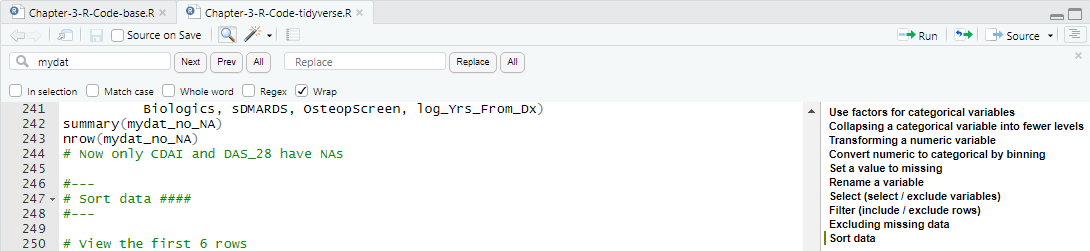
In a script in RStudio, you can comment out lines using #. If you also end a commented out line with at least 4 minus -, equals =, or pound # signs, it will show up as a heading. To see the headings, click on the “Document Outline” button at the top right (looks like a bunch of lines) or type Ctrl-Shift-O (oh, not zero).
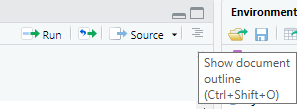
You will see a listing of all the headings in the document, and you can click on a heading to go to that section.
1.3.6 Installing and loading packages
Users of R have created loads of packages that extend R’s basic functionality. If you need to use a package, it must first be installed (and you only have to do this once). For example, if you want to install the package psy (Falissard 2022), you can use the Tools menu or code.
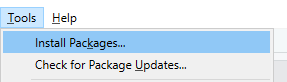
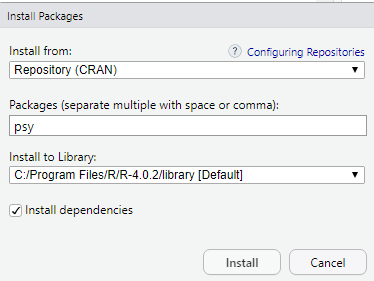
You can either use the menu (as shown in the screenshots) or type code directly into the console;
Once it is installed you can load the library to access the objects inside of it.
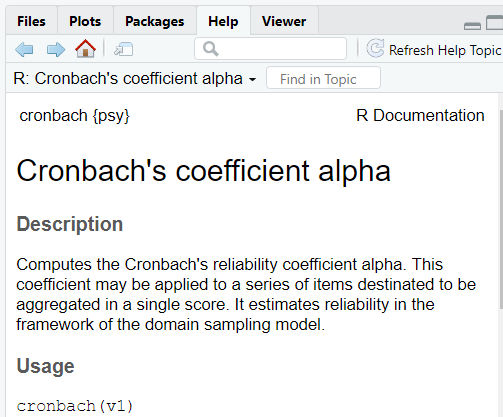
For example, the psy library has a function called cronbach() which computes Cronbach’s \(\alpha\). To view a help file for this function, use ?.
Alternatively, if you have installed a library, you can access objects in that library without loading it first using the :: syntax.
The Help file will appear in the Help tab in the lower right panel in RStudio.
DO: Install some packages that will be used in this text by running the following code in the console.
NOTES:
- If you upgrade R to a newer version, you will need to re-install packages.
- In the Tools menu, there is an option for checking for package updates, but be careful! It is possible you will end up with a package that is too new to use with your current R version or with other packages. Unless you know about a bug that has been fixed or a new feature that has been added that you need, consider waiting to update packages until after you update your R installation.
1.3.7 The R environment
You can see all the objects that currently exist in the R environment by looking at the Environment tab of the upper right pane in RStudio.
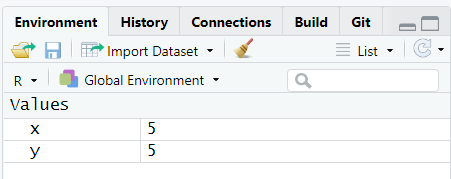
Or you can type ls() in the console.
## [1] "x" "X" "y"You can remove objects using rm().
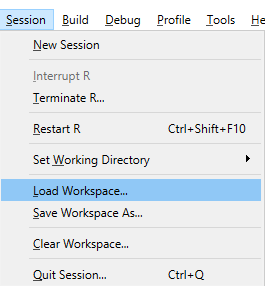
## [1] "x" "X"By default, RStudio asks you, when you quit the program, if you want to save the workspace. If you click “Yes”, you will be prompted to save a file. This file will contain everything that you saw using ls() or in the Environment tab. When you open R again, you can load that workspace from the Session menu.
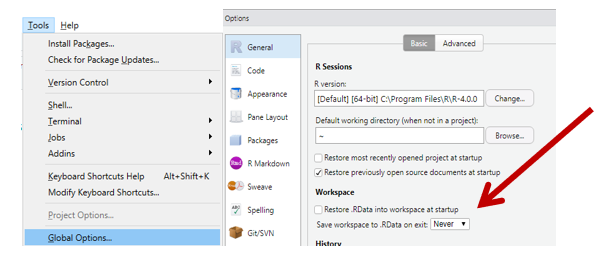
NOTE: In my opinion, it is best practice to NOT save the workspace. The workspace will save objects, but not the code that created them, and that can lead to non-reproducible results and confusion. Better to save your code in an R script, and then if you need to recreate objects you can use that code. If you happened to run code that took a long time to run, rather than save the entire workspace, you can save individual objects to avoid having to re-run the code that produced them. But even then keep careful track of what code was used to create the object you are loading (e.g., a commented out section with the code used to produce the object, followed by a load() statement that loads the object).
To change RStudio’s default behavior, go to Tools – Global Options and in the Basic tab, under Workspace, uncheck “Restore .RData into workspace at startup” and select “Never” for “Save workspace to .RData on exit”.
1.3.8 Working directory
Your working directory is the default path RStudio uses when you save or load a file. To see your current working directory (yours will differ from the output shown here):
If you open RStudio by clicking on the RStudio icon on your computer, your working directory will typically be your Documents folder. However, if you open RStudio by opening an R script file or R Project (see Section 1.3.10), your working directory will be the location of that file or project.
1.3.9 Saving and loading objects
To save a copy of an R object, you can either specify the path explicitly or just specify the object to save it to your current working directory.
NOTE: In Windows, R expects a slash that looks like / (under the question mark on your keyboard), not the default Windows backslash \.
# To save to a specific path
save(x, file = "C:/Users/myname/Documents/x.rda")

# To save to the current working directory
save(x, file = "x.rda")
The tilde symbol ~ (Shift, upper left of your keyboard) can be used as a shortcut for your default working directory (not the current, always the default!). So, if your default working directory is C:/Users/myname/Documents, the following code is equivalent to the “save to a specific path” code above.
To load an object saved to your computer, use load().
# Load using a specific path
load("C:/Users/myname/Documents/x.rda")

# Load from the **default** working directory
load("~/x.rda")

# Load from the **current** working directory
load("x.rda")
You might get an error with one or more of the above if the file x.rda is not in the specified location.
Setting up an R Project automatically sets up the working directory and makes saving and opening scripts and objects easier. This is discussed in the next section.
1.3.10 R Projects
An R Project can make using R simpler by storing all your files in one place and enabling RStudio to give you direct access to those files from within RStudio. Also, it results in script files that are portable. You could move all the files to another location on your computer, or share them with a colleague, and they will be usable as-is.
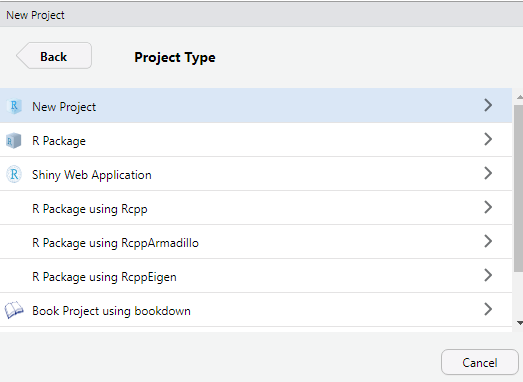
DO: Create an R Project, either in a new or existing folder. Instructions for each method are below.
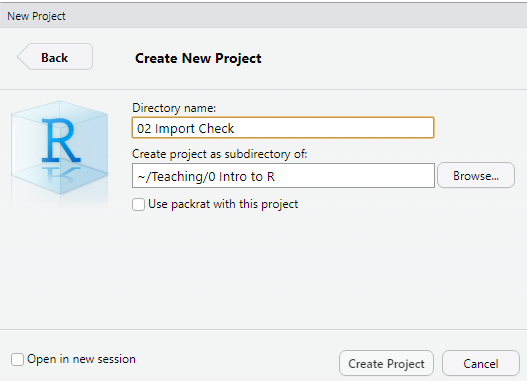
Creating an R Project in a new folder
In RStudio, select File – New Project

In the New Project dialog, choose “New Directory”, then “New Project”, and specify the name and location.

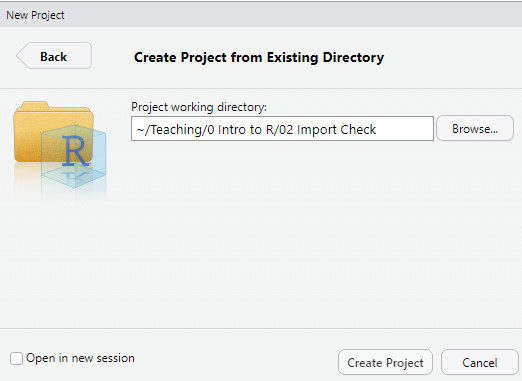
Creating an R Project in an existing folder
In the New Project dialog, choose “Existing Directory” and browse to select an existing folder where you want to store the project.
Browse to the existing folder.
Navigating a project
Whichever method you used above, after you click “Create Project” the lower right panel in RStudio will display the contents of your Project folder. Whatever scripts you are using, put them in this folder. If you create a new script in R then when you save it the default location will be this project.
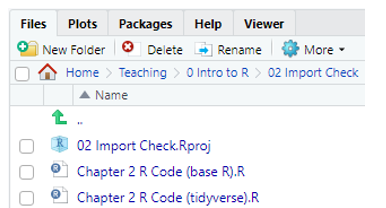
Notice that RStudio automatically created a file in your Project folder with a .Rproj extension. In future, you can open your project by opening this file from your hard drive. Alternatively, you can use File – Open Project to browse to the location of this file and select it. R also created a (possibly hidden) folder called “.Rproj user” on your hard drive. Do not delete or alter that folder or the .Rproj file.
Additionally, you can add subfolders to your Project folder.
DO: Create a subfolder called “Data” in your Project folder (this is done outside of RStudio, in your operating system environment). We will make use of this folder later.
For further study, see Using Projects.
1.3.4 Comment code
Use
#to add a comment. R ignores everything after a#when running code.