7.3 Style code blocks and text output
We can customize the style of code chunks and their text output using the chunk options class.source and class.output, respectively. These options take character vectors of class names (see Section 11.13 for more information). For example, when class.source = "important", the HTML element containing the code chunk in the output will have a class important. Then you can define CSS rules for this class.11 This can be useful when you want to highlight a certain code chunk or its text output.
By default, the HTML output of R Markdown includes the Bootstrap framework, which makes it easy for you to change the appearance of your code and output, because Bootstrap has predefined some CSS classes for backgrounds: "bg-primary", "bg-success", "bg-info", "bg-warning", and "bg-danger".
Below is an example using the chunk options class.source = "bg-danger" and class.output = "bg-warning", and you can see its output in Figure 7.1.
---
title: Change the chunk style
output: html_document
---

When you subset a data frame, it does not necessarily return
a data frame. For example, if you subset two columns, you get
a data frame, but when you try to subset one column, you get
a vector:

```{r class.source="bg-danger", class.output="bg-warning"}
mtcars[1:5, "mpg"]
```

To make sure that we always get a data frame, we have to use
the argument `drop = FALSE`. Now we use the chunk option
`class.source = "bg-success"`.

```{r df-drop-ok, class.source="bg-success"}
mtcars[1:5, "mpg", drop = FALSE]
```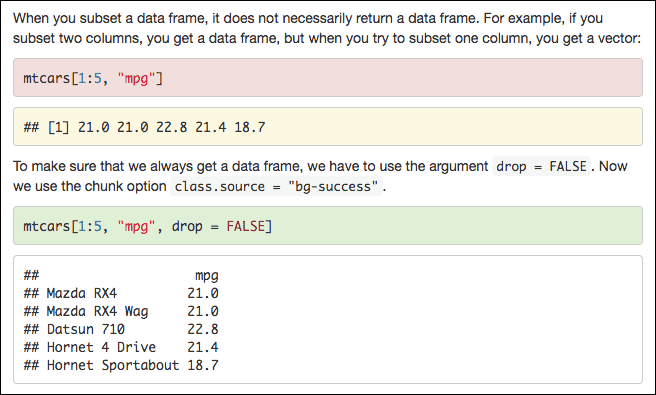
FIGURE 7.1: A code chunk and its text output with background colors defined by Bootstrap.
You can also use arbitrary class names and define CSS rules accordingly. In this case, you will have to include your custom CSS rules using the methods mentioned in Section 7.1. Below is an example:
---
title: Assign custom classes to chunks
output: html_document
---

First we define some CSS rules for a class `watch-out`.

```{css, echo=FALSE}
.watch-out {
  background-color: lightpink;
  border: 3px solid red;
  font-weight: bold;
}
```

Then we assign a class `watch-out` to the code chunk via the
chunk option `class.source`.

```{r class.source="watch-out"}
mtcars[1:5, "mpg"]
```
The output style is shown in Figure 7.2.
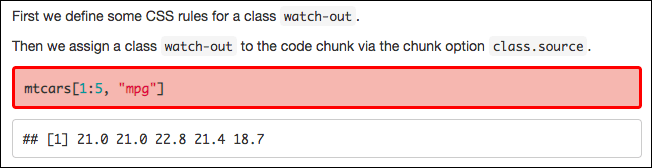
FIGURE 7.2: A code chunk with a light pink background color and a thick red border.
If you want all code blocks in the document to use the custom style, you can set class.source in the global knitr options, e.g.,
knitr::opts_chunk$set(class.source = "watch-out")You can apply multiple classes to the code blocks. For example, with class.source = c("important", "warning"), the code block will have two classes, “important” and “warning.”
If you want to decorate individual elements in code blocks instead of the whole blocks, you may consider using the flair package (Bodwin and Glanz 2025). With this package, you can highlight different parts of your code (such as fixed strings, function names, and arguments) with custom styles (e.g., color, font size, and/or font weight).
References
In this case, the rule would begin
.importantbecause in CSS, classes are prefixed with a period (.).↩︎