8 워크플로: 코드스타일
library(tidyverse)
#> ── Attaching packages ─────────────────────────────────────── tidyverse 1.3.1 ──
#> ✓ ggplot2 3.3.5          ✓ purrr   0.3.4
#> ✓ tibble  3.1.6          ✓ dplyr   1.0.7
#> ✓ tidyr   1.1.4          ✓ stringr 1.4.0.9000
#> ✓ readr   2.1.1          ✓ forcats 0.5.1
#> ── Conflicts ────────────────────────────────────────── tidyverse_conflicts() ──
#> x dplyr::filter() masks stats::filter()
#> x dplyr::lag()    masks stats::lag()
좋은 코드스타일은 올바른 구두점과 같습니다: 없어도 되긴 하지만, 있으면읽기편합니다. 아주 초보 프로그래머도, 코드스타일을 배우는 것은 좋습니다. 일관성 있는 스타일을 사용하면 다른 사람(미래의 당신자신 포함!)이 당신의 작업을 더 쉽게 읽을 수 있고 다른 사람에게 도움이 필요할 때 특별히 더 중요합니다.
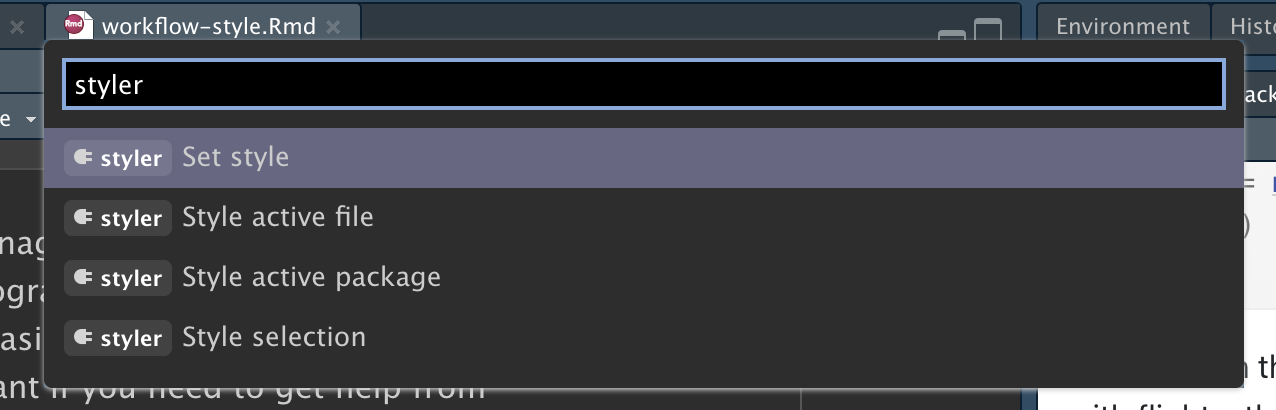
코드 스타일링은 처음에는 조금 귀찮은 것 같이 느껴지지만 연습하면 금새 익숙하게 됩니다. 추가적으로, styler 패키지와 같은 좋은 도구들이 있는데, 이 패키지는 버튼 터치 하나로 90% 의 업무를 해결해 줍니다. 쉽게 스타일을 사용하는 법은 RStudio 의 “command palette” 를 사용하는 것인데, Cmd/Ctrl + Shift + P 로 접근할 수 있습니다. “styler” 를 타이핑하면 styler 가 제공하는 단축어 모두를 볼 수 있습니다:
당신의 코드를 명료하게 하는데 작업하는 시간을 정기적으로 사용하는 것을 강력히 추천합니다. 결과는 정확하게 같을 수도 있지만 시간낭비가 아닙니다: 나중에 코드를 살펴볼 때, 무엇을 했는지 기억하기 더 쉽게 되고 새로운 요구조건에 맞추어 수정하는 것이 쉬워질 것입니다.
여기에서 tidyverse 스타일 가이드의 개념을 소개할 것입니다. 궁금한 부분이 있으면 스타일 가이드 전체목록을 살펴볼 것을 강력하게 추천합니다.
8.1 이름
변수 이름은 소문자, 숫자 _ 만 사용해야 합니다.
언더스코어 (_) 를 사용하여 이름 내부의 단어를 분리하라 (스네이크 케이스라고 불림).
일반적인 원칙으로, 빨리 타이핑 할 수 있는 간략한 이름보다는 과하게 길게 설명적인 이름 쪽으로 치우치는 것이 낫습니다. 짧은 이름을 쓰면 코드작성시 상대적으로 절약되는 시간이 거의 없지만 (자동완성기능이 긴 변수이름을 작성하는 것을 도와주기 때문에 더더욱), 미래에 코드를 다시 읽을 때 시간을 잡아먹고, 알쏭달쏭한 줄임말이 어떤 의미인지 기억을 되살려야 합니다.
8.2 공백
수학 연산자(예: +, -, ==, < ; ^는 제외) 와 할당 연산자 (<-) 양 쪽에 공백을 넣으세요.
함수 호출의 괄호 내부와 외부에 공백을 넣지 마세요.
영어에서 처럼 컴마 뒤에 항상 공백을 넣으세요.
= 정렬을 개선하기 위해 공백을 더 추가하는 것은 괜찮습니다.
8.3 파이프
|> should always have a space after and should usually be followed by a new line.
After the first step, each line should be indented by two spaces.
This structure makes it easier to add new steps (or rearrange existing steps) and harder to overlook a step.
If the function as named arguments (like mutate() or summarise()) then put each argument on a new line, indented by another two spaces.
Make sure the closing parentheses start a new line and are lined up with the start of the function name.
The same basic rules apply to ggplot2, just treat + the same way as |>.
It’s ok to skip these rules if your snippet is fits easily on one line (e.g.) mutate(df, y = x + 1) or df %>% mutate(df, y = x + 1).
But it’s pretty common for short snippets to grow longer, so you’ll save time in the long run by starting out as you wish to continue.
Be wary of writing very long pipes, say longer than 10-15 lines. Try to break them up into logical subtasks, giving each part an informative name. The names will help cue the reader into what’s happening and gives convenient places to check that intermediate results are as expected. Whenever you can give something an informative name, you should give it an informative name. Don’t expect to get it right the first time! This means breaking up long pipelines if there are intermediate states that can get good names.
Strive to limit your code to 80 characters per line. This fits comfortably on a printed page with a reasonably sized font. If you find yourself running out of room, this is a good indication that you should encapsulate some of the work in a separate function.