Chapter 2 Getting Started and Installing Your Tools
One of the most intimidating parts of getting started with something new is the actual getting started part. Don’t worry, I will walk you through this step-by step.
2.1 Goals for this Chapter
- Install R on your Computer
- Install RStudio on your Computer
- Install Git on your Computer
- Get Acquainted with the RStudio IDE
2.2 Website links needed for this Chapter
While in many chapters, I will list the R packages you need, in this chapter, you will be downloading and installing new software, so I will list the links here for your reference.
2.3 Pathway for this Chapter
This Chapter is part of the TOOLS pathway. Chapters in this pathway include
- Getting Started and Installing Your Tools
- Using the RStudio IDE
- Updating R, RStudio, and Your Packages
- Advanced Use of the RStudio IDE
- When You Don’t Want to Update Packages (Using renv)
- Major R Updates (Where Are My Packages?)
2.4 Installing R on your Computer
R is a statistical programming language, designed for non-programmers (statisticians). It is optimized to work with data in rectangular tables of rows (observations) and columns (variables). It is a fast and powerful programming engine, but it is not terribly comfortable or convenient. Base R itself is not terribly user-friendly. It is a lot like a drag racing car, which is basically a person with a steering wheel strapped to an airplane engine.

Very aerodynamic and fast, but not comfortable for the long run (more than about 8 seconds). You will need something more like a production car, with a nice interior and a dashboard, and comfy leather seats.

This equivalent of a comfy coding environment is provided by the RStudio
IDE (Integrated Developer Environment). I want you to install both the R
statistical language and the RStudio IDE, in that order.
Note that serious computer programmers do not consider R a fast coding language. R was designed by statisticians for managing data and running models, and is not optimizedW like languages like C++ and Julia for modern computers. If you have really big data, R will slow down, and using R packages like {arrow} and {data.table} will dramatically increase the speed of R.
Let’s start with installing R.
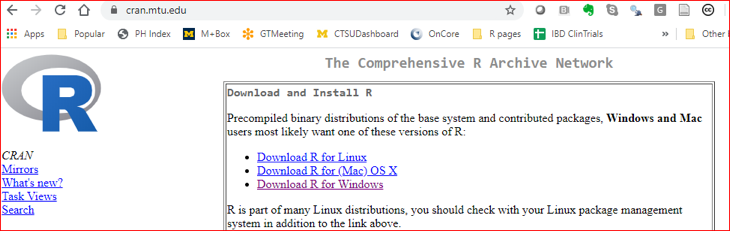
R is free and available for download on the web. Click on the following
link to go to the r-project website to get
started.
This screen will look like this 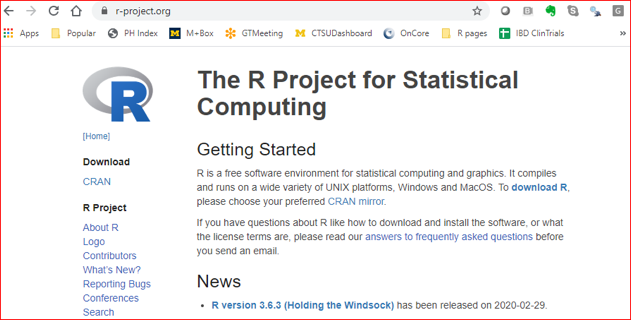
You can see from the blue link (download R) that you can use this
link to download R, but you will be downloading it faster if you pick a
local CRAN mirror.
You might be wondering what CRAN and CRAN Mirrors are. Nothing to do
with cranberries, fortunately. CRAN is the Comprehensive R Archive
Network. Each site (mirror) in the network contains an archive of all R
versions and packages, and the sites are scattered over the globe. A
CRAN Mirror maintains an up-to-date copy of all of the R versions and
packages on CRAN. If you use the nearest CRAN mirror, you will generally
get faster downloads.
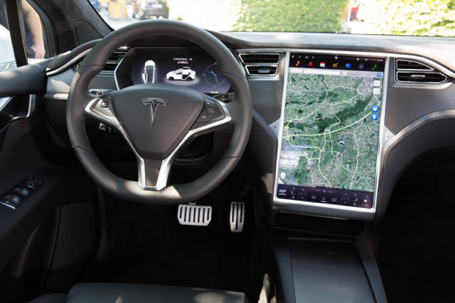
At this point, you might be wondering what a package is…
A package is a set of functions and/or data that you can download to
upgrade and add features to R. It is like a downloadable upgrade to a
Tesla vehicle that lets you play the video game The Witcher 3 on your
console, but more useful.
Another useful analogy for packages is that they are like apps for a smartphone. When you buy a new smartphone, it only comes with the basic apps that allow it to work as a phone, and a few other things, like a notepad and a calculator.
If you want to do cool things with your smartphone, you download additional apps that allow your smartphone to have new capabilities. That is what packages do for your installation of R.

Now let’s get started. Click on the blue link that says “download R”.
This will take you to a page to select your local CRAN Mirror , from
which you will download R.
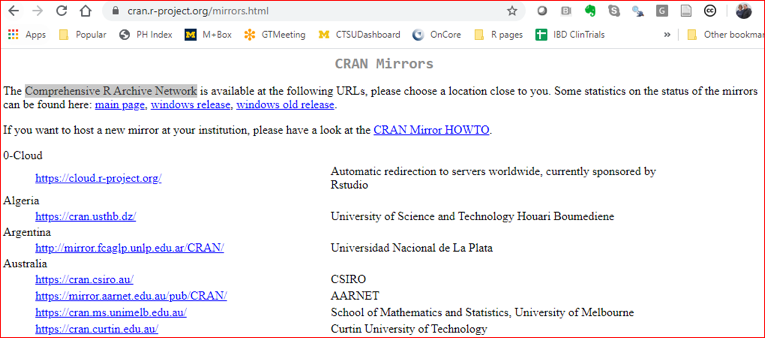
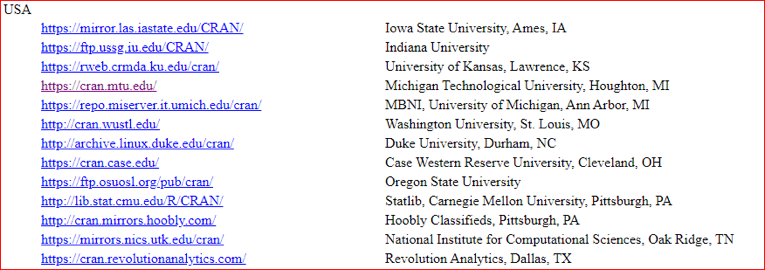
Scroll down to your local country (yes, the USA is at the bottom), and a CRAN mirror near you. This is an example from the state of Michigan, in the USA.
Once you click on a CRAN Mirror site to select the location, you will be taken to the actual Download site.
Select the link for the operating system you want to use. We will walk through this with Windows first, then Mac. If you are using a Mac, skip forward to the Mac install directions in section 2.6. If you are computer-savvy enough to be using Linux, you can probably figure it out on your own (it will look a lot like these).
2.5 Windows-Specific Steps for Installing R
If you are installing R on a Mac, jump ahead to the Mac-specific version below in section 2.6.
On Windows, once you have clicked through, your next screen will look
like this:
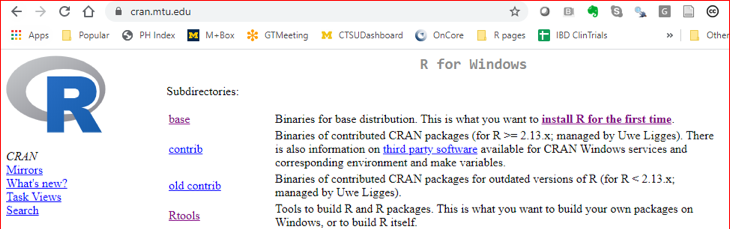
You want to download both base and Rtools (you might need Rtools later to build packages for Windows). The base link will take you to the latest version, which will look something like this.
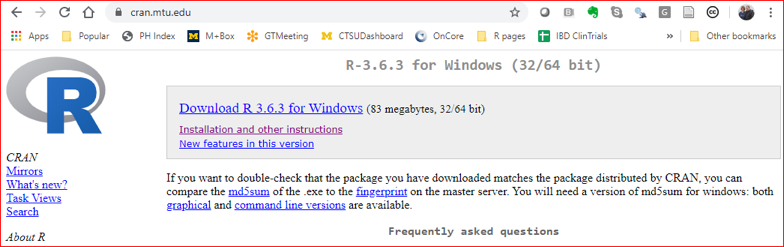
Click on this link, and you will be able to save the latest version to a file named R-N.N.N-win.exe (N values vary depending on the latest version number, recent versions look like R-4.1.2-win.exe) to your Downloads folder. Click on the Save button
to save it.
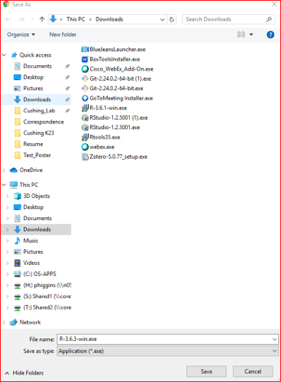
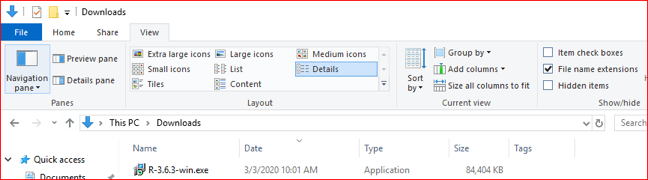
Now, go to your Downloads folder in Windows, and double click on the the latest version of the R installation file (something like R-N.N.N-win.exe. Recent versions have looked something like R-4.1.2.exe). Click Yes to allow this to install.
Now select your language option.
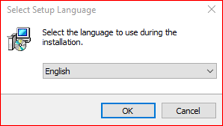
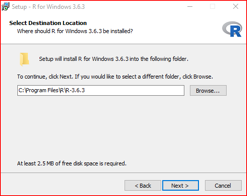
You will be asked to accept the GNU license - do so. Click Yes to allow this to install. Then select where to install - generally use the default- a local (often C) drive - we usually do not install on a shared network drive or in the cloud.
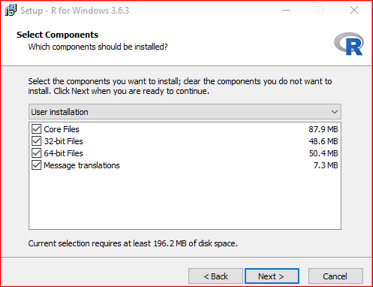
Then select the Components - generally use the defaults, but newer computers can skip the 32 bit version.
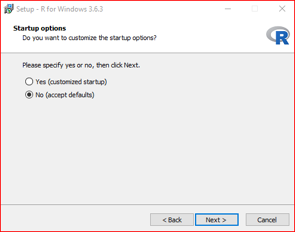
In the next dialog box, accept the default startup options.
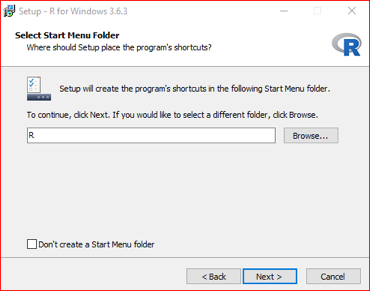
You can choose the start menu folder. The default R folder is fine.
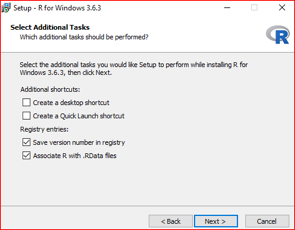
If you want a shortcut icon for R on your desktop, you can leave this checked. But most people start RStudio, with R running within RStudio, rather than directly starting R. You can choose to create an R shortcut on your desktop in the next dialog box. You can delete it later if you don’t like it.
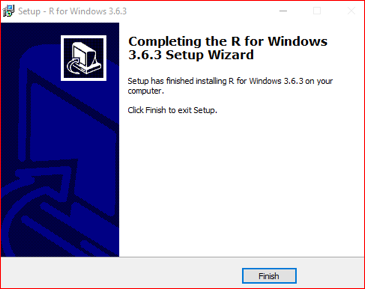
Then the Setup Wizard will appear - click Finish, and the rest of the installation will occur.
2.5.1 Testing R on Windows
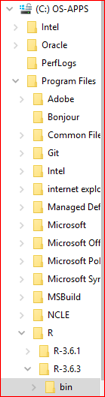
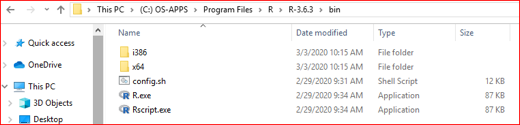
Now you want to test whether your Windows installation was successful. Can you find R and make it work? This is easy if you chose to make an R shortcut. If not, hunt for your C folder, then for OS-APPS within that folder. Keep drilling down to the Program Files folder. Then the R folder, and the current version folder within that one (R-N.N.N). Within that folder will be the bin folder, and within that will be your R-N.N.N.exe file. Double click on this to run it. The example paths below can help guide you.
Opening the exe file will open a classic year 2000-era terminal window, called Rterm, with 64 bit if that is what your computer uses. The version number should match what you downloaded. The messaging should end with a “>” prompt.
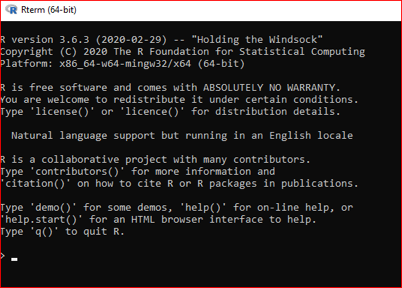
At this prompt, type in:
paste(“Two to the seventh power is”, 2^7)
(don’t leave out the comma or the quotes) - then press the Enter key.
This should produce the following:
Two to the seventh power is 128

Note that you have explained what is being done in the text, and computed the result and displayed it.
2.6 Mac-specific Installation of R
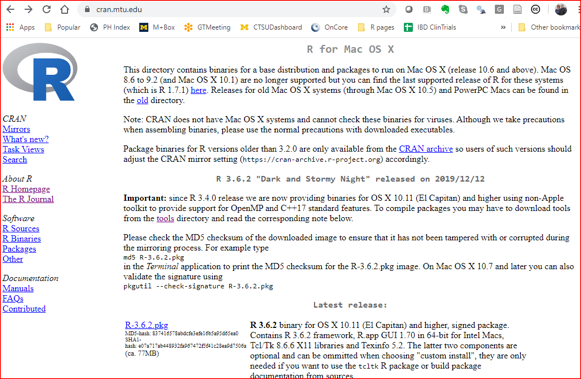
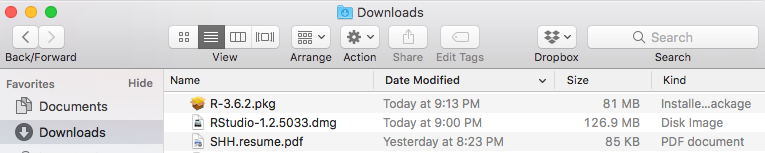
The installation for Mac is very similar, but the windows look a bit different. If you are working with Windows, jump ahead at this point to Installing RStudio in section 2.7. At the Download Version page, you click on the Mac Download. You will then click on the link for the latest version of R, which will look something like R-N.N.N.pkg (recent versions have been something like R-4.1.2.pkg), and allow downloads from CRAN.
Then go to Finder, and navigate to the Downloads folder. Click on R-N.N.N.pkg You will then click on the link for R-N.N.N.pkg, and allow downloads from CRAN.
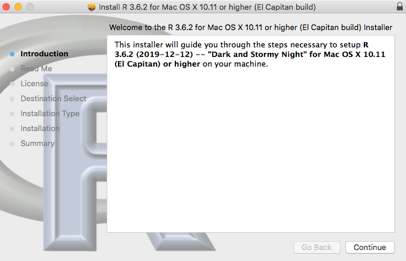
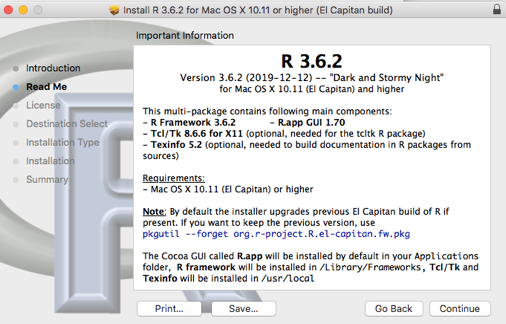
Click on Continue on 2 consecutive screens to download
Then you need to agree with the License Agreement,

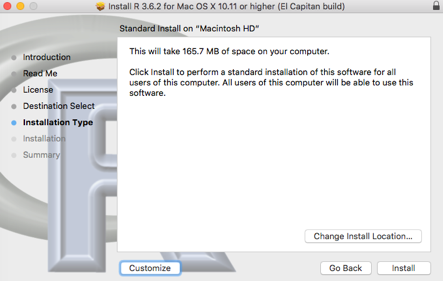
then Click on Install, and provide your Mac password for permission to install.
When the installation is complete, click on the Close button. Accept the prompt to move the installer file to the trash.
2.6.1 Testing R on the Mac
If you chose to create an R desktop shortcut, double-click on this to start. If not, go to Finder, and then your Applications folder. Scroll down to the R file. Double click on this to run it.
You should get this 2000-era terminal window named R Console. The version number should match what you downloaded, and the messaging should end with a “>” prompt. At this prompt, type in
paste(“Two to the seventh power is”, 2^7)
(DON’T leave out the comma or the quotes)
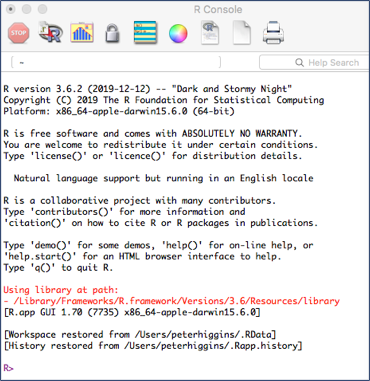
This should result in


2.7 Installing RStudio on your Computer
Now that R is working, we will install RStudio. This is an IDE (Integrated Development Environment), with lots of bells and whistles to help you do reproducible medical research.

This is a lot like adding a dashboard with polished walnut panels, a large video screen map, and heated car seats with Corinthian Leather. Not absolutely necessary, but nice to have.
The RStudio IDE wraps around the R engine to make your experience more comfortable and efficient.
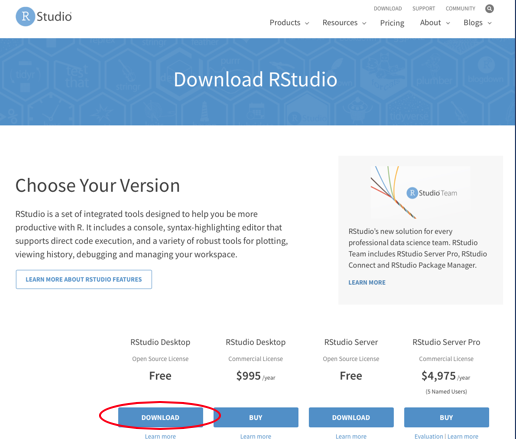
Fortunately, RStudio is a lot cheaper than any of these cars. In fact, it is free and open source. You can download it from the web at:
Click on the RStudio Desktop icon to begin.
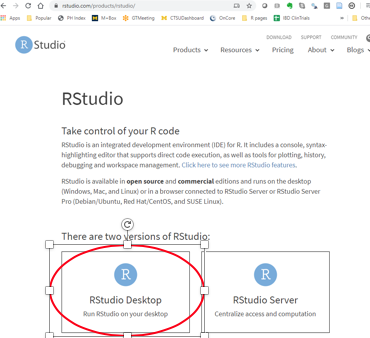
This will take you to a new site, where you will select the Open Source Edition of RStudio Desktop
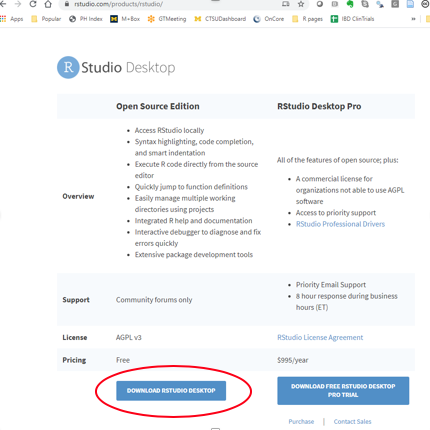
This will take you to a new site, where you will select the Free Version of RStudio Desktop
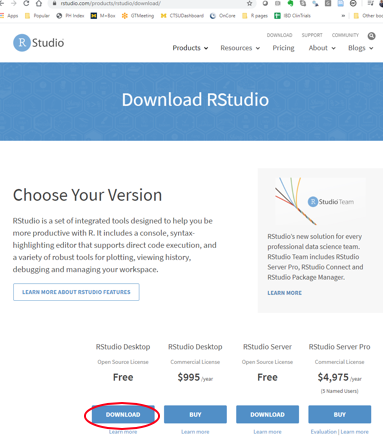
Now select the right version for your Operating syxtem - Windows or Mac.
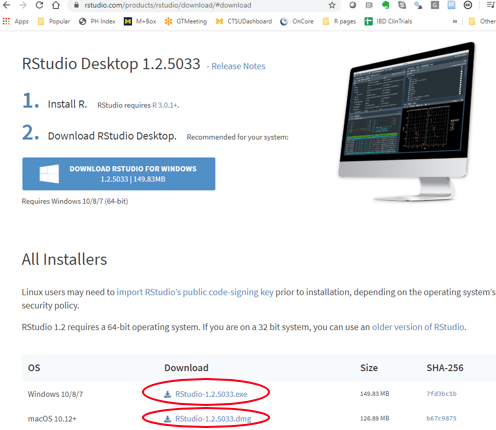
2.7.1 Windows Install of RStudio
If you are installing on a Mac, jump ahead now to the Mac-specfic installation instructions.
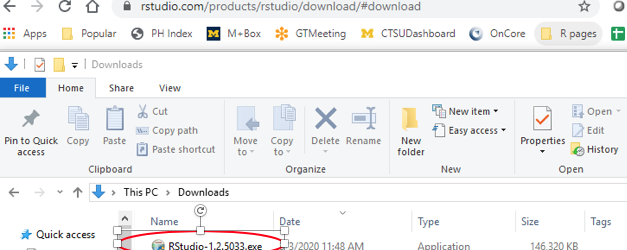
Now save the RStudio.N.N.N.exe file (Ns will be digits representing the version number) to your downloads folder.

Now go to your downloads folder, and double click on the RStudio.N.N.N.exe file.
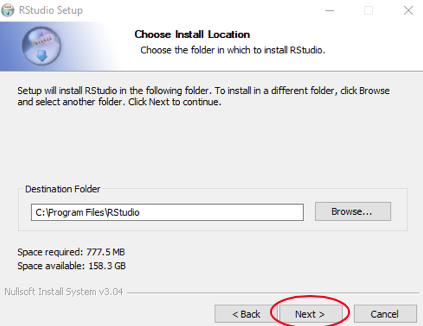
Allow this app to make changes. Click Next to Continue, and Agree to the Install Location.
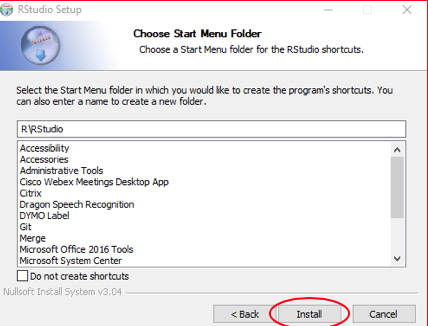
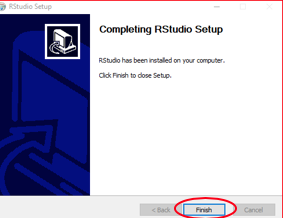
Click Install to put RStudio in the default Start Menu Folder, and when done, click the Finish button.
Now select your preferred language option, accept the GNU license, Click Yes to allow this to install. Select where to install. This is generally on a local (often C:) drive, and usually not a shared network drive or in the cloud.
2.7.2 Testing Windows RStudio
Now you should be ready to test your Windows installation of RStudio.
Open your Start menu Program list, and find RStudio.
Pin it as a favorite now.
Click to Open RStudio.
Within the Console window of RStudio, an instance of R is started up. Check that the version number matches the version of R that you downloaded.
Now run a test at the prompt (“>”) in the Console window. Type in
paste("Three to the 5th power is", 3^5)
do not leave out the quotes or the comma
Then press the enter key
and this should be your result:

A successful result means that you are ready to roll in RStudio and R!

2.7.3 Installing RStudio on the Mac
Start at this link: RStudio Download
Select the Free RStudio Desktop Version
Then click on the big button to Download RStudio for Mac.
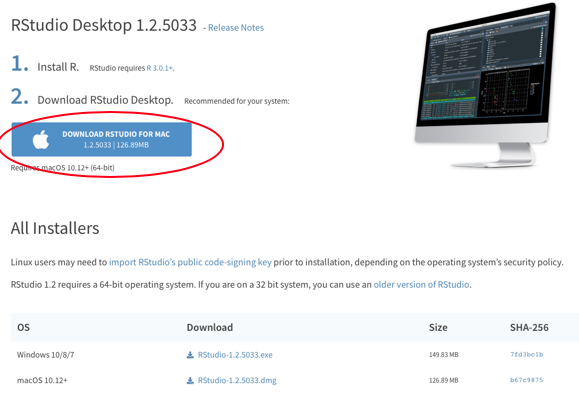
After the Download is complete, go to Finder and the Downloads Folder. Double click on the RStudio.N.N.N.dmg file in your Downloads folder.

This will open a window that looks like this
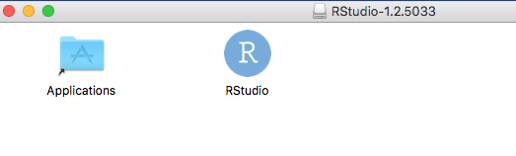
Use your mouse to drag the RStudio icon into the Applications folder.
Now go back to Finder, then into the Applications folder. Double click on the RStudio icon, and click OK to Open.
Pin your RStudio to the Dock.
Double Click to run RStudio.
RStudio will open an instance of R inside the Console pane of RStudio with the version number of R that you installed, and a “>” prompt.
2.7.4 Testing the Mac Installation of RStudio
Type in
paste("Three to the 5th power is", 3^5)
do not leave out the quotes or the comma
Then press the enter key
and this should be your result.
A successful result means that you are ready to roll in RStudio and R!
2.7.5 Critical Setup - Tuning Up Your RStudio Installation
You now have ~ 7 adjustments that you need to make in your RStudio Global Settings for optimal R and RStudio use.
- At this point, it is a good idea to jump out of RStudio and create an “Rcode” folder on your computer, in a place that is easy to find, often at the top level in your Documents folder, to make all of your future projects easy to find.
Once this Rcode folder is in place, switch back to RStudio. In the top bar of RStudio Menus, go to Tools/Global Options. A new Global Options window will open up. Click on the General tab on the left. At the top, there is a small window for identifying your Default working directory. Click on the Browse button, and browse to your new “Rcode” folder and select it. From now on, your R files and Projects will all be in one place and easy to find.
- In the same General tab, de-select the first 3 options
- turn off Restore most recently opened project at startup
- turn off Restore previously open source documents at startup
- turn off Restore .RData into workspace
- In the same General tab, find Save workspace to .RData on exit. Click on the dropdown menu to select “Never”
These tune-ups (#2 and #3) to your RStudio will mean you will always start with a clean workspace in a new RStudio session, which will help avoid a lot of potential problems later.
- In the same General tab, at the top, click on the Advanced tab. Then select the box for
- Show full path to project in window title. This will show your working directory at the top of your Console Pane. This can prevent confusion and problems later.
- On the left, click on the Rmarkdown tab. Then de-select the option for
- Show output inline for all Rmarkdown documents.
This will put your temporary output from Code Chunks into the larger and nicer Viewer tab.
Take a look at the Appearance tab. You can change your code font, the font size, and the theme. I wouldn’t make any drastic changes at this point, but it is good to know that these options are available. Any changes here are entirely optional (and cosmetic) at this point.
in the RStudio menus, select Tools/Global Options/Code, then check/select three options to turn these on:
- In the Editing tab - select Soft Wrap Long Lines - so that your code does not get too wide
- In the Editing tab - select Use Native Pipe Operator, |> (requires R > 4.1+) to get the modern pipe operator
- In the Display tab - select Rainbow Parentheses - this option color-codes parentheses so that you can keep track of whether you have closed all of your open parentheses (a common source of errors). When your last close parenthesis is red, all is well.
Now your RStudio installation is tuned and ready to go!
2.8 Installing Git on your Computer
The software program, git, is a version control system. It is the most common version control system in the world. It is free and open source, and is the foundation of reproducible computing.
We won’t be doing a lot with git just yet, but it is helpful to get this installation done and out of the way. It will come up a lot when we start to discuss reproducible research and collaboration.
2.8.1 Installing Git on macOS
If you are using Windows, jump ahead to Installing Git on Windows.
- The easiest approach on the macOS is to go to the Terminal tab in the Console pane (lower left) in RStudio. A prompt will appear that ends in a $.
At that prompt, type git --version
note that there are 2 dashes before version.
This will tell you the current version of git (2.29.2 as of January 1, 2021), or prompt you to install git.
- If you want the current version of git, you can install this yourself.
a. First, let’s check if you have homebrew installed.
Go to the Terminal tab in the Console pane (lower left) in RStudio. A
prompt will appear that ends in a $.
at the prompt, type command -v brew
This should return “/usr/local/bin/brew” if homebrew is installed, or will tell you “brew not found” or something similar.
b. Installing homebrew
At the terminal prompt($), paste in the following:
/bin/bash -c "$(curl -fsSL https://raw.githubusercontent.com/Homebrew/install/HEAD/install.sh)"Then press Enter to run it. This installs the homebrew program, which allows you to install software on macOS that does not come from the Apple App Store
This will take a couple of minutes.
c. Installing git
Once you have homebrew installed, installing git is straightforward.
At the Terminal prompt (the prompt looks like a dollar sign $), type
brew install git
and this will quickly install. You will be returned to the Terminal prompt ($) when installation is complete.
Check your installation.
At the Terminal prompt ($), type
git --versionand this should return a result like “git version 2.29.2”, depending on the most recent version number.
2.8.2 Installing Git on Windows
If you are using Windows, go to the website, https://git-scm.com/download/win.
This will start the download automatically
Go to your downloads folder and install the downloaded .exe file by clicking on it
Check your installation.
At the Terminal prompt ($), type
git --versionand this should return a result like “git version 2.29.2”, depending on the version number.
2.8.3 Installing Git on Linux
If you are using Fedora, or a related version of Linux like RHEL or CentOS, use dnf
At the $ prompt, type sudo dnf install git-all
If you are using a Debian-based version of Linux like Ubuntu, use apt
At the $ prompt, type sudo apt install git-all
For other distributions of Linux, follow the instructions at https://git-scm.com/download/linux.
Check your installation.
At the Terminal prompt ($), type
git --versionand this should return a result like “git version 2.29.2”, depending on the version number.
2.9 Getting Acquainted with the RStudio IDE
When you first open the RStudio IDE (Integrated Development Environment), there will be a left side pane, with tabs for Console, Terminal, and Jobs. This is called the Console pane.
Just for fun, go to the RStudio menus, and choose File/New File/RScript. This will open a new pane at the top left, which we will call the top left pane, or the Source pane. This pane will contain tabs for each active script or document, along with tabs for any datasets you have opened up to have a look at.
The Console pane, with tabs for Console, Terminal, and Jobs, has now been pushed to the lower left quadrant. You will use the Console pane for interactive programming, and as a “sandbox” to test out new code. When your code works and is good enough to save, you will move it to the Source pane and save it to a Script or an Rmarkdown document. Any code that is not saved to Source will be lost (actually it will be somewhere in the History, but it can be a pain to find the version that works later - it is best to save the good stuff to an R Script or .Rmd (rmarkdown) document).
The top right pane includes tabs for your Environment (objects, like datasets, functions, and variables you have defined), History (saving the past in case you forget to, but messy), and Connections tabs for connections to databases. Later a Git tab will be added for version control (backup) of your Source documents.
The bottom right pane contains tabs for your Files, Plots, Packages, Help, and a Viewer for HTML output.
This is material that is also well described in the “Basic Basics 1” section of RLadiesSydney. Check it out at Basic Basics 1. There is a nice ~ 15 minute video by Jen Richmond worth watching if you are just getting started. Note that a lot of the other material on this website (RYouWithMe) is very helpful for getting started with R.
For a more complete introduction to the RStudio IDE, see Chapter TBD, titled Using the RStudio IDE.