Chapter 4 Imaging Considerations
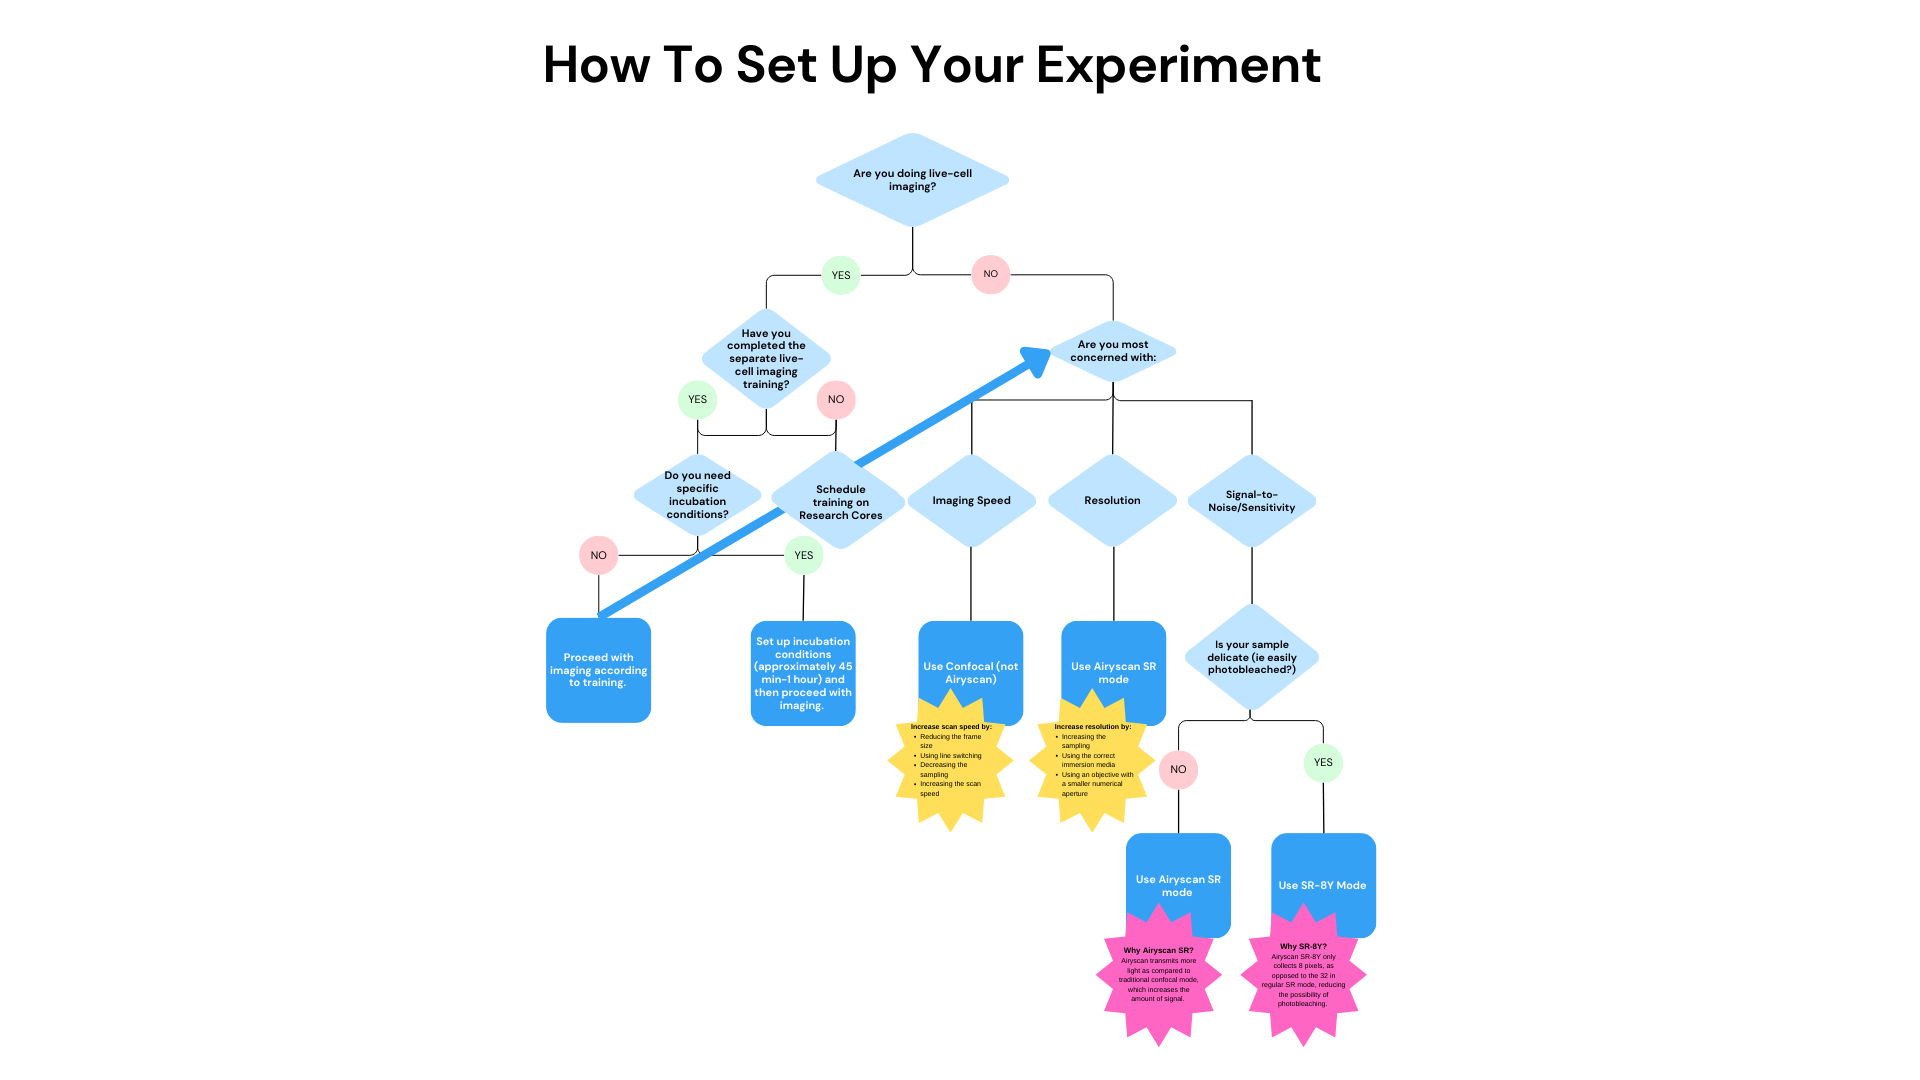
The purpose of this section is to introduce some lines of reasoning for making certain choices on this microscope when setting up your experiment. To begin, here is a useful flow chart for getting started:
4.1 When to Use SR Mode
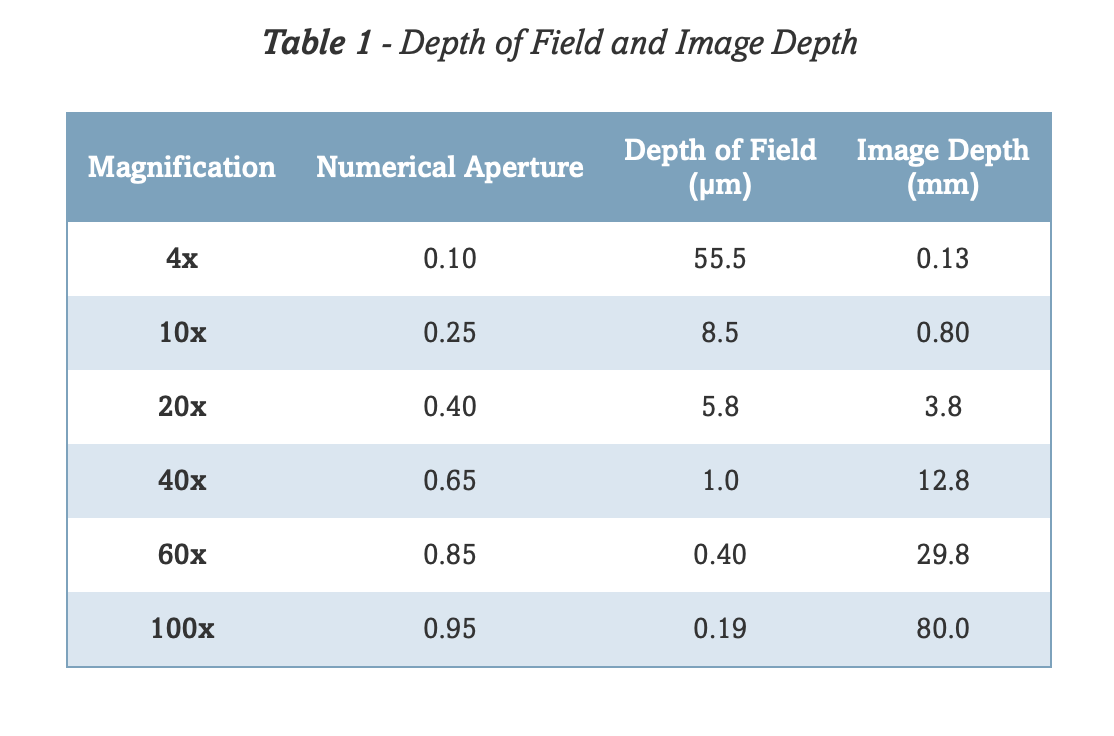
SR mode is for resolution gain. SR mode is for seeing organelle or sub-organelle levels of detail. If you do not need this level of detail, then their is really no reason to use SR mode; it will slow down your image acquisition. Furthermore, SR mode is most applicable when you are using the 63X oil objective. You likely want to see fine detail if you are using this objective, so SR mode will likely be what you want. However, if you are using the 20X objective, for example, using Multiplex mode will be faster than SR and will still offer higher resolution than traditional confocal, so Multiplex mode would be a good choice. Confocal mode is even faster than Multiplex, so if detail is not too important, and you just want to see difference in intensity within cells, confocal mode might be the best choice.
4.2 Capturing Information in Z for Increased Resolution
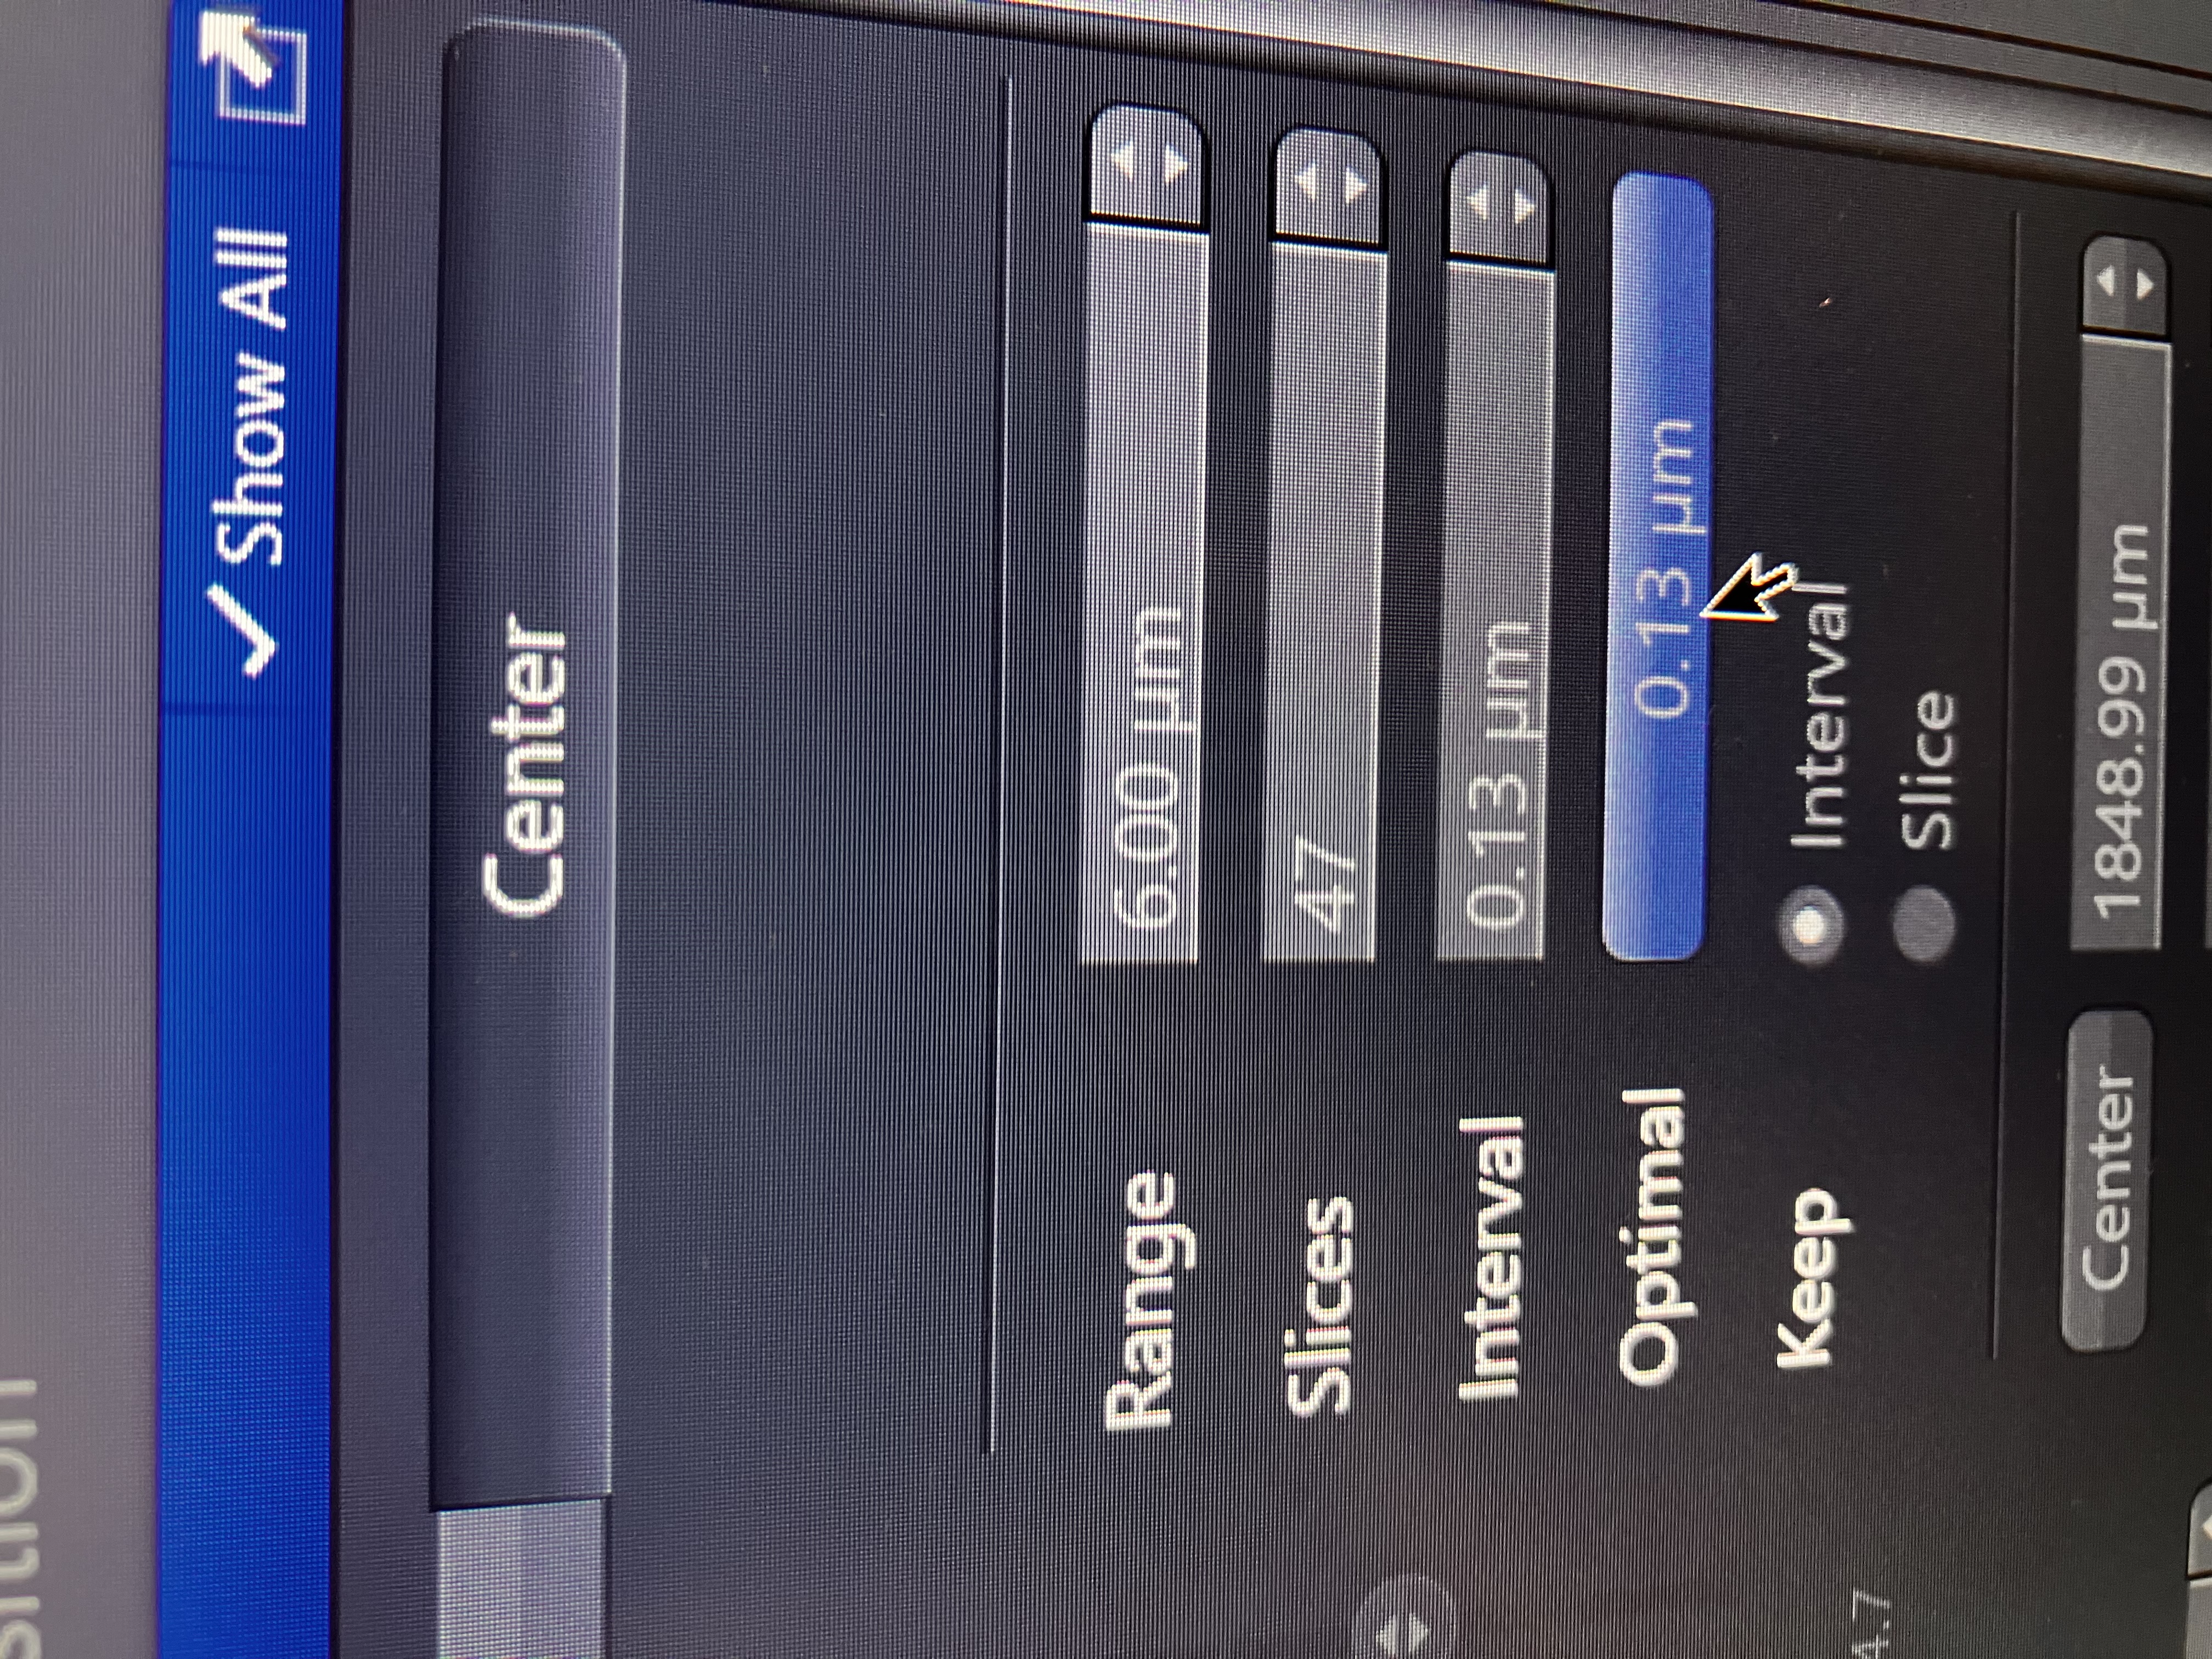
Information in the Z axis can indeed allow one to gain information in the X and Y axes. Basically, you can leverage Z resolution to increase XY resolution. In practice, this means that Joint Deconvolution will work better if given a z-stack, even if it is a small z-stack. Our Zeiss field scientist has recommended that you capture at least 5 slices in Z in order to see a noticeabl difference in XY resolution after Joint Deconvolution. Note that you will want to make sure to click “Optimal” in the z-stack menu (shown below) in order to employ Nyquist sampling, which will permit this slight resolution gain:
4.3 Oversampling in XY For Increased Resolution
You can click the “SR” button or the “Confocal” button to achieve sampling that will result in the corresponding level of resolution. You may think if you are in “Confocal” mode, you cannot do better than “Confocal” resolution and likewise for “SR” mode. Per our Zeiss field scientist, this is true when it comes to an unprocessed image; however, this is not necessarily true when it comes to images produced by downstream deconvolution. Oversampling in XY may indeed result in some added resolution after implementing deconvolution methods. So, you may want to oversample in XY, if resolution is of utmost importance.
4.4 When to Use Multiplex Mode
As stated above, Multiplex mode may be more logical choice than SR mode when you are using the lower magnification objectives. In addition, Multiplex mode is always a better choice than Confocal mode, if you are using a delicate sample (i.e. a sample that could be damaged by a strong laser or a sample that could photobleach easily). This is because the Multiplex mode uses the Airyscan detector, which is much more sensitive than the PMT detectors used by Confocal mode. Consequently, less laser power is needed in Multiplex mode than is needed in Confocal mode to achieve the same level of signal, so a more gentle laser is employed in the light path. Using less laser power will be more tolerable for delicate samples. This microscope allows you to see how much you are reducing the laser power in Multiplex mode:
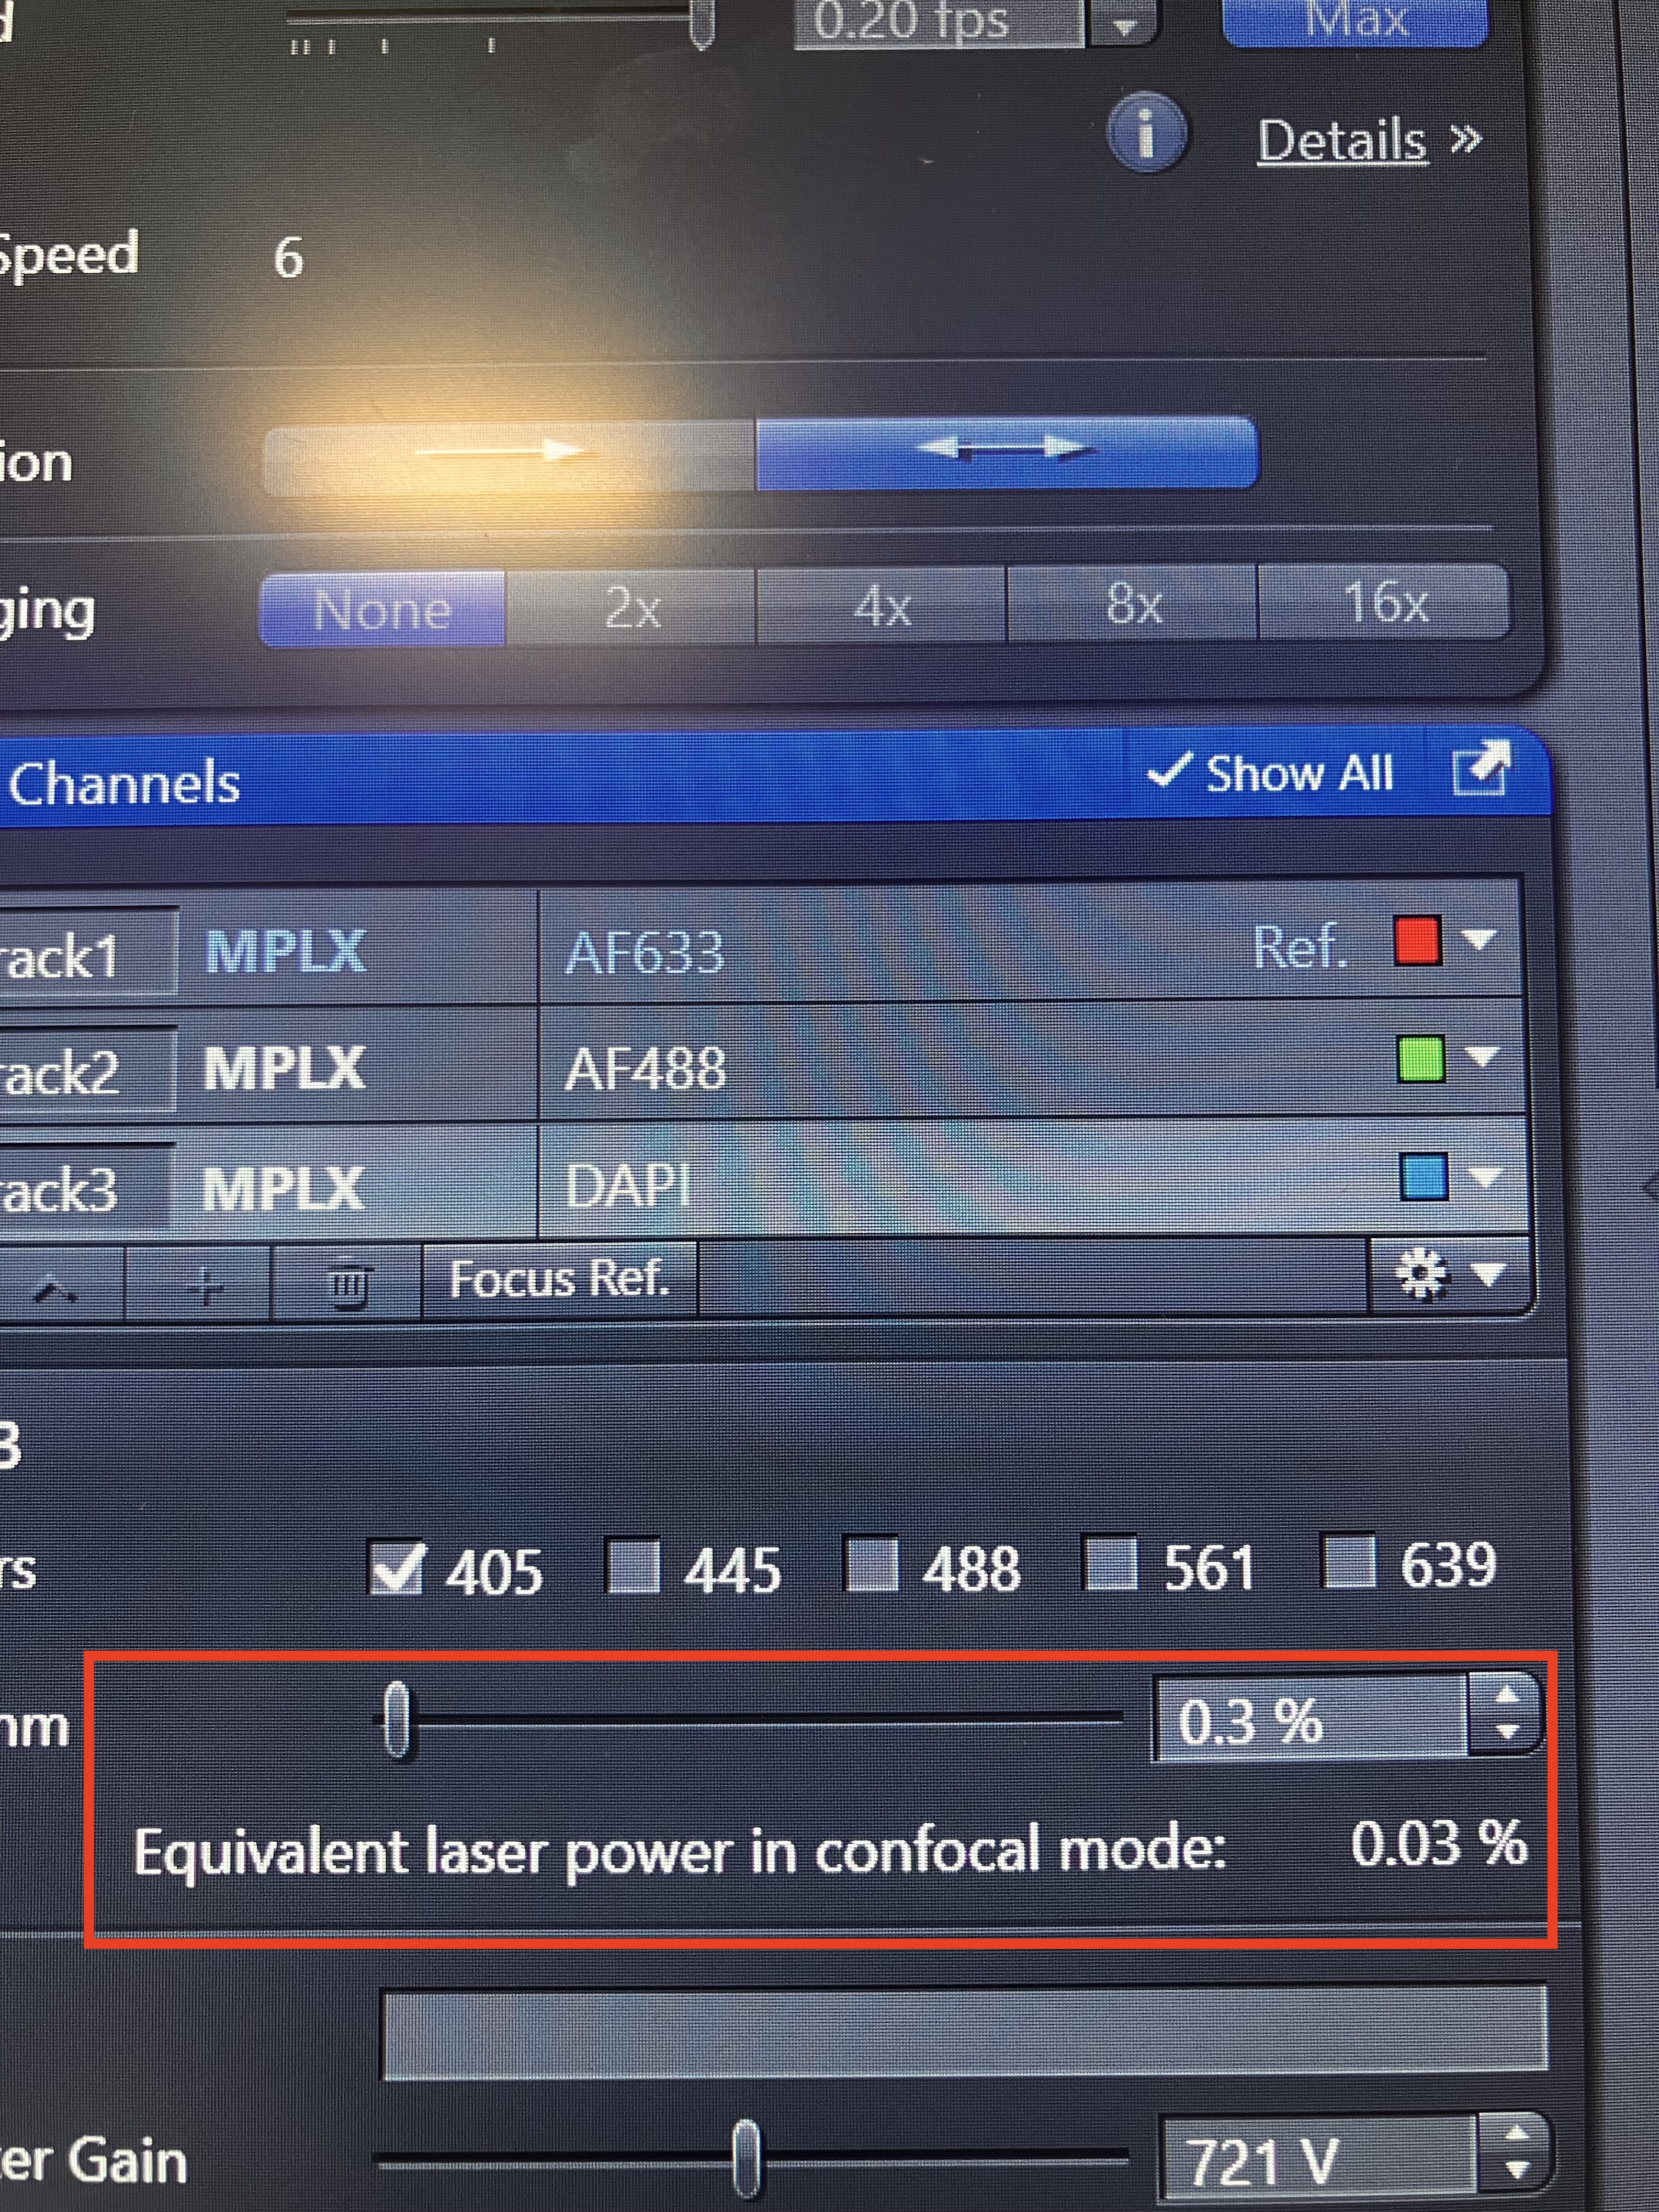
Here, a laser power that is comparable to a confocal laser set to 0.03% is being used. For reference, remember from the Single Image Acquisition that typically you set the confocal laser to 1-5%.
4.5 When to Use Confocal Mode
As alluded to above, Confocal mode is significantly faster than SR or Multiplex mode. This is because you can do simultaneous acquisition in Confocal mode (i.e. measure multiple channels at once). Therefore, if you have a large number of images to take for your experiment, you will want to consider using Confocal mode. You may sacrifice some resolution, but if resolution is not needed for your analysis, then this should be a no-brainer, and you should gladly make the sacrifice for speeding up your acquisition.
4.6 Considering Excitation Bleedthrough
Sometimes, a laser can excite an unintended fluor. If this fluor then emits light that falls within another channel’s emission spectrum, that light channel will be misattributed to the wrong channel during acquisition, leading to an image that is not representative of the sample. For example, consider the following Confocal mode setup:
DAPI and AF488 are on the sample track, which means that the 405 nm and 488 nm lasers will both be shining at the same time when the image is acquired.
The AF488 signal will really bright, but if we only look at AF488, and toggle the 405 laser on/off, while in “Live,” clearly, the 405 nm laser being on is making the AF488 signal brighter. This is due to excitation bleedthrough. The 405 nm laser is exciting the AF488 fluors. To mitigate this effect, we want to image AF488 without the 405 nm laser on at all. The way we can do this is by splitting the AF488 channel and the DAPI channel to separate tracks.
4.7 Line Scanning vs. Frame Scanning
Line scanning will be much faster than frame scanning, provided that the acquisition parameters are almost identical across tracks. Switching the lasers that are used at each track is not an issue. So, if one track uses the visible laser and another track uses the UV laser, switching those lasers for each line is not slow. Also, switching the laser power for each line is not slow. But, switching the gain and/or internal components, such as filters or beamsplitters, is very slow. So, if you can get away with using the same filters, beamsplitters, and gain for all tracks, you should use line scanning. It will be way faster than frame switching. Moreover, for moving samples (i.e. live cell imaging), you definitely want to use line scanning. This will capture light from all fluors at positions that match up best. If you were to use frame scanning, your sample may move while the frame is being captured or during a track switch, leading to channels that do not overlap.
Maybe you cannot get away with keeping the aforementioned things constant across tracks. For example, maybe one of your fluors has weak signal and to see it at all, you need to keep the gain higher than you do for your other fluors. Or, maybe you really want to mitigate excitation bleedthrough. In cases like these, you would want to use frame scanning. The image will take a bit more time to be captured, but you will not sacrifice as much quality.
Something to note here is that the ZEN software will try to prevent you from having inconsistent parameters across tracks when line scanning is selected. Sometimes, the software will overwrite settings you select while in line scanning mode. Pay attention to this, and test acquisition with a “Snap” while line scanning is selected before starting an experiment.
4.8 Widefield Mode: A Completely Different Optical System
This may be obvious to some users, but it is worth mentioning to all that Widefield mode is not a type of confocal imaging. Widefield mode is the same widefield fluorescence microscopy that has been around for decades. It is not confocal microscopy, and it does not utilize laser-scanning. Rather, Widefield mode is a totally different optical system and works totally differently. It emits LED light onto the entire sample at once and uses a camera to capture an image of a cropped region. Even though you see a single region on the computer screen, the entire sample is being hit with light and is thus at risk of photobleaching. Also, as has been alluded to in other parts of this guide, because the optical system is different, the focal plane is different than the one in the confocal system. So, switching between these systems will require refocusing by the user. Lastly, Widefield mode does not filter out out-of-focus light, but it still affords high-quality images. If you do not need or want to optically section your sample for whatever reason, Widefield mode is a perfectly acceptable (and maybe even preferred) mode to use. Moreover, if you will only be doing Widefield microscopy for your project, you might not even want to use this microscope, and you should reach out to the Core to find a scope with better availability that will suit your needs.
4.9 Definite Focus vs. AutoFocus
AutoFocus shines laser light onto the sample, pans up and down in the Z axis, and decides on a focal plane by determining which Z position created the highest signal. This is not always accurate, the light that is shone can confound your experiment, and the light that is shone can contribute to photobleaching. So, if you are worried about confounding your experiment, or if you have a delicate sample, then you may opt not to use AutoFocus.
Definite Focus uses a pre-defined focal distance set by the user. The user gets the system in focus. Then, when the user clicks “Lock Focus,” the scope uses gentle IR light and a system of mirrors to record how far the objective is from the top edge of the sample. As long as “Lock Focus” is on or Definite Focus is set for the focus strategy, the scope will maintain a constant distance between the objective and the top edge of the sample by constantly measuring this distance and then correcting it to the recorded value. This maintains focus as images are captured across the sample, without shining any harmful laser light on the sample. As a result, Definite Focus is almost always a better choice than AutoFocus.