Chapter 1 Data formatting and uploading
1.1 Formatting data
For step by step instructions on formatting data, you can either watch this tutorial video or read the text description below.
To import your data to ENA web tool, you will need to first format your data for ENA. In brief, ENA web tool requires your data to be in .csv, .xlsx, or .xls format and include columns to specify Units (details in Chapter x), Conversations (details in Chapter x), and Codes (details in Chapter x).
Let’s use Shakespeare data set as an example.
Figure 1.1 is a screenshot of a section from the Shakespeare csv file. Columns A-I include metadata that is used to describe the play itself. For example, for a given line “Long live the kind!” we can tell it is from the speaker named “Bernardo” in Hamlet, in Act 1, Scene 1, utterance 4, and its line index is 1.1.4 accordingly. These columns can be used in combination to specify Units and Conversations. Column J-S include qualitative codes that are used to binary code each line in each play: 0 means the absence of a certain code in a line, 1 means the presence of a code. For example, code “Men” is marked as 1 in line “Long live the king!” because the meaning of code “Men” is present in this line.
Please note that although binary coding (0 or 1) is commonly used in ENA analyses, models can also be constructed using data with weighted coding.

Figure 1.1: A segment of sample dataset hamletRomeoJuliet.csv.
1.2 Uploading data
For step by step instructions on uploading data, you can either watch this tutorial video or read the text description below.
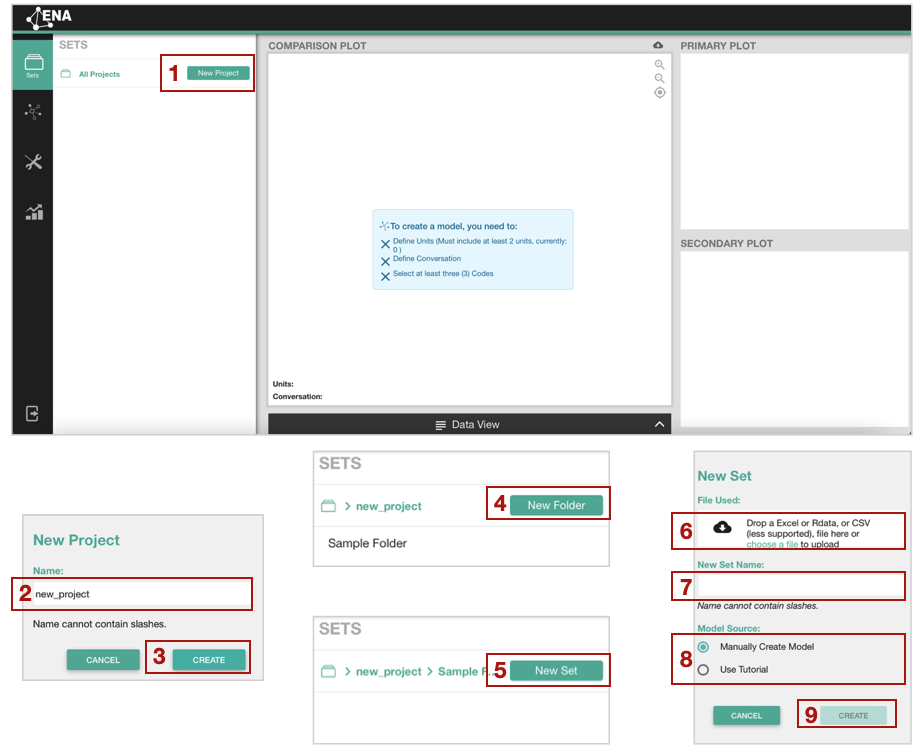
Figure 1.2: Uploading data in the ENA webtool
To upload your data to the ENA webtool click the New Project[1] button first (See Figure 1.2). A pop-up window will appear, where you can name your project[2] and create [3]. The next step is to create a new folder by clicking on New Folder [4]. Alternatively, you can choose a default Sample Folder, to interact with sample data sets. Finally, by clicking on New Set, a pop-up window will appear with the following options:
- selection of your data file in a CSV, Excel or Rdata format [5],
- set naming [6],
- two ways of creating a model 1) Manual mode, or 2) Tutorial mode.
If this is your first time using the ENA web tool, we recommend you choose Use Tutorial for step-by-step guidance. Otherwise, you can choose Manually Create Model to skip the tutorial.
After you uploaded your data, named your set, and selected model creation mode, click on Create [9].
Regardless of whether you chose to create an ENA model manually or use the tutorial, to create an ENA model, you need to make decisions on several model specifications to build your ENA model. These model specifications include Units, Conversation, Stanza Window, and Codes. In the next section, we will briefly explain what each of them means conceptually and how you specify them in the ENA web tool. Since the Tutorial mode automatically provides detailed step-by-step guidance, the instructions below focus on the mode for manually creating models.