Chapter 3 Conversations
3.1 Conversations selection in the manual mode
Once you uploaded your data and decided to manually build the model (see Chapter 1), you should land on the main page of the ENA web tool. On the sidebar the Model icon should be selected, and on the tab bar the Conversation icon (see Figure 3.1). A short explanation of conversations is provided, if you hover over the question mark next to the codes icon [1]. If you click on the plus button under the tab bar, a list with all column header in your dataset will appear [2]. To select a column, click on the column name in the list. Once you have chosen your conversations, your selection will appear under the tab bar [3].
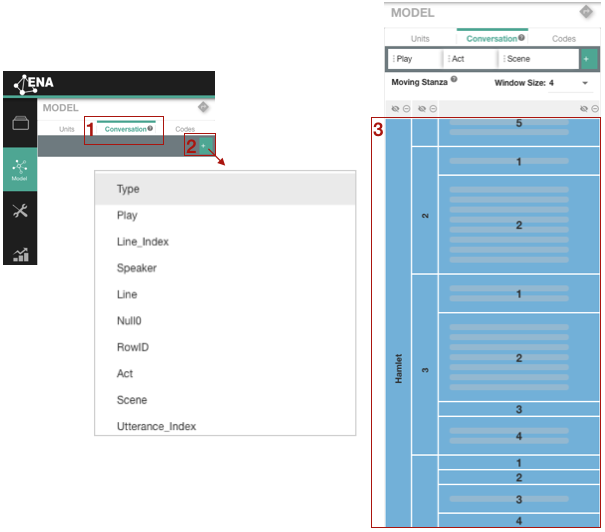
Figure 3.1: Selecting conversations in the manual mode
3.2 Exclude/include conversations
In comparison to hidden conversations, excluded conversations are not part of an ENA model. You might want to exclude some conversations, if some of your conversations include outlier data and you do not want to remove it from your dataset. While excluding conversations, notice that if your conversations are also selected as units, you will get an error message. For example, your units are Play > Act > Scene > Speaker, and your conversations are Play > Act > Scene. If you try to remove conversation Scene 1 in Act 1 in one of the plays, it will produce an error. To avoid the error, do not select Scene in your unit selection - Play > Act > Speaker.
THE SIGNIFICANCE OF CHOOSING Play > Act > Scene OR only SCENE AS CONVERSATIONS FOR THE ENA MODEL
You can exclude a conversation by clicking on the hide icon under that will appear next to the conversation by hovering over the conversation name [1] (see Figure 3.2. Once you click on the exclude icon, the hidden conversation names will become grey. If you want to include the conversation, click on the include icon that will appear, if you hover over the conversation name [2].
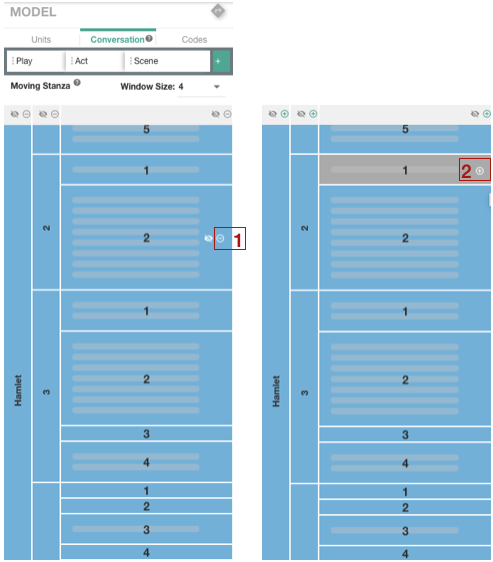
Figure 3.2: Excluding/including conversations
3.3 Stanza selection
There are 4 types of stanza window available in the ENA web tool:
- Moving stanza: computes the co-occurrences of each line in a conversation relative to every line that comes before it within the window (e.g. window of 5 lines).
- Whole conversation: computes the co-occurrences contributed by the same unit within an entire conversation.
- Infinite stanza: computes the co-occurrences of each line in a conversation relative to every line that comes before it within the conversation.
- Threaded data: computes the co-occurrences by accunting for the hierarchical structure of data
You choose your stanza based on your research question and the type of data that your are working with. For from information on determining your stanza size, we recommend In Search of Conversational Grain Size: Modelling Semantic Structure Using Moving Stanza Windows by Siebert-Evenstone, Irgens, Collier, Swiecki, Ruis & Shaffer, (2017).
The default stanza setting in the ENA web tool is moving stanza, window size 4. You can find your current stanza selection under the tab bar in bold [1] (see Figure 3.3. In case of moving stanza or threaded data, you can select a different size window by clicking on the window size drop down window [2]. To choose another stanza type, go to the advanced options under your conversation selection [3]. If your data is not formatted correctly for the threaded data, you will get an error [4]. For more information on threaded data, go to Chapter ??.
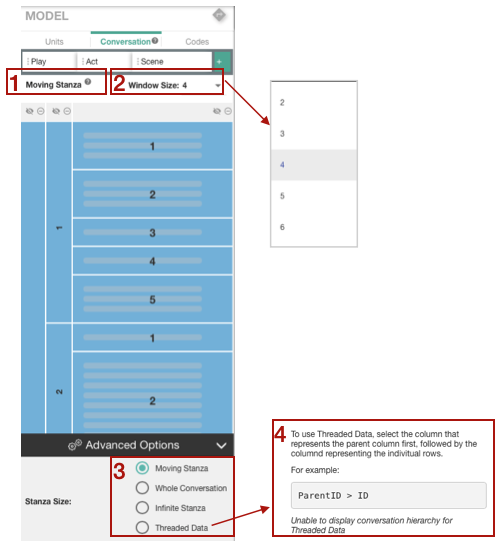
Figure 3.3: Stanza selection