Chapter 6 Installing dbt
Now that we’ve seen how to access a dataset inside our data warehouse, now let’s proceed to installing dbt. This section assumes you already have Visual Studio (VS) Code installed. All code in this book has been operated within a Linux environment. For Window’s users, a Linux environment can be enabled by installing the Windows Subsystem for Linux (WSL2) virtualization platform.
6.1 Setting the environment
Open your VS Code.
Create a new folder called dbt_book. Move into this directory in your VS Code by typing cd dbt_book/ in your terminal.
The first thing we shall do is create a virtual environment from which we shall conduct all our dbt operations. A virtual environment is useful in preventing conflicts between packages across your various programming projects.
python3 -m venv venvThe first venv tells python that you’re creating a virtual environment while the second refers to the name of the virtual environment. In this case, our virtual environment shall still share the name venv.
Now let’s activate our virtual environment.
source venv/bin/activate
You will see your namespace appended with venv which means that your virtual environment is now active. For example:
(venv) sammigachuhi@Gachuhi:~/dbt_book$ Now here comes the big part: installing dbt for Big Query. The following code will install everything we need; both dbt and the dependencies needed to connect it to BigQuery.
python3 -m pip install dbt-core dbt-bigquery
6.2 Connecting to your BigQuery data warehouse
We wish connecting to a data warehouse for dbt were as easy as providing a username and password. Far from it, but it is definitely possible. To connect dbt to a data warehouse, we use a keyfile. A keyfile is a file that contains encryption keys or licenses for a particular task. The keyfile we shall use shall be the doorway to our data warehouse.
As the first step, go to your GCP Credentials Wizard page.
Ensure that your project is set to the dbt project you created in the previous chapter. For my case, I reverted to an earlier created project called dbt_project since my other project dbt_project1 started incurring costs.
For Credential Type:
From the Select an API dropdown, choose BigQuery API
Select Application data for the type of data you will be accessing
Click Next to create a new service account.
In the service account page:
Type
dbt-bookas the Service account name or any other name you prefer.From the Select a role dropdown, choose BigQuery Job User and BigQuery Data Editor roles and click Continue
Leave the Grant users access to this service account fields blank
Once everything is fine, it is as good as clicking Done!
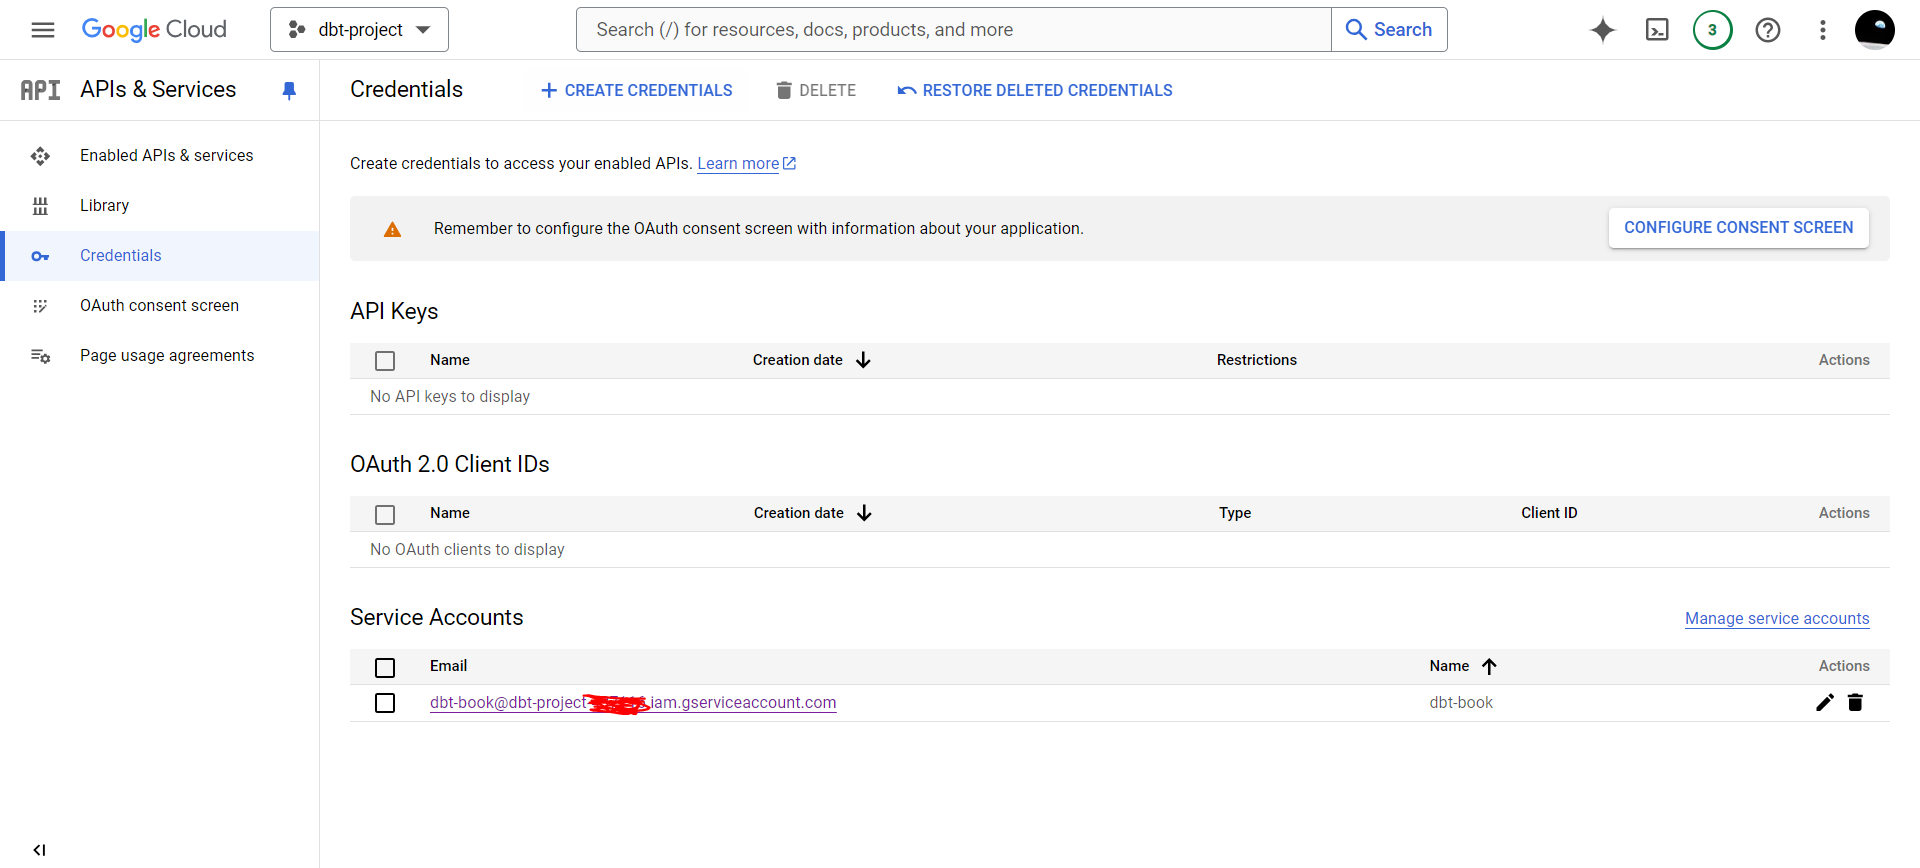
Your credentials interface will look like this:

Click on your service account name.
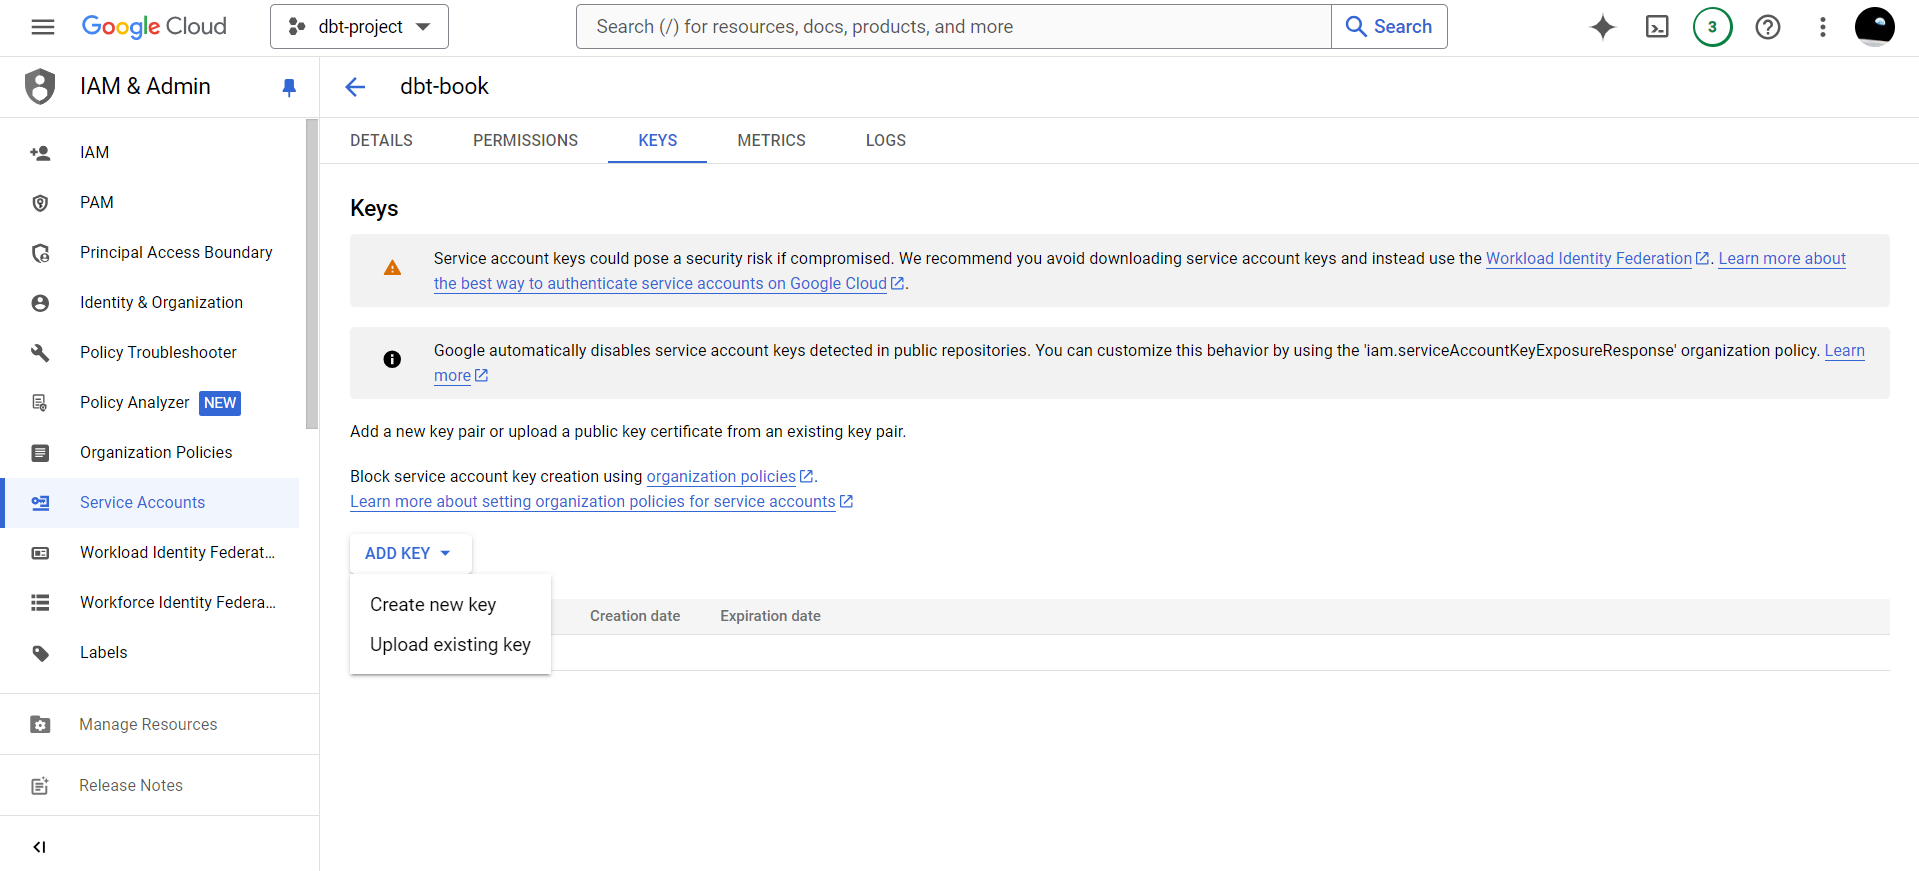
Click on the KEYS tab. We want to create a key that dbt will use to connect to our data warehouse.
Click on ADD KEY>Create new key.

Select JSON on the interface that appears and click CREATE.
This will download a json file containing the encryption keys that dbt will use to connect to your data warehouse.
Store this json file in a safe place.
6.3 Initializing a dbt project
To create a dbt project, we run the open sesame key: dbt init.
It will create a string of outputs. It’s important to key in the right details if you want to create a dbt project.
The first output will ask for the name of your dbt project. Insert dbt_book or any other name you prefer.
19:07:31  Running with dbt=1.8.7
Enter a name for your project (letters, digits, underscore): dbt_book
If you had an already pre-existing dbt project with the same name, dbt will ask if it can overwrite that project. Type y if you wish to do so.
dbt will thereafter ask you which database you would like to use. Since we had installed dbt with the package dependancies for BigQuery, you will see the sole option for BigQuery. Type 1 to select BigQuery.
Which database would you like to use?
[1] bigquery

(Don't see the one you want? https://docs.getdbt.com/docs/available-adapters)

Enter a number: 1
You will thereafter be asked the authentication method you would like to use. Since we had already created a service account and downloaded the JSON file containing the encryption keys, we shall select option 2.
Enter a number: 1
[1] oauth
[2] service_account
Desired authentication method option (enter a number): 2
For the keyfile, provide the path to where you had saved the json file. As a note, this path should be somewhere different than where your dbt project is located. Github will set off alarms and send alert emails in case it finds the keyfile within your repository. Keyfiles are never meant to be shared or stored somewhere accessible. They are considered sensitive information.
keyfile (/path/to/bigquery/keyfile.json): /home/sammigachuhi/dbt_credentials/dbt_book.jsonYou will also be asked to provide your project ID. This is available under your dbt project’s dashboard under the Project ID heading.
project (GCP project id): dbt-project-437116For the dataset name, we will use nyc_bikes which is the dataset we want to conduct our dbt operations on.
dataset (the name of your dbt dataset): nyc_bikesFor the rest of the options, you can fill them as below:
threads (1 or more): 1
job_execution_timeout_seconds [300]:
[1] US
[2] EU
Desired location option (enter a number): 1
19:09:24  Profile dbt_book written to /home/sammigachuhi/.dbt/profiles.yml using target's profile_template.yml and your supplied values. Run 'dbt debug' to validate the connection.
Now, in order to test whether your dbt installation is correct, you will have to change directory (cd) into your dbt_book subfolder we created as part of the dbt init prompts. At first, we had created a directory called dbt_book in which we also activated the virtual environment. When we ran dbt init from this directory, we specified our project name to be dbt_book as well. It is from here we want to check if our dbt initialization and access to BigQuery was successful.
So move into this subfolder via cd dbt_book/.
(venv) sammigachuhi@Gachuhi:~/dbt_book$ cd dbt_book/
(venv) sammigachuhi@Gachuhi:~/dbt_book/dbt_book$ dbt debug
Inside the dbt_book subfolder we created as part of the dbt initialization prompts, run dbt debug. If the final output of the run is All checks passed!, you are good to go!
19:10:20  Running with dbt=1.8.7
19:10:20  dbt version: 1.8.7
19:10:20  python version: 3.10.12
19:10:20  python path: /home/sammigachuhi/dbt_book/venv/bin/python3
19:10:20  os info: Linux-5.15.153.1-microsoft-standard-WSL2-x86_64-with-glibc2.35
19:10:21  Using profiles dir at /home/sammigachuhi/.dbt
19:10:21  Using profiles.yml file at /home/sammigachuhi/.dbt/profiles.yml
19:10:21  Using dbt_project.yml file at /home/sammigachuhi/dbt_book/dbt_book/dbt_project.yml
19:10:21  adapter type: bigquery
19:10:21  adapter version: 1.8.2
19:10:22  Configuration:
19:10:22    profiles.yml file [OK found and valid]
19:10:22    dbt_project.yml file [OK found and valid]
19:10:22  Required dependencies:
19:10:22   - git [OK found]

19:10:22  Connection:
19:10:22    method: service-account
19:10:22    database: dbt-project-437116
19:10:22    execution_project: dbt-project-437116
19:10:22    schema: nyc_bikes
19:10:22    location: US
19:10:22    priority: interactive
19:10:22    maximum_bytes_billed: None
19:10:22    impersonate_service_account: None
19:10:22    job_retry_deadline_seconds: None
19:10:22    job_retries: 1
19:10:22    job_creation_timeout_seconds: None
19:10:22    job_execution_timeout_seconds: 300
19:10:22    timeout_seconds: 300
19:10:22    client_id: None
19:10:22    token_uri: None
19:10:22    dataproc_region: None
19:10:22    dataproc_cluster_name: None
19:10:22    gcs_bucket: None
19:10:22    dataproc_batch: None
19:10:22  Registered adapter: bigquery=1.8.2
19:10:26    Connection test: [OK connection ok]

19:10:26  All checks passed!