Chapter 8 Documentation
In the book The voyages and adventures of Captain Hatteras the sailors aboard a ship whose expedition was to the North Pole relied on the writing of former captains, explorers and sailsmen to not only find the best possible route to the North Pole, but also the hazards to avoid and the places where coal was hidden for their sustenance. So how does this tie to data engineering and dbt? Well, in any digital organization, there is sure to be some turnover. There is sure to be some new chap who would want to wrap their heads around what the organization had been doing, and the data used. Documentation is one way to enable these experts start on a sure footing, but this is rarely the norm. The good thing with dbt is that it provides a way to create documentation at the same place you write code to transform it, and not in a spare pdf2!
8.1 The yml files
In dbt, yml files can do a lot of things. One of the stuff it does is documentation and creation of tests for your data. But first, here are the rules of writing a yml file.
Indents should be two spaces
List items should be indented
Use a new line to separate list items that are dictionaries where appropriate
For this case, we shall use the YAML files to create documentation for our data. We already have a template to start us off with. This is the schema.yml file inside the models/example directory.
version: 2

models:
  - name: my_first_dbt_model
    description: "A starter dbt model"
    columns:
      - name: id
        description: "The primary key for this table"
        data_tests:
          - unique
          - not_null

  - name: my_second_dbt_model
    description: "A starter dbt model"
    columns:
      - name: id
        description: "The primary key for this table"
        data_tests:
          - unique
          - not_null
Let’s go through the above structure briefly.
8.1.1 version: 2
There is a story behind this. It is that at the very beginning of dbt development, the structure was very different and inserting version: 2 enabled developers know which version of dbt they were working with. Don’t expect a version: 3 to come any time soon, but writing version: 2 is just the norm but is not mandatory either.
8.1.2 models
Remember when we said that a model in dbt is simply a SQL file? Well, next to the name you specify the name of your SQL file, minus the .sql extension.
8.1.4 columns
These are the fields contained in your table. You name them here and under each column are three mappings.
name- this is the name of the field in your table. In other words, it is the column name.description- this is a short explanation of your column.data_test- the kind of tests that you would like to perform on your field are inserted here. dbt comes with generic tests such asunique,not_nullandintegerbut you can create your own custom tests too.
8.2 Definition for our model
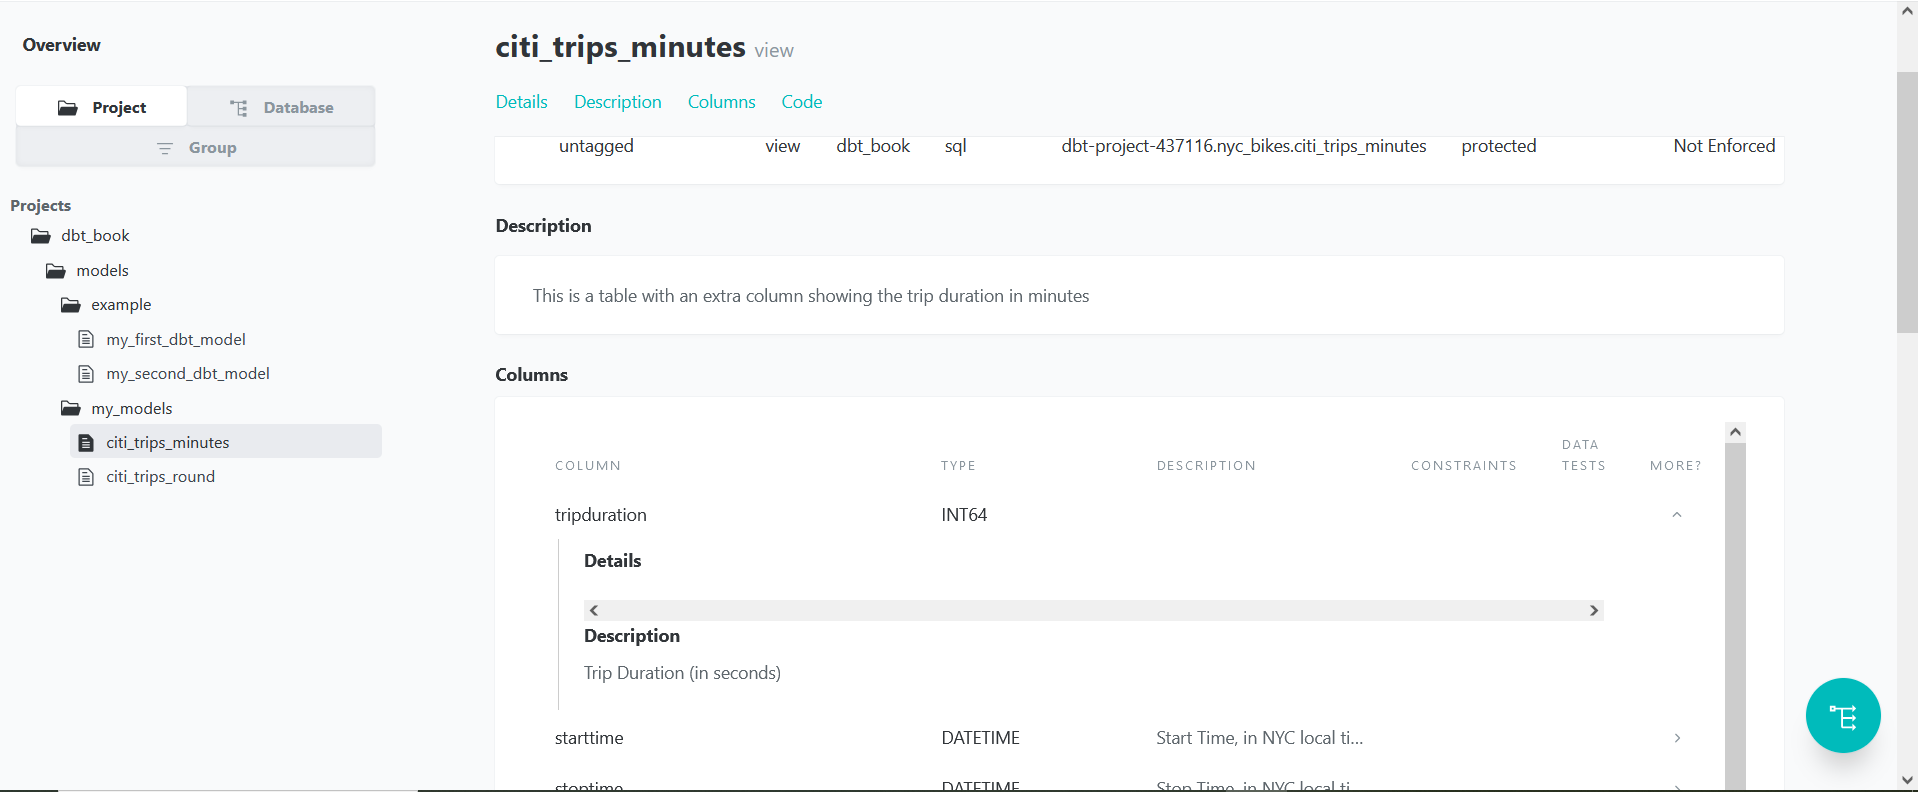
Alright, having gone through the template, we can create our own yml file under the my_models directory. Let’s call it my_models.yml. Copy past the YAML structure from schema.yml to the my_models.yml and let the first YAML structure for citi_trips_minutes.sql look like below.
version: 2

models:
  - name: citi_trips_minutes
    description: "This is a table with an extra column showing the trip duration in minutes"
    columns:
      - name: tripduration
        description: "Trip Duration (in seconds)"

      - name: starttime
        description: "Start Time, in NYC local time."

      - name: stoptime
        description: "Stop Time, in NYC local time."

      - name: start_station_id
        description: "Start Station ID"

      - name: start_station_name
        description: "Start Station Name"

      - name: start_station_latitude
        description: "Start Station Latitude"

      - name: start_station_longitude
        description: "Start Station Longitude"

      - name: end_station_id
        description: "End Station ID"

      - name: end_station_name
        description: "End Station Name"

      - name: end_station_latitude
        description: "End Station Latitude"

      - name: end_station_longitude
        description: "End Station Longitude"

      - name: bike_id
        description: "Bike ID"

      - name: usertype
        description: "User Type (Customer = 24-hour pass or 7-day pass user, Subscriber = Annual Member)"

      - name: birth_year
        description: "Year of Birth"

      - name: gender
        description: "Gender (unknown, male, female)"

      - name: customer_plan
        description: "The name of the plan that determines the rate charged for the trip"

      - name: trip_duration_min
        description: "The trip duration in minutes"
What we’ve done is quite straightforward. We have simply typed out the descriptions next to the description mapping key.
However, imagine you were working with hundreds of models which use similar definitions. Would you have the nerve to copy paste every definition to its respective model? Perhaps not. There is a function by the name of the docs() function which can reference to descriptions in a separate markdown file.
8.3 Using the doc function
To use the doc() function, we write our definitions in a separate markdown (.md) file and place the descriptions within {% docs <field-name> %} {% enddocs %} tags. For this tutorial, we created three markdown tables.
references.md- this contains the descriptions for our column names of interesttables.md- contains the descriptions for our tables of interestoverview.md- contains the text that will go to the overview page
Here is what our references.md contains. As you can see, we have provided some textual information for some of our column names. We can also add some more style to our descriptions since they are now on a separate markdown. For example we could insert links, make the text italic, and bold if you wish!
{% docs tripduration %}

Trip Duration (in seconds). Like:

- How long did the trip take?
- What is the time in seconds?
- More info on time, see [here](https://www.poemhunter.com/poem/time-xxi/)

*https://www.poemhunter.com/poem/time-xxi/*

{% enddocs %}

{% docs starttime %}

Start Time, in NYC local time. As accurate as could ever be.

{% enddocs %}

--snip--
The tables.md just contains a description of our citi_trips_round table.
{% docs citi_trips_round %}

This table contains the trip duration in minutes to one decimal place only.

{% enddocs %}
Now, in order to enable dbt reference these descriptions from our YAML file, we would simply use the doc () function as shown below:
- name: citi_trips_round
    description: '{{ doc("citi_trips_round") }}'
    columns:
      - name: tripduration
        description: '{{ doc("tripduration") }}'

      - name: starttime
        description: '{{ doc("starttime") }}'

      - name: stoptime
        description: '{{ doc("stoptime") }}'

      - name: start_station_id
        description: "Start Station ID"

--snip--
The file saved as overview.md in our project will be used to display the home page of our dbt documentation website. However, the homepage uses a different syntax, like so:
{% docs __overview__ %}

Some more text here...

{% enddocs %}
Therefore, here is some dummy text for our overview page.
{% docs __overview__ %}

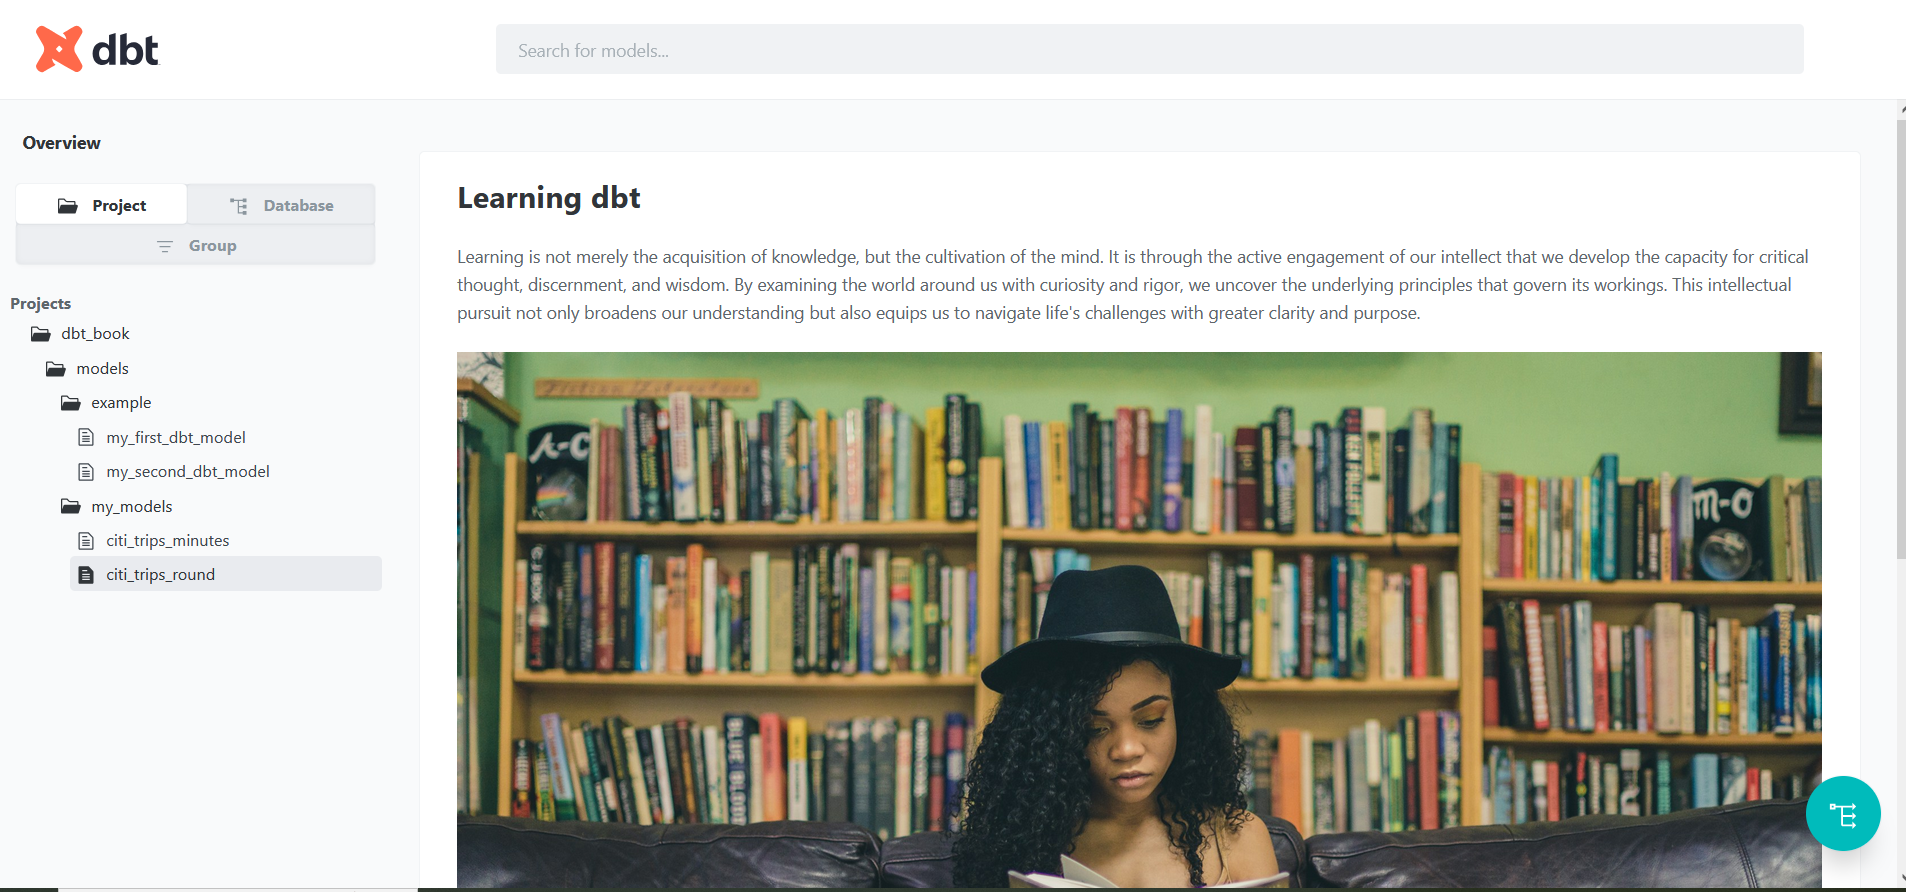
# Learning dbt

Learning is not merely the acquisition of knowledge, but the cultivation of the mind. It is through the active engagement of our intellect that we develop the capacity for critical thought, discernment, and wisdom.

--snip--

{% enddocs %}
8.4 Images in dbt documentation
They say an image is worth a thousand words. In dbt, we store images in a folder called assets. Ideally, one can create any folder in dbt to store images provided you reference it correctly in the documentation. However, for versioning purposes, it is better you store it in an assets folder. Furthermore, images in dbt, once run as part of your document generation, will also appear under the targets/ folder just like your SQL models.
Therefore, going with the recommended approach, create an assets/ folder under dbt_book. Place your image in there.
Go to the dbt_projects.yml file and create a new line with the following code:
asset-paths: ["assets"]This path tells dbt to copy all items within assets into the target directory. Any image in a different directory will not get copied into the target directory when documents are generated.
Finally, as the missing piece to the puzzle, insert a reference to your image in the overview.md file.

One can also create custom overviews for the dbt packages they used.
Below is our complete overview.md file.
{% docs __overview__ %}
# Learning dbt
Learning is not merely the acquisition of knowledge, but the cultivation of the mind. It is through the active engagement of our intellect that we develop the capacity for critical thought, discernment, and wisdom. By examining the world around us with curiosity and rigor, we uncover the underlying principles that govern its workings. This intellectual pursuit not only broadens our understanding but also equips us to navigate life's challenges with greater clarity and purpose.

Some more text here...
{% enddocs %}
8.5 Generating the document
Now is the time where we ignite the rocket engines and shoot off. To generate a dbt documentation, first run dbt docs generate. This command tells dbt to compile the necessary information of your project into the catalog.json and manifest.json files. The ignition key for our documentation generation is dbt docs serve. dbt will generate a list of outputs and create a popup providing the link to open up your documentation. You can click on the popup or copy-paste the link. Our documentation is in the host: localhost:8080/.


If you go to the targets directory, our image(s) will be there!
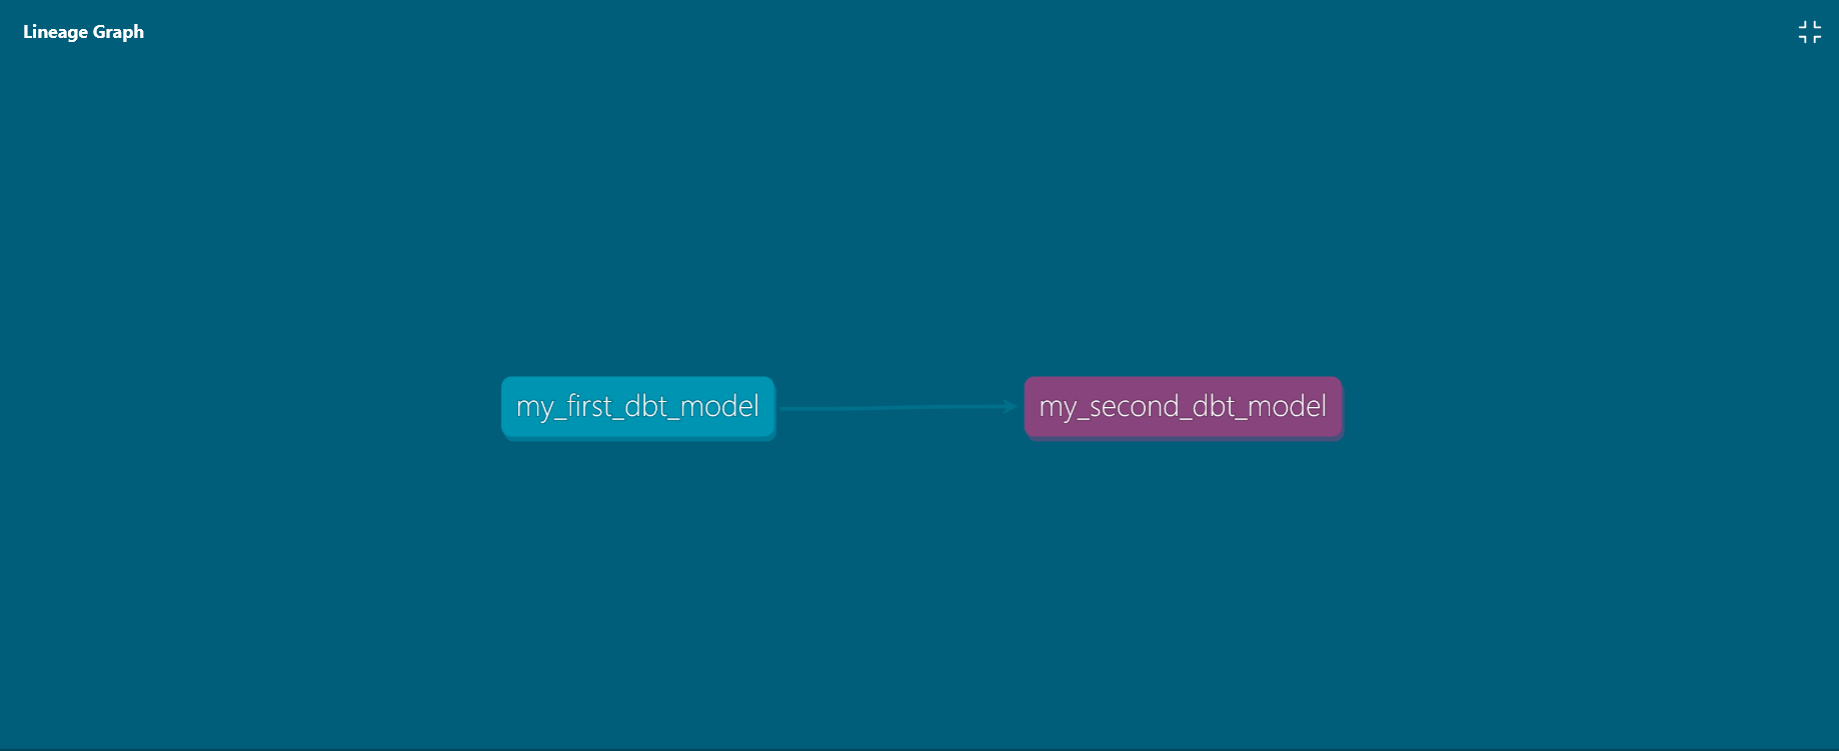
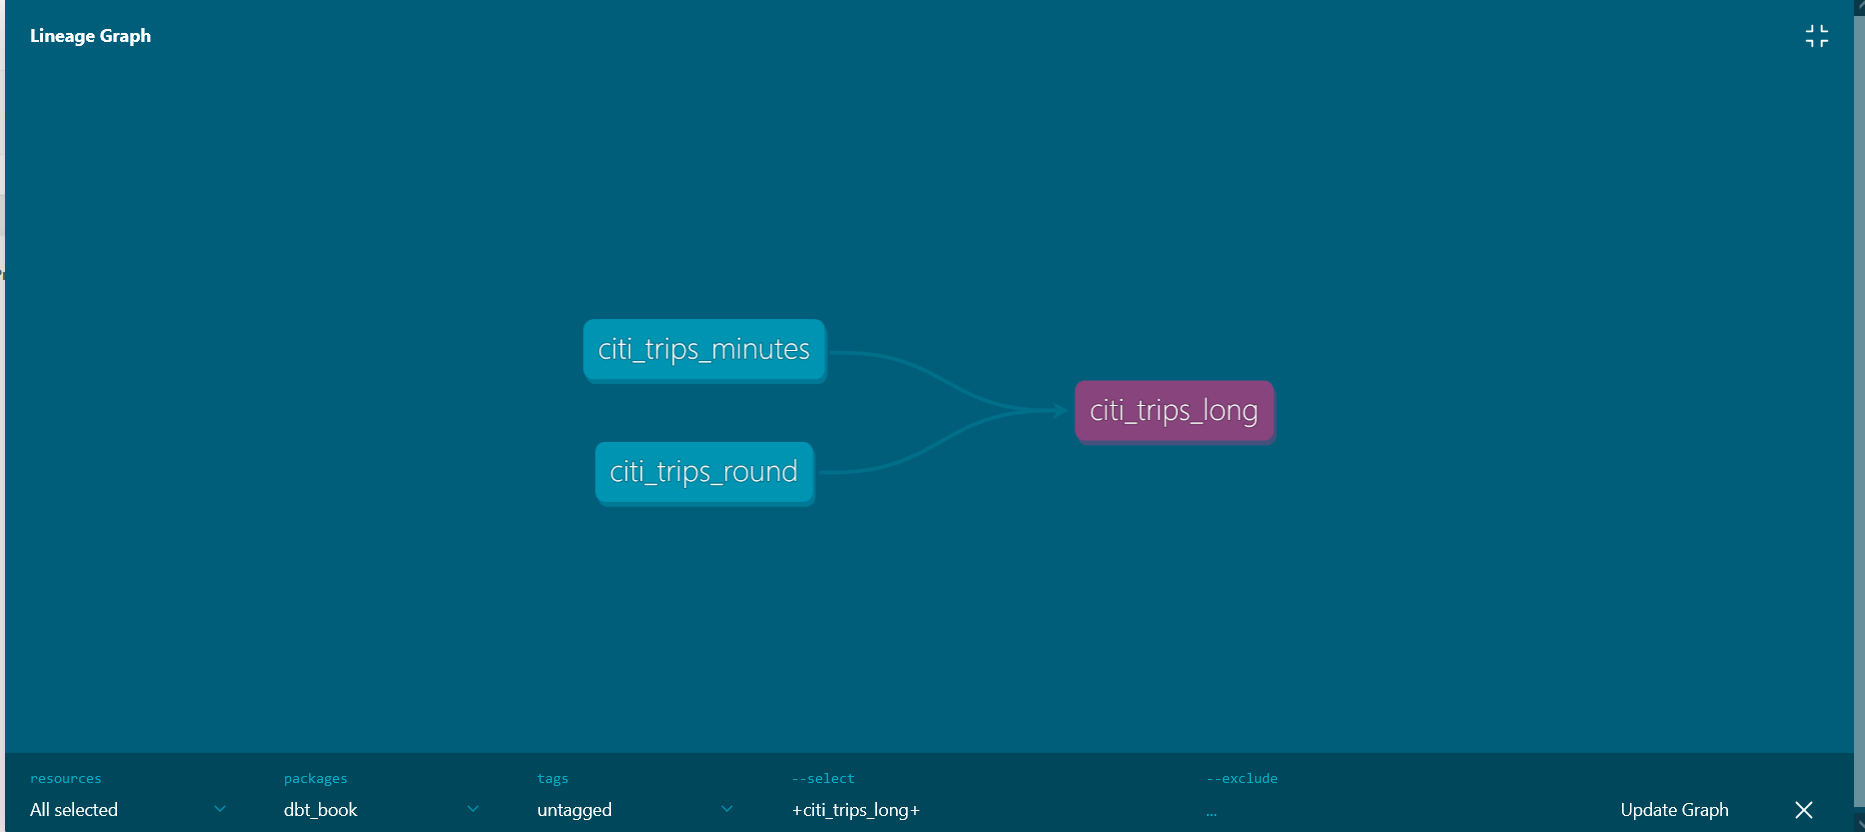
There is also one more cool functionality of the dbt documentation. On the bottom right, there is a turquoise button for showing the lineage graph for each model. If you click on any model, such as my_second_dbt_model, you will see it shows a dependency on my_first_dbt_model. If you have worked on a model that has several dependencies, or children, the model will most likely be more complex. A good example will be for the citi_trips_long model.

It is highly encouraged to play around with the buttons resources, packages, tags, –select and –exclude. For the select button, play around with inserting + both before and after the name of the model. Clue: it has to do with showing or hiding the model’s dependencies and/or children.
Below is an example of the citi_trips_long model, which has more than one dependency.

Portable Document Format↩︎