5.3 Grilling
5.3.1 Chicken
Chicken is, of course, incredibly versatile, and like pork or beef, it can benefit from low temperature cooking (see recipes in the Barbecue section. But sometimes, you may want to cook up some chicken pieces for a quick dinner. As with most chicken recipes, I greatly prefer thighs - they are much more forgiving, in that unlike white meat, they don’t dry out if they are cooked to too high a temperature. Here’s a very basic but versatile recipe.
Ingredients
Four bone-in chicken thighs
olive oil
kosher salt
milled black pepper
~1/2 cup your favorite barbecue sauce
- Light your grill and heat it to 450o F.
- Rub the surface of the chicken pieces with the olive oil and sprinkle with salt and pepper.
- Grill the chicken for ~15 minutes, turning every 3-4 minutes.
- Brush both sides of the chicken with barbecue sauce and return to the grill.
- After 2 minutes, brush the chicken with more barbecue sauce, flip, and brush the second side as well.
- Repeat this process 1-2 more times, until the barbecue sauce is gone and/or the internal temperature of the thighs has reached 170o F. (155o for white meat).
Note that this recipe goes very well with the next recipe for corn on the cob. If you choose to do both, grill the chicken first, put it in a foil-covered bowl, and then grill the corn.
5.3.2 Corn on the cob
I am fortunate enough to have grown up in sweet corn country. Indeed, one of my fondest childhood memories is, when we were visiting family friends on a farm in Macedon NY, the children (including me) were sent out in the field to pick fresh corn for the day’s dinner. From the field to the pot in 10 minutes - absolutely delicious! Unfortunately, I then spent a big chunk of my life in Florida, and corn there simply doesn’t measure up to what I grew up with. Thus, it was absolutely wonder to discover, when I moved to Ohio in July of 2007 (peak corn season) that the corn here measures up to what I remember as a child.
So the first secret about corn on the cob is freshness. Ideally, it should be cooked the day it is picked; with storage, even refrigerated, the sugar in the corn rapidly turns to starch. I have eaten second day corn, which is satisfactory, but fresher is better.
So here’s my method for cooking corn on the grill. I’m not sure where I got the original recipe, but it’s pretty basic and ubiquitous.
Ingredients
2-6 ears of fresh sweet corn, in husks
melted butter
fresh ground pepper
grated parmesan (optional)
butcher twine
- Peel the husks back (do NOT remove them) and discard silks.
- Place corn into a large kettle of water and let soak for at least an hour.
- Remove the corn from the water, baste with melted butter, and sprinkle with pepper, Parmesan (if desired) and any other flavors you might like (dill is a popular one). A half a stick of butter is sufficient for four ears.
- Cut one ~8 inch piece of twine for each ear. Wet them in water to make them easier to tie.
- Fold the husks up over the corn and tie together with twine.
- Place the corn on your grill preheated to 450o and roast a total of 10 minutes, rotating the ears every 2.5 minutes.
- Remove ears from grill. With neoprene mitts on, grasp the ear with one hand and the stem with the other. Snap vigorously and separate the stem and attached husk from the ear of corn (you may want to cut the twine with scissors first).
- Serve with just about anything.
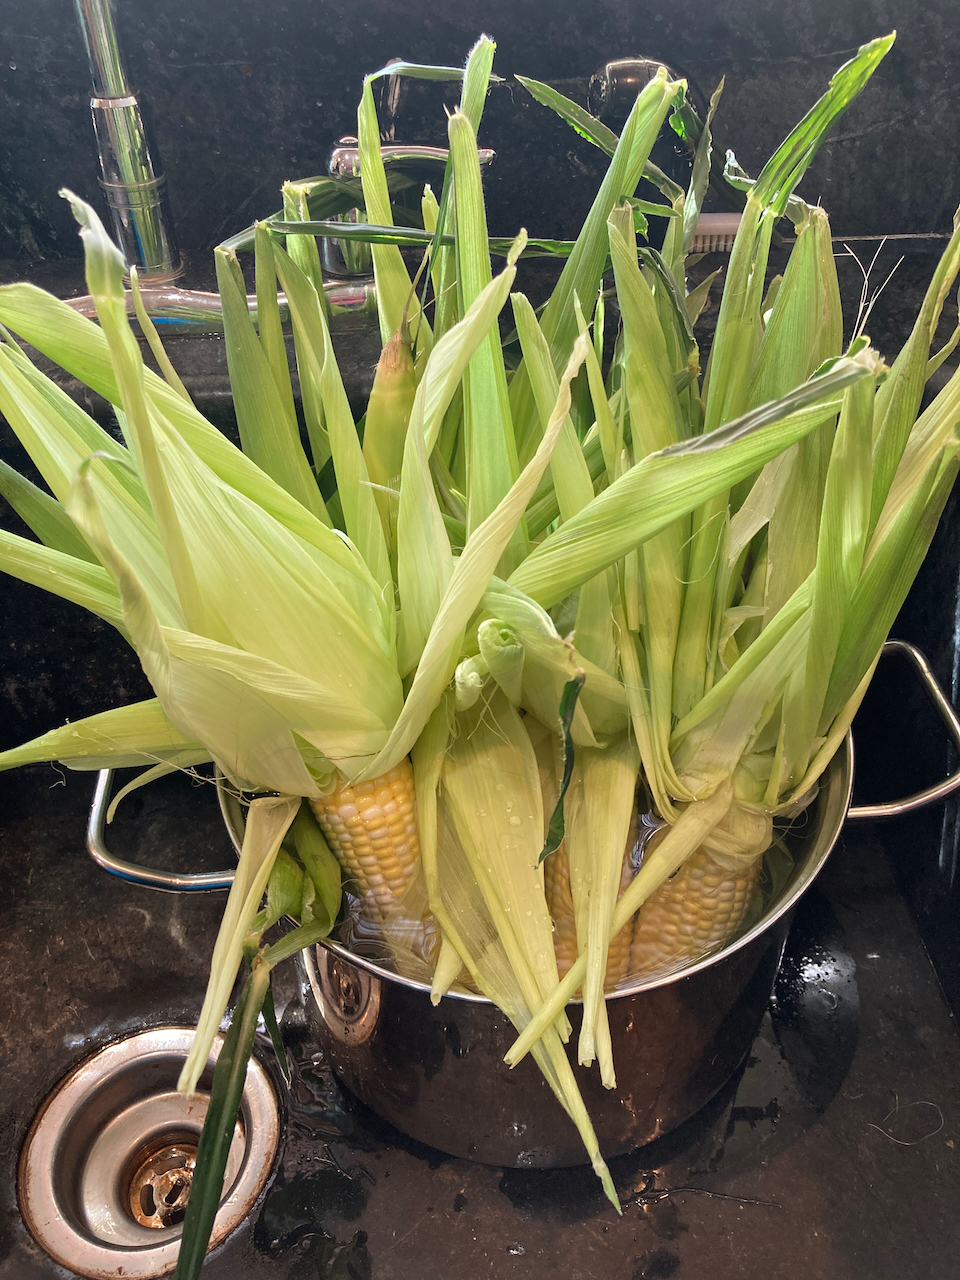
Four ears of corn soaking with the husks pulled back and the silks removed.
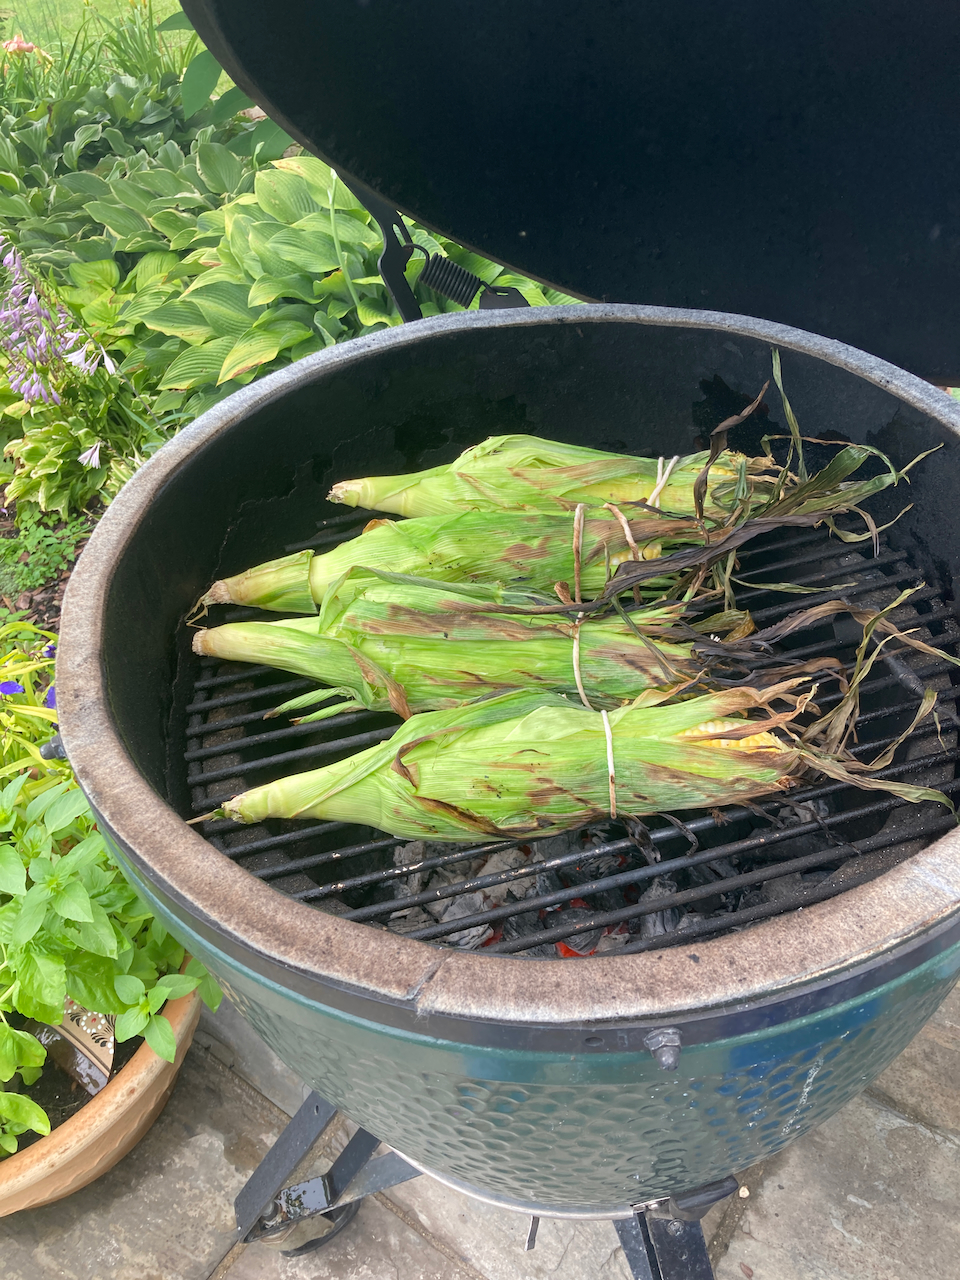
Corn prepared as described and half way through grilling
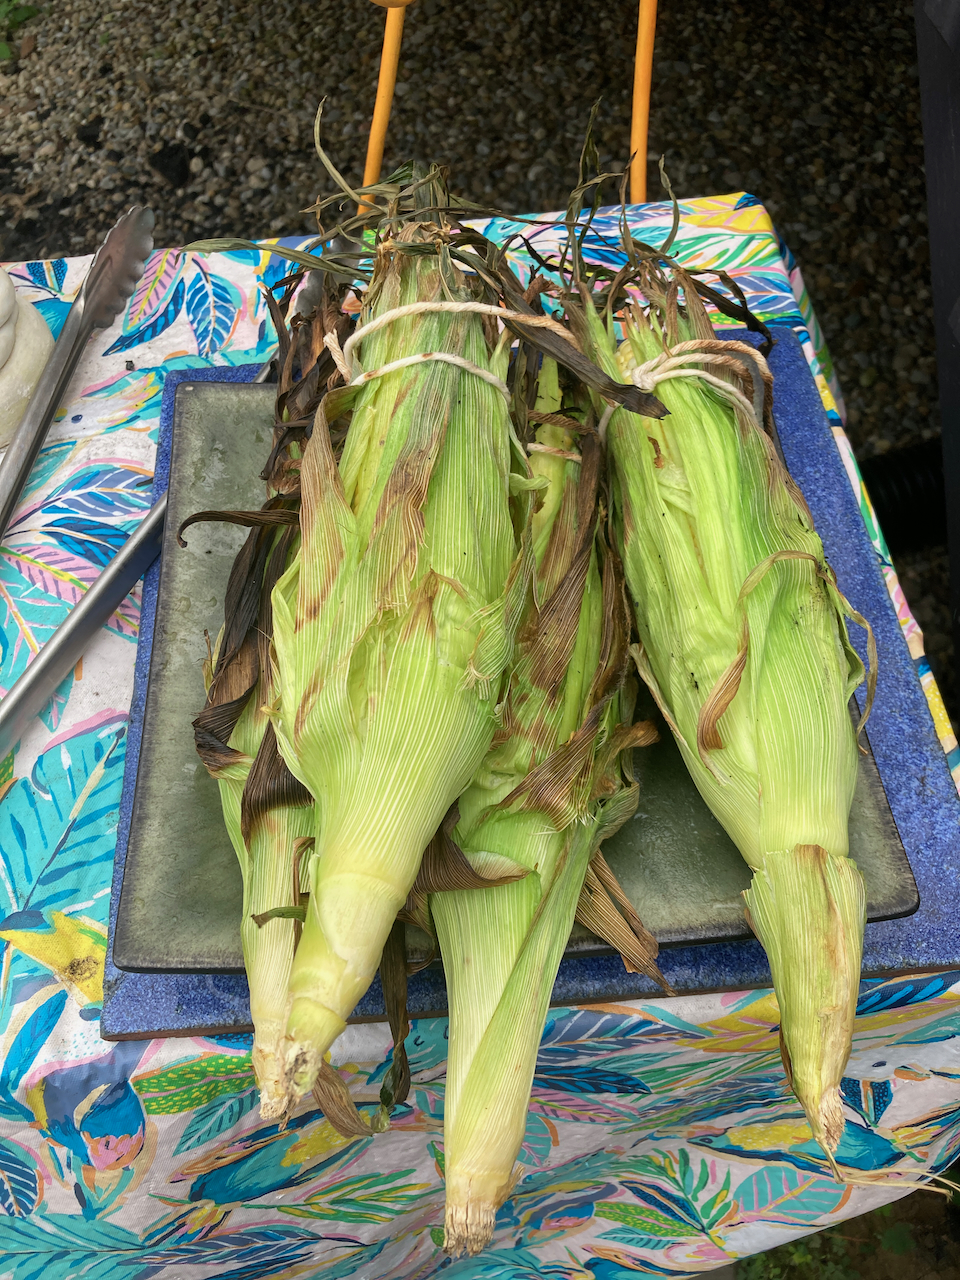
Grilling is complete
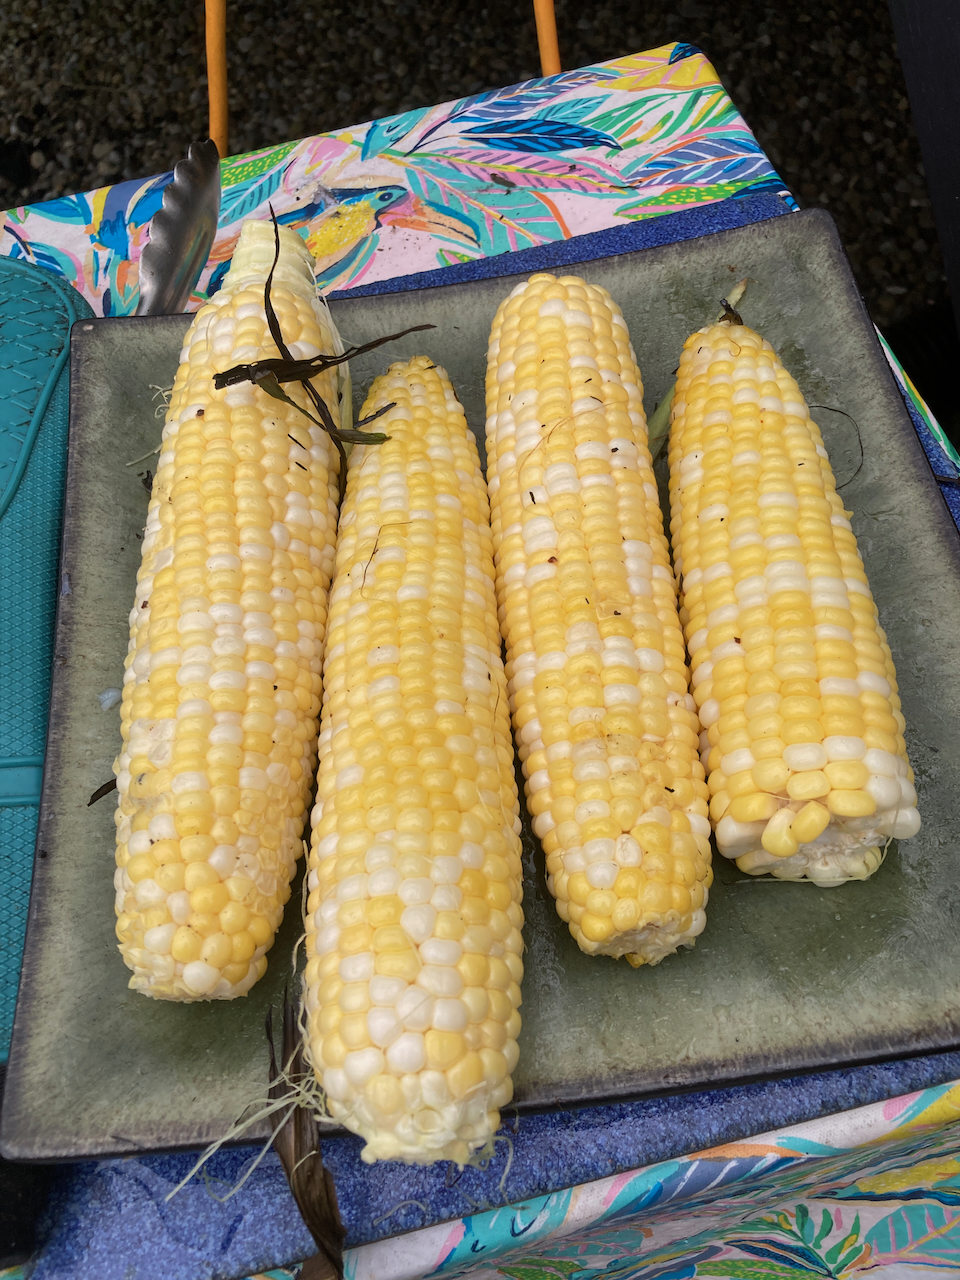
Ready to eat
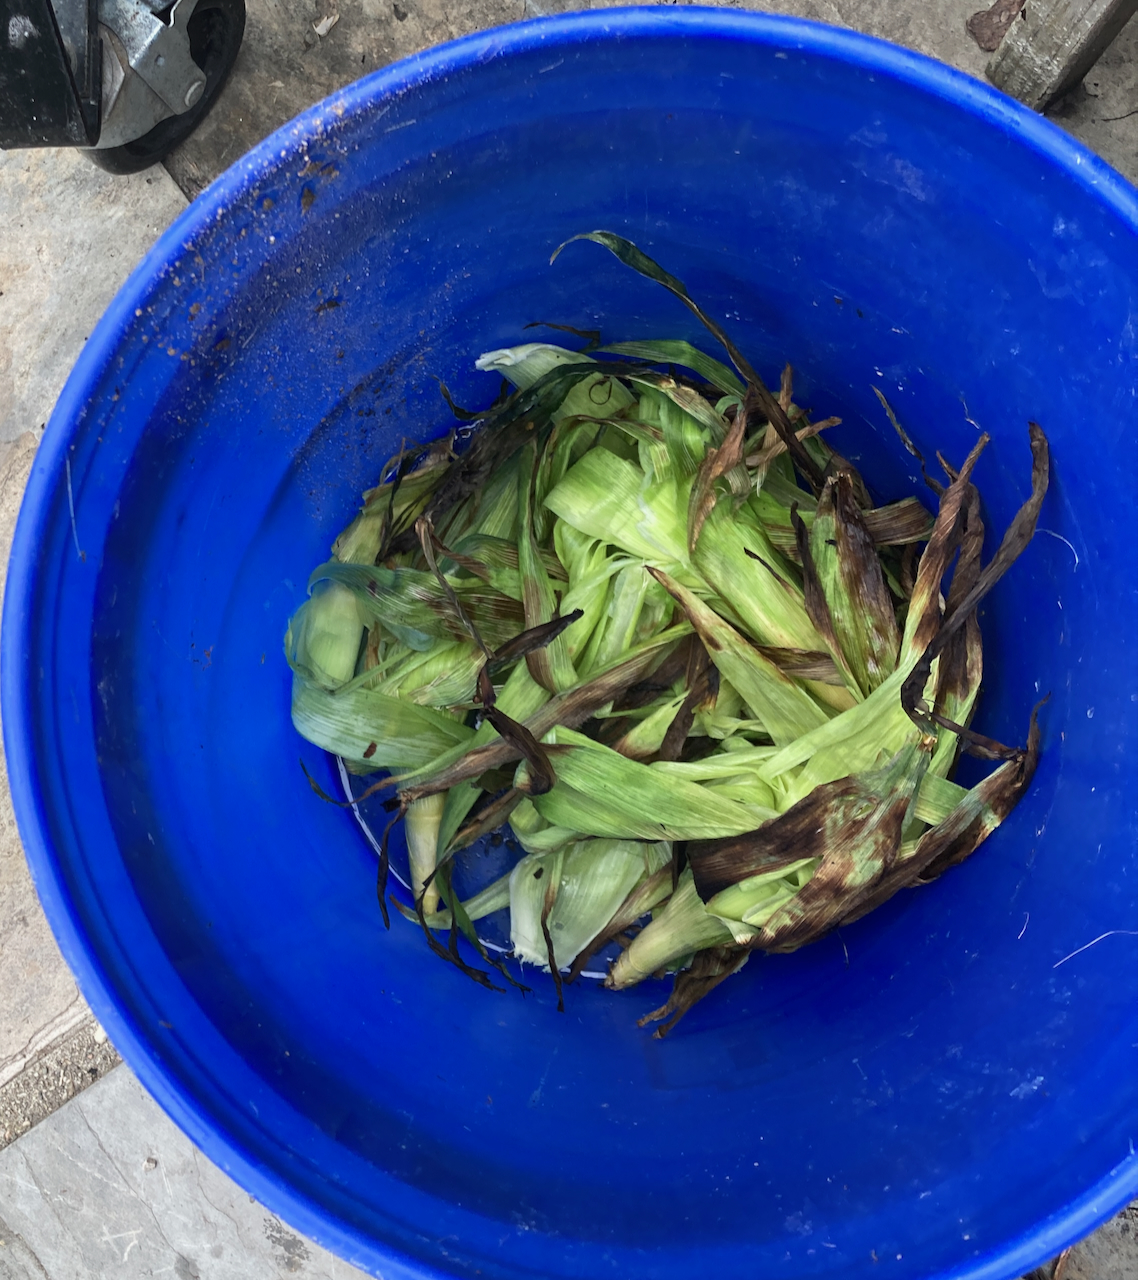
Ready for the compost pile.
5.3.3 Beef Fajitas
This recipe was originally one designed for the Instant Pot, but it is really easy to prepare it on a grill. It can also be prepared on the stove top, substituting a heavy frying pan for the grill basket.
Ingredients
~3/4 lb beef, sliced into strips for stir fry (flank steak works well)
2 tbsp fajita seasoning*
1 bell pepper
1 onion
Splash of red wine
1 lime, cut into wedges
Flour tortillas
- Coat the beef with a tablespoon of fajita seasoning and the splash of red wine. Marinate for 30 min to an hour.
- Slice the vegetables and add the remaining seasoning.
- Place the meat in a grill basket and cook over a medium hot (450o F.) grill until browned, about 3-5 minutes. Remove and set aside.
- Add the vegetables to the basket and cook for about 10 minutes, until vegetables are cooked through.
- Add the meat to the mixture and cook for another 5-10 minutes.
- In your kitchen, briefly warm the tortillas eitheron a frying pan over medium heat or by toasting briefly (1-2 minutes) in a toaster oven. Place in a basket and cover with a kitchen towel.
- Serve the tortillas, filling and lime wedges for people to put together for guests to serve themselves. If desired, add your favorite hot sauce and/or sour cream (not my favorite).
*There are plenty good choices of fajita seasonings out there. If you choose to make your own, here is the recipe that I use.
2 tbsp chili powder
4 tbsp ground cumin
2 tsp smoked paprika
4 tbsp garlic powder
2 tsp onion powder
2 tsp cayenne pepper
2 tsp oregano
1 tsp black pepper
1 tsp salt
Mix everything together and store in an air tight container. Paprika, cayenne, and salt amounts can be adjusted to taste.
If you are an instant pot user, you can find the original recipe here.
5.3.4 Chicken Fajitas/Tacos
This is a recipe from New York Times commentator Jamelle Bouie. He recommends adding guacamole to the final product; do so according to your taste.
Ingredients
1 cup dark Mexican beer
2 tbsp sesame oil
2-3 cloves garlic, chopped
1 tsp dried oregano
1 tsp kosher salt
1/2 tsp freshly ground black pepper
1/4 tsp ground cayenne pepper
6 boneless skinless chicken thighs
guacamole to taste
(optional) Sautéd onions and peppers
flour or corn tortillas
- Mix all of the ingredients except for the last four.
- Add the chicken thighs (intact) to the mixture, cover, and let marinate for at least two hours and up to overnight.
- Prepare your grill for direct cooking at 450 o F.
- Grill the chicken until browned, about 4-5 minutes per side.
- Let the chicken rest for at least 5 minutes and then cut into strips for use in fajitas or tortillas
- Warm the tortillas, either on the grill or in a toaster oven, for 1-2 minutes
- Add guacamole and/or sautéd vegetables to the tortillas and cover with chicken strips for serving.
As an alternative to this recipe, I’m sure that the recipe for Beef Fajitas would work as well, only the chicken would be sliced prior to seasoning and cooking, and grilling would be in a basket.
5.3.5 Korean Chicken Skewers
This is a recipe from Southern Living and is absolutely delicious and pretty easy to prepare. I cook these on metal skewers that are about 12 inches long and have a flat shape, so that the skewered food is easier to handle.
Ingredients
1/2 cup unsalted butter
2 garlic cloves, peeled and grated
1/3 cup honey
1 tsp kosher salt
1 tsp rice vinegar
2 lb boneless skinless thighs, cut into 1 inch cubes
1 large red onion, cut into wedges
- Prepare your grill for direct cooking at 450o F.
- Melt the butter on the stovetop over medium low heat.
- Add the garlic and cook for about two minutes.
- Add the salt, vinegar and 2 Tbsp soy sauce, bring to a boil, and cook for about 2 minutes.
- Toss the chicken with the remaining soy sauce.
- Thread the chicken and onion wedges onto skewers, adding two pieces of chicken followed by one onion wedge.
- Grill, basting often with honey butter mixture, for 10-12 minutes until chicken is light charred and cooked (if you want to check with an instant read thermometer, the internal temperature of the chicken should be ~165o.
- Serve over rice or bucatini.
5.3.6 Grilled Korean Short Ribs
This needs some advance planning for marinating, but it results in a tasty and straightforward meal it - only requires about five minutes on the grill.
Ingredients
1 medium onion cut into 1-inch pieces
1 Asian pear cut into 1-inch pieces (substitute a standard pear if not available)
5 garlic cloves
1-inch piece fresh ginger, cut into 1/4-inch pieces
1 C soy sauce
1/2 C water
1/4 C packed brown sugar
2 Tbsp mirin
1 Tbsp freshly ground black pepper
4 scallions, thinly sliced
2 Tbsp toasted sesame oil
2 Tbsp toasted sesame seeds
3 pounds flanken-style beef short ribs, cut about 1/4–1/2-inch thick
- Combine the onion, pear, garlic cloves, and fresh ginger in a food processor and process to a coarse paste.
- Add thse soy sauce, water, sugar, mirin and pepper and continue to process until everything is combined.
- In a bowl, combine the paste with sesame seeds, sesame oil and scallions.
- Place the meat in a shallow pan and cover with the marinade. Let it marinade at least one hour or overnight.
- Prepare your grill for cooking at 450o F.
- Grill, turning regularly, until the internal temperatures of the ribs reaches 170o F.
- Serve with white rice.
5.3.7 Grilled Shrimp
I agree with Bubba in Forrest Gump - you can do just about anything with shrimp. Furthermore, they can be cooked easily and rapidly (the big danger is overcooking). As for grilling, there are lots of possibilities - allrecipes.com provides 18 recipes for doing so. Thermoworks has a post that goes through the grilling process in detail.
Here’s the recipe I’ve settled on. You may also want to try shrimp wrapped in Serrano ham described elsewhere.
Ingredients
1/2 cup butter 1 shallot, minced
4 cloves garlic, peeled and minced
1/4 tsp red pepper
1 tsp. paprika
0.5-1 lb. large (16/20) shrimp, peeled and deveined
1 lemon, quartered
- Light your grill and bring it to about 350o F.
- Soak 3-6 wooden skewers in water for at least 20 minutes
- Melt the butter over low heat.
- Add the shallot, garlic, paprika and red pepper. Simmer 2 minutes
- Place the shrimp on skewers (3-4 shrimp on each) and brush liberally with the butter mixture.
- Grill for about four minutes, turning at least once. The desired internal temperature is 120o F.
- Serve over pasta, with any remaining butter mix mixed in. Squeeze 2 lemon quarters over each serving.
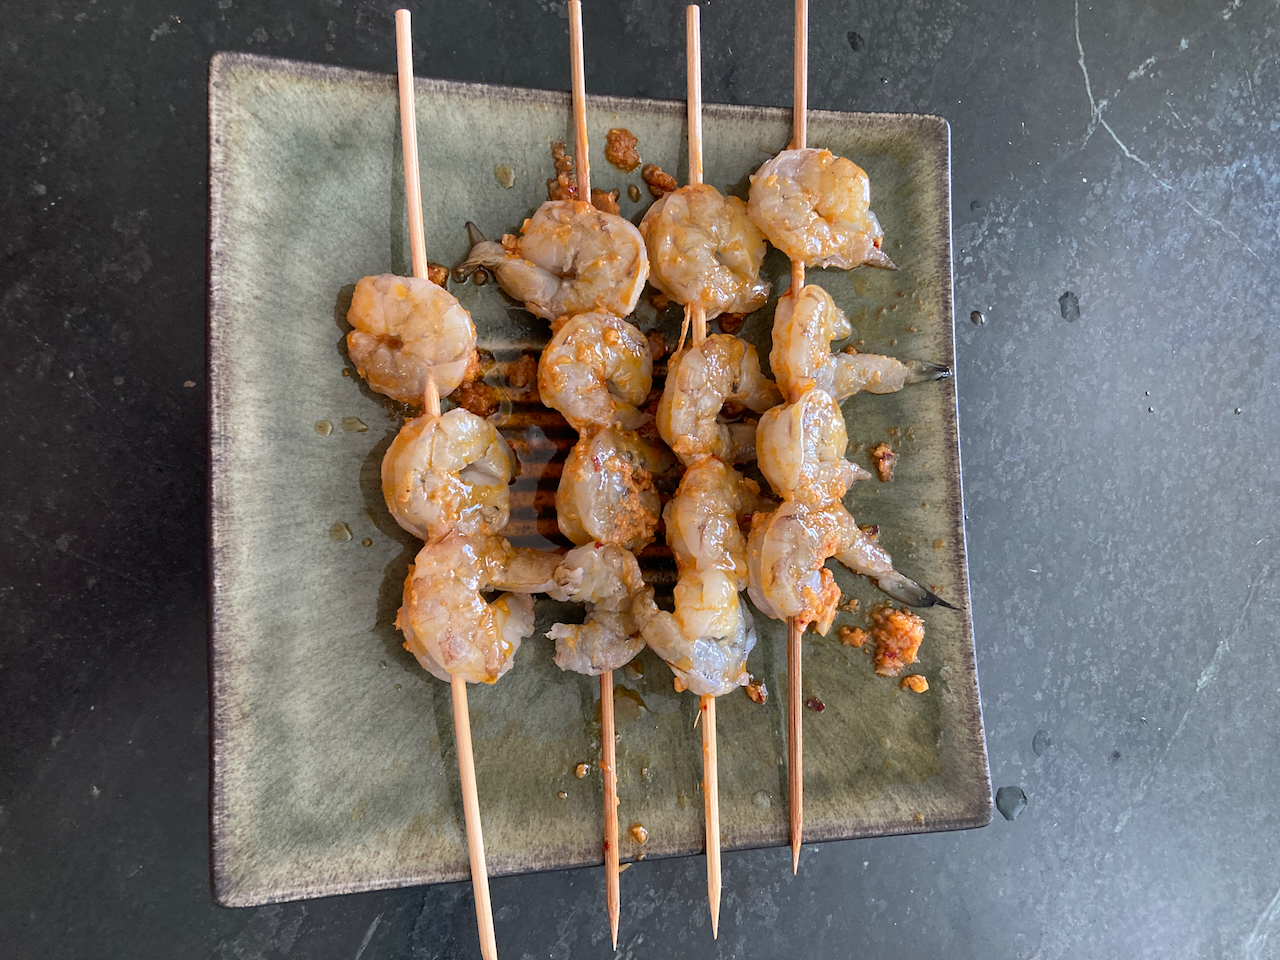
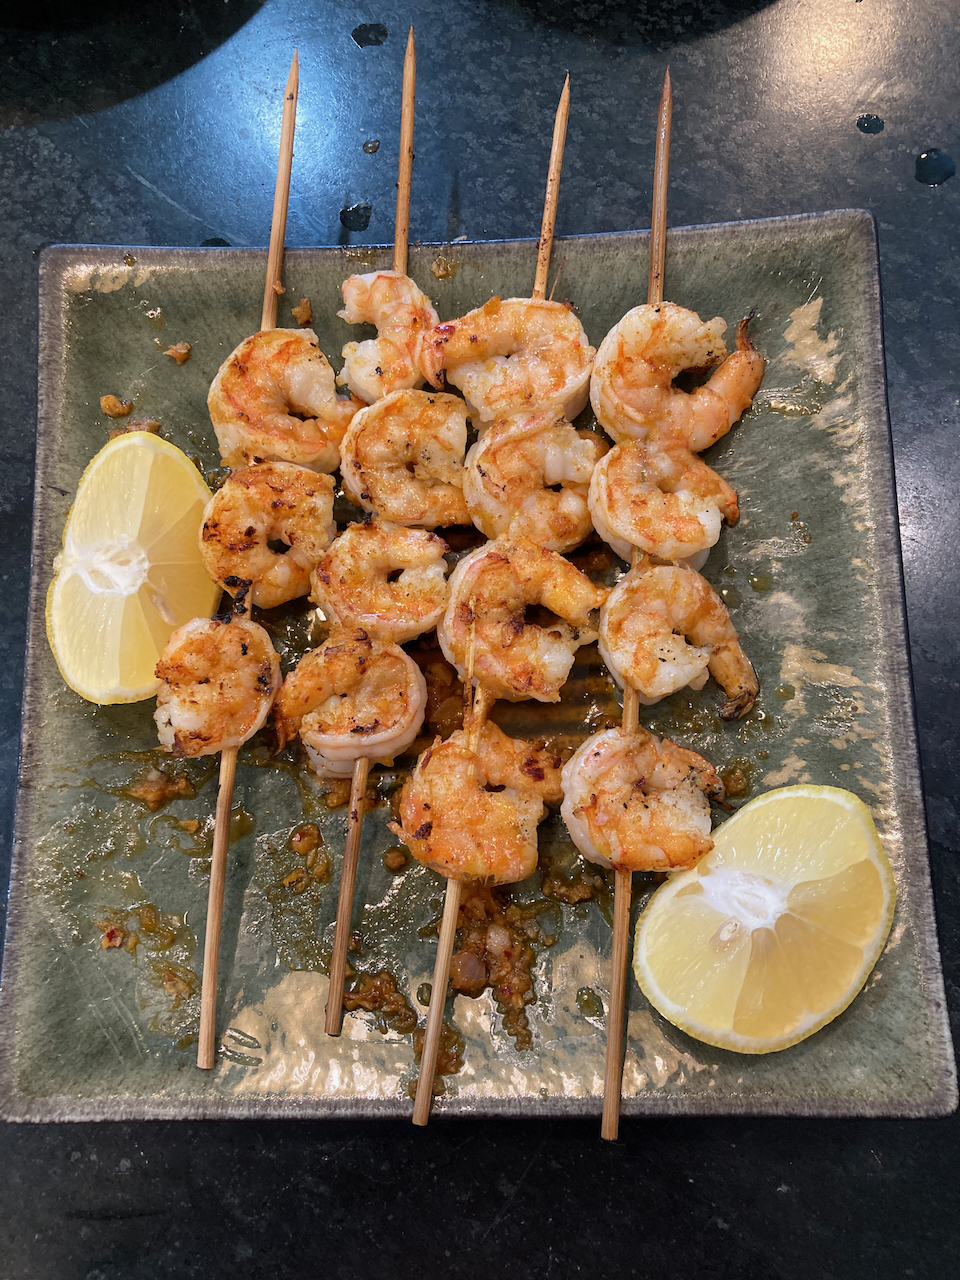
Shrimp on skewers, before and after grilling
5.3.8 Blackened Grouper
The original recipe calls for cooking indoors on a hot frying pan. I decided to try it on the grill, and while I realized the spicing needed some adjustment, the fish cooked just fine.
Ingredients
1.5 lb. grouper filets
3 tbsp melted butter
lemon
Seasoning mix
2 tsp sweet paprika
1/2 tsp cayenne pepper
1/2 tsp black pepper
1/2 tsp dried oregano
1/2 tsp dried thyme
1/2 tsp ground cumin
1 tsp garlic powder
1 tsp onion powder
1 tsp brown sugar
- prepare your grill for high heat direct cooking (500-550o F.)
- Combine all the ingredients of the spice mix and stir well.
- Blot the fish dry with paper towels.
- Brush melted butter on the top side of the fish and spread the spice mix over it.
- Flip the fish and repeat step 3.
- Oil a grilling basket liberally and place the fish on it.
- Insert a leave-in probe into the fish.
- Grill until the internal temperature reaches ~100o F.
- Flip the fish and continue to grill until it reaches an internal temperature of 125o F.
- Squeeze lemon juice over each filet and serve.
5.3.9 Elk Burger
I hadn’t eaten elk in nearly 50 years, but I remember it fondly. The partner of a friend had the good fortune of bagging one and thus had a LOT of meat to share. I, being a low paid VISTA volunteer at the time, jumped at this free food opportunity, and I didn’t have cause to regret it.
Recently, Thermoworks posted this interesting recipe, one that uses a novel cooking - grilling indirect until the burger is partially cooked and then doing so directly until it is done. I tried it, and it was wonderful. Inde ed, while I don’t eat hamburgers much anymore, if I do so in the future, I’m going to use this approach.
But how does one do indirect cooking on a Green Egg? A little searching on Amazon led me to this device. It’s a bit pricey, but it works like a charm for the purpose. It also results in improved air circulation and thus cleaner burning charcoal.
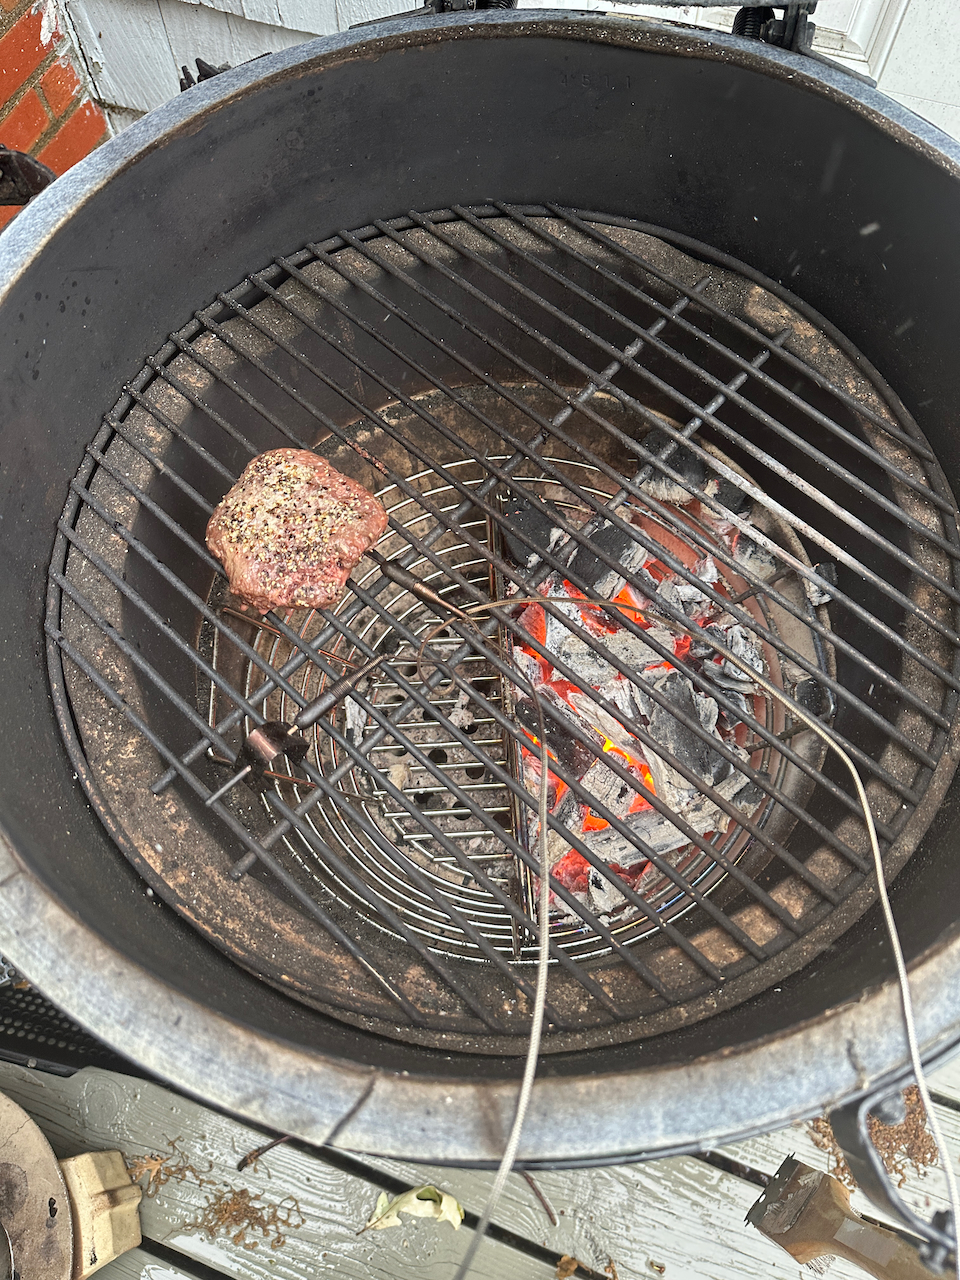
Big Green Egg set up for indirect and direct cooking. A single elk burger is on the indirect side, and grill and internal temperature probes are in place.
Ingredients
1 lb ground elk, divided into three patties
salt and pepper
3 kaiser rolls or hamburger buns
cheese and condiments, as desired
- Load charcoal in one side of the divider and ignite. When they are burning, close the lid and monitor the temparture until it reaches 450o F.
- While the charcoal is igniting, apply salt and pepper to the patties to taste. I found that lots of pepper and just a little salt works well.
- If necessary, slice the rolls in half.
- Insert a needle probe into the side of one of the burgers. Place them on the indirect cooking side of the Green Egg and close the lid.
- When the internal temperature reaches 120o F, switch them to the direct side, and place the rolls on the indirect side, face down.
- Grill the burgers, flipping every 40 seconds or so, until the internal temperature reaches 160o F, monitoring with a handheld probe. This takes about 2-3 minutes.
- When they are done, check the rolls - they should be lightly toasted.
- If using cheese, return the burgers to the indirect side when they reach 150o F. and let them stand until the cheese is melted.
- Apply your favorite toppings and eat! Ready to eat.