7.3 Slide formatting
The remark.js Wiki contains detailed documentation about how to format slides and use the presentation (keyboard shortcuts). The xaringan package has simplified several things compared to the official remark.js guide, e.g., you do not need a boilerplate HTML file, you can set the autoplay mode via an option of moon_reader(), and LaTeX math basically just works.
Please note that remark.js has its own Markdown interpreter that is not compatible with Pandoc’s Markdown converter, so you will not be able to use any advanced Pandoc Markdown features (e.g., the citation syntax [@key]). You may use raw HTML when there is something you desire that is not supported by remark.js. For example, you can generate an HTML table via knitr::kable(head(iris), 'html').
7.3.1 Slides and properties
Every new slide is created under three dashes (---). The dashes must be directly followed by a line break, and there must not be any other characters after the dashes (not even white spaces). When you see that you new slide appear on the previous slide after a horizontal rule, you might have white spaces after the three dashes (if so, you have to delete them).
The content of the slide can be arbitrary, e.g., it does not have to have a slide title, and if it does, the title can be of any level you prefer (#, ##, or ###).
A slide can have a few properties, including class and background-image, etc. Properties are written in the beginning of a slide, e.g.,
---

class: center, inverse
background-image: url("images/cool.png")

# A new slide

Content.
The class property assigns class names to the HTML tag of the slide, so that you can use CSS to style specific slides. For example, for a slide with the inverse class, you may define the CSS rules (to render text in white on a dark background):
.inverse {
  background-color: #272822;
  color: #d6d6d6;
  text-shadow: 0 0 20px #333;
}
Then include the CSS file (say, my-style.css) via the css option of xaringan::moon_reader:
---
output:
  xaringan::moon_reader:
    css: "my-style.css"
---
Actually the style for the inverse class has been defined in the default theme of xaringan, so you do not really need to define it again unless you want to override it.
Other available class names are left, center, and right for the horizontal alignment of all elements on a slide, and top, middle, and bottom for the vertical alignment.
Background images can be set via the background-image property. The image can be either a local file or an online image. The path should be put inside url(), which is the CSS syntax. You can also set the background image size and position, e.g.,
background-image: url("`r xaringan:::karl`")
background-position: center
background-size: contain
All these properties require you to understand CSS.9 In the above example, we actually used an inline expression xaringan::karl to return a URL of an image of Karl Broman (http://kbroman.org), which is one of the highlights of the xaringan package.
7.3.2 The title slide
There is a special slide, the title slide, that is automatically generated from the YAML metadata of your Rmd document. It contains the title, subtitle, author, and date (all are optional). This slide has the classes inverse, center, middle, and title-slide by default, which looks like the left image in Figure 7.1. If you do not like the default style, you may either customize the .title-slide class, or provide a custom vector of classes via the titleSlideClass option under the nature option, e.g.,
---
output:
  xaringan::moon_reader:
    nature:
      titleSlideClass: ["right", "top", "my-title"]
---
You can also disable the automatic title slide via the seal option and create one manually by yourself:
---
output:
  xaringan::moon_reader:
    seal: false
---

# My Own Title

### Author

Whatever you want to put on the title slide.
7.3.3 Content classes
You can assign classes to any elements on a slide, too. The syntax is .className[content]. This is a very powerful feature of remark.js, and one of very few features not available in Pandoc. Basically it makes it possible to style any elements on a slide via CSS. There are a few built-in content classes, .left[ ], .center[ ], and .right[ ], to align elements horizontally on a slide, e.g., you may center an image:
.center[]The content inside [ ] can be anything, such as several paragraphs, or lists. The default theme of xaringan has provided four more content classes:
.left-column[ ]and.right-column[ ]provide a sidebar layout. The left sidebar is narrow (20% of the slide width), and the right column is the main column (75% of the slide width). If you have multiple level-2 (##) or level-3 (###) headings in the left column, the last heading will be highlighted, with previous headings being grayed out..pull-left[ ]and.pull-right[ ]provide a two-column layout, and the two columns are of the same width. Below is an example:.pull-left[ - One bullet. - Another bullet. ] .pull-right[  ]
You can design your own content classes if you know CSS, e.g., if you want to make text red via .red[ ], you may define this in CSS:
.red { color: red; }7.3.4 Incremental slides
When you want to show content incrementally on a slide (e.g., holding a funny picture until the last moment), you can use two dashes to separate the content. The two dashes can appear anywhere except inside content classes, so you can basically split your content in any way you like, e.g.,
---
# Two dashes
The easiest way to build incremental slides is...
--
to use two dashes `--` to separate content on a slide.
--
You can divide a slide in _any way you want_.
--
- One bullet
- Another bullet
--
- And one more
--
.center[

Don't saw your slides too hard.
]There are a few other advanced ways to build incremental slides documented in the presentation at https://slides.yihui.name/xaringan/incremental.html.
7.3.5 Presenter notes
You can write notes for yourself to read in the presenter mode (press the keyboard shortcut p). These notes are written under three question marks ??? after a slide, and the syntax is also Markdown, which means you can write any elements supported by Markdown, such as paragraphs, lists, images, and so on. For example:
---

The holy passion of Friendship is of so sweet and steady
and loyal and enduring a nature that it will last through
a whole lifetime...

???

_if not asked to lend money_.

--- Mark Twain
A common mistake in presentations, especially for presenters without much experience, is to stuff a slide with too much content. The consequence is either a speaker, out of breath, reading the so many words out loud, or the audience starting to read the slides quietly by themselves without listening. Slides are not papers or books, so you should try to be brief in the visual content of slides but verbose in verbal narratives. If you have a lot to say about a slide, but cannot remember everything, you may consider using presenter notes.
I want to mention a technical note about the presenter mode: when connecting to a projector, you should make sure not to mirror the two screens. Instead, separate the two displays, so you can drag the window with the normal view of slides to the second screen. Figure 7.2 shows how to do it from the “System Preferences” on macOS (do not check the box “Mirror Displays”).
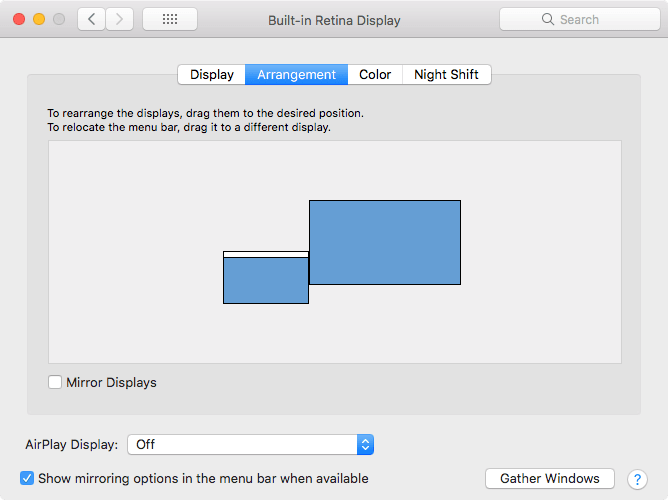
FIGURE 7.2: Separate the current display from the external display.
7.3.6 yolo: true
Inspired by a random feature request from a tweet by Karthik Ram, the output format xaringan::moon_reader provided an option named yolo (an acronym of “you only live once”). If you set it to true, a photo of Karl Broman (with a mustache) will be inserted into a random slide in your presentation.10
---
output:
  xaringan::moon_reader:
    yolo: true
---
The xaringan package is probably best known for this feature. I want to thank Karl for letting me use this photo. It always makes me happy for mysterious reasons.
A less well-known feature is that you can actually replace Karl’s picture with other pictures,11 and/or specify how many times you want a picture to randomly show up in your presentation. For example:
---
output:
  xaringan::moon_reader:
    yolo:
      img: kangaroo.jpg
      times: 5
---
Developing software is fun, isn’t it?
There are many tutorials online if you search for “CSS background,” e.g., https://www.w3schools.com/cssref/css3_pr_background.asp.↩︎
For the full story behind the mustache, see Karl’s post at http://kbroman.org/blog/2014/08/28/the-mustache-photo/.↩︎
In case you are also interested in Karl’s great grandfather’s mustache, you can find a picture at https://twitter.com/kwbroman/status/1199142650185691137.↩︎