4 SQL: Create and fill a new database
In this chapter, we will introduce the Data Definition Language (DDL) and will create a new database from scratch. In particular, we will use the following Entity Relationship diagram that describes a fictional music label called NoFuture records:
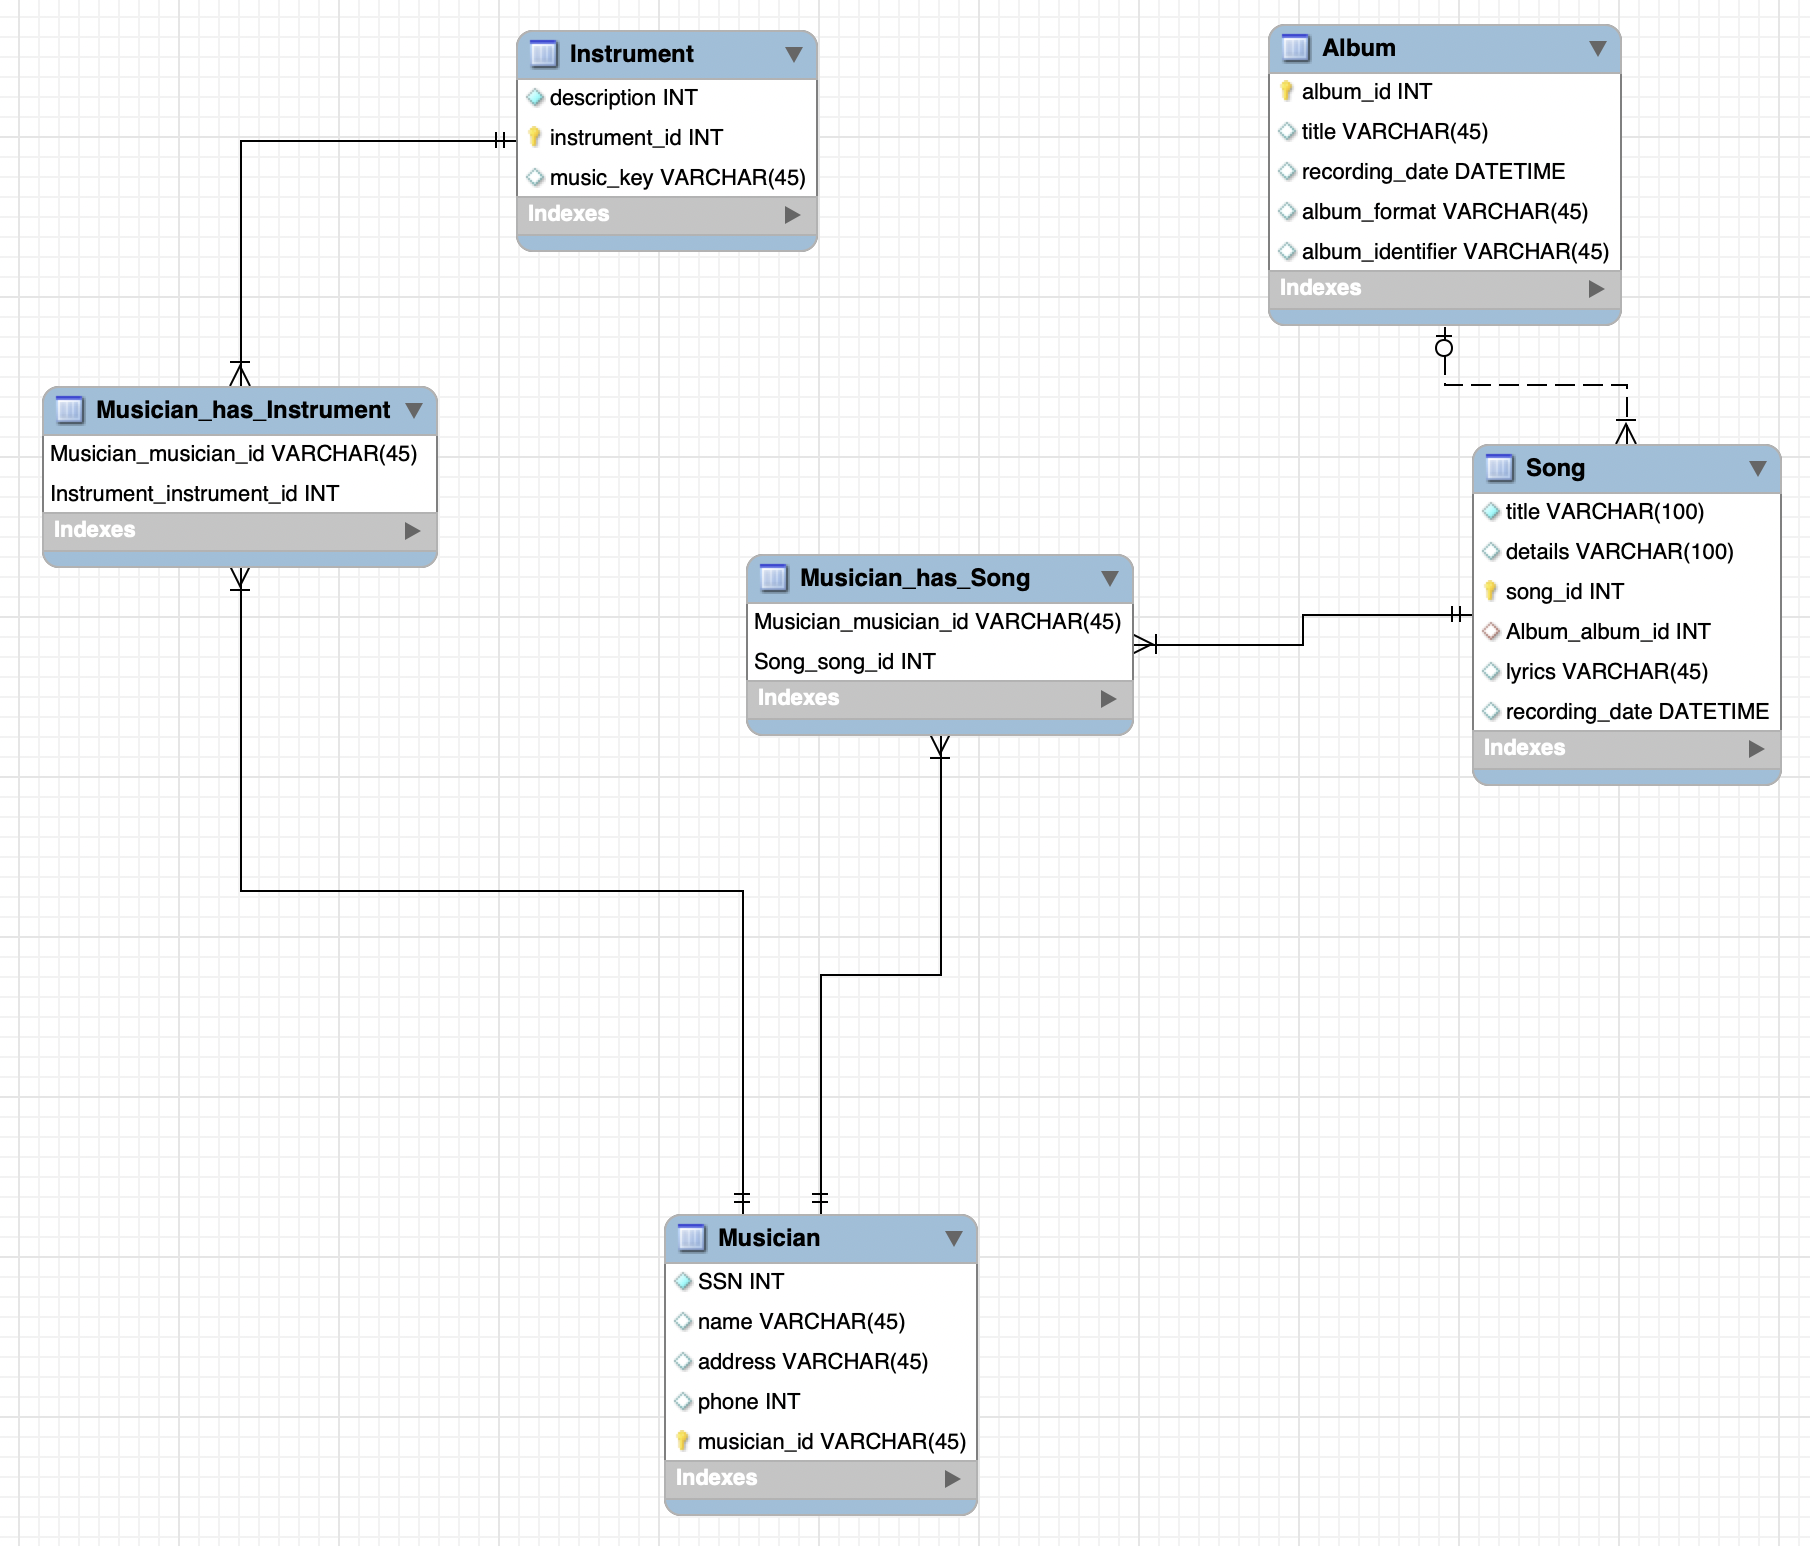
Figure 4.1: The Entity Relationship diagram of schema music_marketplace.
As per the diagram:
- Each musician that records at NoFuture has an SSN, a name, an address, and a phone number.
- Each instrument used in songs recorded at NoFuture has a unique identification number, a description (e.g., guitar, synthesizer, flute) and a musical key (e.g., C, B-flat, E-flat).
- Each album recorded at NoFuture has a unique identification number, a title, a recording date, and a format (e.g., Vinyl, CD, Digital, Multiple).
- Each song recorded at NoFuture has a unique identification number, a title, lyrics, a recording date, and any other additional details.
- Each musician may play several instruments, and a given instrument may be played by several musicians.
- Each album includes multiple songs.
- Each song may appear on (at most) one album.
- Each song is performed by one or more musicians, and a musician may perform a number of songs.
4.1 Connect to a DBMS through RStudio
The first thing we need to do is to connect to our database from RStudio. For this process, we will need to install three new packages:
DBI: provides functions that allow R to connect to database management systems.odbc: provides a DBI-compliant interface to Open Database Connectivity (ODBC) drivers (see here: https://db.rstudio.com/r-packages/odbc/)RODBC: implements ODBC database connectivity. (https://cran.r-project.org/web/packages/RODBC/RODBC.pdf)
install.packages("DBI")
install.packages("odbc")
install.packages("RODBC")
Then, we will need to load these packages along with the tidyverse package in our environment:
library(DBI)
library(odbc)
library(RODBC)
library(tidyverse)
Now, we are ready to explore what drivers our system offers for connecting to a database:
unique(odbcListDrivers()[[1]])## [1] "ODBC Drivers" "ODBC Connection Pooling"
## [3] "MySQL Driver"The output of function
odbcListDrivers()[[1]]will be different in your systems.
In general, to connect to a database management system we need 4 parameters:
- Host address (server address): The IP or the URL of the DBMS.
- Username: The username to connect.
- Password: The password associated with the above username.
- Port: The port number that the DBMS is accepting connections.
Once we have this information, we can call the dbConnect function from the DBI package to create a connection object:
con = DBI::dbConnect(odbc::odbc(),
                    Driver= "MySQL",
                    Server='mysql-isys3350.bc.edu',
                    UID='your_username',
                    PWD= 'your_password',
                    Port= 3306)
You will need to edit the above code to work for your case. Specifically, you will need to (1) replace
MySQL Driverwith the MySQL driver as printed out by theodbcListDrivers()[[1]]command; (2) replaceSys.getenv("dbisys3350host")with the URL of the DBMS; (3) replaceSys.getenv("dbisys3350user")with your username; (4) replaceSys.getenv("dbisys3350pass")with your password; (5) replaceSys.getenv("dbisys3350port")with the DBMS port.
Sys.getenv(). This function uses global system variables that I have already created in my system. You can find more here: https://www.rdocumentation.org/packages/base/versions/3.6.2/topics/Sys.getenv
4.2 CREATE
4.2.1 Create a new schema
To create a new schema we can use the CREATE command:
kokkodis_student with your last name in the following commands.
CREATE SCHEMA kokkodis_student_no_future;
Recall that the term
schemais synonymous to the termdatabasde.
;.
To run SQL commands within an R Mardkown file you will need to create an SQL chunk by typing ```{sql connection=con} and then close it with three left quotes ```.
Insert a new code chunk button and choose SQL.
Now let’s see if the new database we just created shows up. We can view all the available databses in a DBMS as follows:
show databases;| Database |
|---|
| information_schema |
| isys3350 |
| kokkodis_student_db |
| kokkodis_student_no_future |
| music_marketplace |
4.2.2 Create new tables
Once we have the new schema, we can enrich it with new tables through the CREATE TABLE statement:
CREATE TABLE kokkodis_student_no_future.musician (
    SSN INT,
    name VARCHAR(45),
    address VARCHAR(45),
    phone INT,
    musician_id VARCHAR(45),
    PRIMARY KEY (musician_id)
);
We can see whether we actually created this table in our schema with the show tables statement:
show tables in kokkodis_student_no_future;| Tables_in_kokkodis_student_no_future |
|---|
| musician |
And we can further inspect a table with the show columns statement:
show columns in kokkodis_student_no_future.musician;| Field | Type | Null | Key | Default | Extra |
|---|---|---|---|---|---|
| SSN | int(11) | YES | NA | ||
| name | varchar(45) | YES | NA | ||
| address | varchar(45) | YES | NA | ||
| phone | int(11) | YES | NA | ||
| musician_id | varchar(45) | NO | PRI | NA |
4.2.3 Datatypes in SQL
The above CREATE statement has the general form:
CREATE TABLE database_name.table_name (
 column_name_1 data_type
 [, column_name_2 data_type] /*optional*/
 [, table_constraints] /*optional*/
)
In SQL a comment is surrounded by
/*and*/.
Similar to R, SQL has data types. Each column we add in a new table needs to have a data type. The most common data types that we will use are:
VARCHAR(M): Stores variable-length strings up toMcharactersINT: Stores integersDOUBLE: Stores floating-point numbersDATETIME: Stores a date and a time. Its default format isyyyy-mm-dd hh:mm:ssTEXT: Stores text of up to 65KB
4.2.4 Constraints
In the generic CREATE statement there is an optional clause for including table-specific constraints. This is where we can define our primary keys, foreign keys, and any other constraints we want to impose on the table.
For instance, in our example, we included the constraint PRIMARY KEY (musician_id) that identifies column musician_id as the primary key of the new table.
The syntax to define a foreign key is as follows:
[CONSTRAINT constraint_name]
FOREIGN KEY (column_name)
REFERENCES database_name.table_name (column_name)
We will see examples of foreign key definitions in Section 4.5.
4.3 ALTER
Once we have created a table, we can make changes by using the ALTER statement. For instance, we can add a new column as follows:
ALTER TABLE kokkodis_student_no_future.musician
ADD genre VARCHAR(30);
show columns in kokkodis_student_no_future.musician;| Field | Type | Null | Key | Default | Extra |
|---|---|---|---|---|---|
| SSN | int(11) | YES | NA | ||
| name | varchar(45) | YES | NA | ||
| address | varchar(45) | YES | NA | ||
| phone | int(11) | YES | NA | ||
| musician_id | varchar(45) | NO | PRI | NA | |
| genre | varchar(30) | YES | NA |
Similarly, we can drop a column from the table:
ALTER TABLE kokkodis_student_no_future.musician
DROP COLUMN genre;
show columns in kokkodis_student_no_future.musician;| Field | Type | Null | Key | Default | Extra |
|---|---|---|---|---|---|
| SSN | int(11) | YES | NA | ||
| name | varchar(45) | YES | NA | ||
| address | varchar(45) | YES | NA | ||
| phone | int(11) | YES | NA | ||
| musician_id | varchar(45) | NO | PRI | NA |
We can also add and drop constraints:
ALTER TABLE kokkodis_student_no_future.musician
DROP PRIMARY KEY;
show columns in kokkodis_student_no_future.musician;| Field | Type | Null | Key | Default | Extra |
|---|---|---|---|---|---|
| SSN | int(11) | YES | NA | ||
| name | varchar(45) | YES | NA | ||
| address | varchar(45) | YES | NA | ||
| phone | int(11) | YES | NA | ||
| musician_id | varchar(45) | NO | NA |
ALTER TABLE kokkodis_student_no_future.musician
ADD PRIMARY KEY (musician_id);
show columns in kokkodis_student_no_future.musician;| Field | Type | Null | Key | Default | Extra |
|---|---|---|---|---|---|
| SSN | int(11) | YES | NA | ||
| name | varchar(45) | YES | NA | ||
| address | varchar(45) | YES | NA | ||
| phone | int(11) | YES | NA | ||
| musician_id | varchar(45) | NO | PRI | NA |
Note the
PRIidentifier in columnKeythat identifies the primary key (if any) of a table.
4.4 DROP
We can drop a table with the DROP command as follows:
DROP TABLE kokkodis_student_no_future.musician;show tables in kokkodis_student_no_future;| Tables_in_kokkodis_student_no_future |
|---|
Now sometimes, when designing a database, we might need to drop and re-create a table multiple times.
In those cases–and in cases where we are not certain that a table we want to drop exists–we can use the IF EXISTS modifier as follows:
DROP TABLE IF EXISTS kokkodis_student_no_future.musician;4.5 Create all tables
Next, we will create all tables listed in the ERD digram of Figure 4.1:
CREATE TABLE kokkodis_student_no_future.musician (
    SSN INT,
    name VARCHAR(45),
    address VARCHAR(45),
    phone INT,
    musician_id VARCHAR(45),
    PRIMARY KEY (musician_id)
);
CREATE TABLE kokkodis_student_no_future.instrument (
description VARCHAR(100),
instrument_id INT,
music_key VARCHAR(2),
PRIMARY KEY (instrument_id)
);CREATE TABLE kokkodis_student_no_future.album (
title VARCHAR(100),
album_id INT,
album_format VARCHAR(45),
recording_date DATETIME NULL,
PRIMARY KEY (album_id)
);
CREATE TABLE kokkodis_student_no_future.song (
    title VARCHAR(100),
    song_id INT,
    details VARCHAR(100),
    lyrics TEXT,
    recording_date DATETIME,
    album_id INT,
    PRIMARY KEY (song_id),
    CONSTRAINT fk_Song_Album
    FOREIGN KEY (album_id)
    REFERENCES kokkodis_student_no_future.album (album_id)
);
CREATE TABLE kokkodis_student_no_future.musician_has_instrument (
musician_id VARCHAR(45),
instrument_id INT,
PRIMARY KEY (musician_id, instrument_id),
CONSTRAINT fk_musician_id
FOREIGN KEY (musician_id)
REFERENCES kokkodis_student_no_future.musician (musician_id),
CONSTRAINT instrument_id
FOREIGN KEY (instrument_id)
REFERENCES kokkodis_student_no_future.instrument (instrument_id)
);CREATE TABLE kokkodis_student_no_future.musician_has_song (
musician_id VARCHAR(45),
song_id INT,
PRIMARY KEY (musician_id, song_id),
CONSTRAINT fk_musician_id_2
FOREIGN KEY (musician_id)
REFERENCES kokkodis_student_no_future.musician (musician_id),
CONSTRAINT fk_song_id
FOREIGN KEY (song_id)
REFERENCES kokkodis_student_no_future.song (song_id)
);show tables in kokkodis_student_no_future;| Tables_in_kokkodis_student_no_future |
|---|
| album |
| instrument |
| musician |
| musician_has_instrument |
| musician_has_song |
| song |
4.6 Load data into tables
Once we define a table, we can use the INSERT, UPDATE, and DELETE statements to fill it with data.
4.6.1 INSERT
We can use the INSERT statement to add a new row in our table:
INSERT INTO kokkodis_student_no_future.musician VALUES
(123456789, 'Kokkodis', ' 140 Commonwealth Ave', 123456789, 1);
As we will discuss next in Section 2.3.5.1, we can use the SELECT clause to retrieve rows from a table as follows:
SELECT * FROM kokkodis_student_no_future.musician;| SSN | name | address | phone | musician_id |
|---|---|---|---|---|
| 123456789 | Kokkodis | 140 Commonwealth Ave | 123456789 | 1 |
As you can see, in the previous example, we have successfully loaded a single row.
We can also insert multiple rows as follows:
INSERT INTO kokkodis_student_no_future.musician VALUES
(123456789, 'John', ' ',NULL , 2),
(NULL, 'Doe', ' ', 123456789, 3)
;
NULL. (Recall that in R we use NA).
Let us see the results:
SELECT * FROM kokkodis_student_no_future.musician;| SSN | name | address | phone | musician_id |
|---|---|---|---|---|
| 123456789 | Kokkodis | 140 Commonwealth Ave | 123456789 | 1 |
| 123456789 | John | NA | 2 | |
| NA | Doe | 123456789 | 3 |
4.6.2 UPDATE
We can update an existing row in a table with the UPDATE statement as follows:
UPDATE kokkodis_student_no_future.musician
SET  SSN = 1
WHERE musician_id=3
;
SELECT * FROM kokkodis_student_no_future.musician| SSN | name | address | phone | musician_id |
|---|---|---|---|---|
| 123456789 | Kokkodis | 140 Commonwealth Ave | 123456789 | 1 |
| 123456789 | John | NA | 2 | |
| 1 | Doe | 123456789 | 3 |
WHERE clause in detail in Section 5.1.2.
4.6.3 DELETE
Finally, we can delete a row that we no longer need with the DELETE statement:
DELETE from kokkodis_student_no_future.musician
WHERE musician_id=3
;
SELECT * FROM kokkodis_student_no_future.musician| SSN | name | address | phone | musician_id |
|---|---|---|---|---|
| 123456789 | Kokkodis | 140 Commonwealth Ave | 123456789 | 1 |
| 123456789 | John | NA | 2 |
For comments, suggestions, errors, and typos, please email me at: kokkodis@bc.edu