Chapter 13 Standard Website with Leaflet Project
13.1 Get the HTML Template
Back in Chapter 4 we inserted a Leaflet map into a pale looking website. Taking that exercises a little further, we would like to demonstrate how Leaflet can be added to a standard, professional looking HTML website. This chapter will train you how to insert a Leaflet map into your company’s, client’s or even colleague’s website.
The template used in this exercise was acquired from Free CSS.com and is available here. Extract the files and take a look at the HTML documents. That is, the index.html, about.html, contact.html, courses.html, team.html and testimonial.html files. Pay special attention to the <head> element and the <div> containing the Gallery section of the website. The Gallery <div> looks like so:
<div class="col-lg-3 col-md-6">
                    <h4 class="text-white mb-3">Gallery</h4>
                    <div class="row g-2 pt-2">
                        <div class="col-4">
                            <img class="img-fluid bg-light p-1" src="img/course-1.jpg" alt="">
                        </div>
                        <div class="col-4">
                            <img class="img-fluid bg-light p-1" src="img/course-2.jpg" alt="">
                        </div>
                        <div class="col-4">
                            <img class="img-fluid bg-light p-1" src="img/course-3.jpg" alt="">
                        </div>
                        <div class="col-4">
                            <img class="img-fluid bg-light p-1" src="img/course-1.jpg" alt="">
                        </div>
                    </div>
                </div>
Here is where the Gallery in the eLearning webpage is situated (bounded in red).
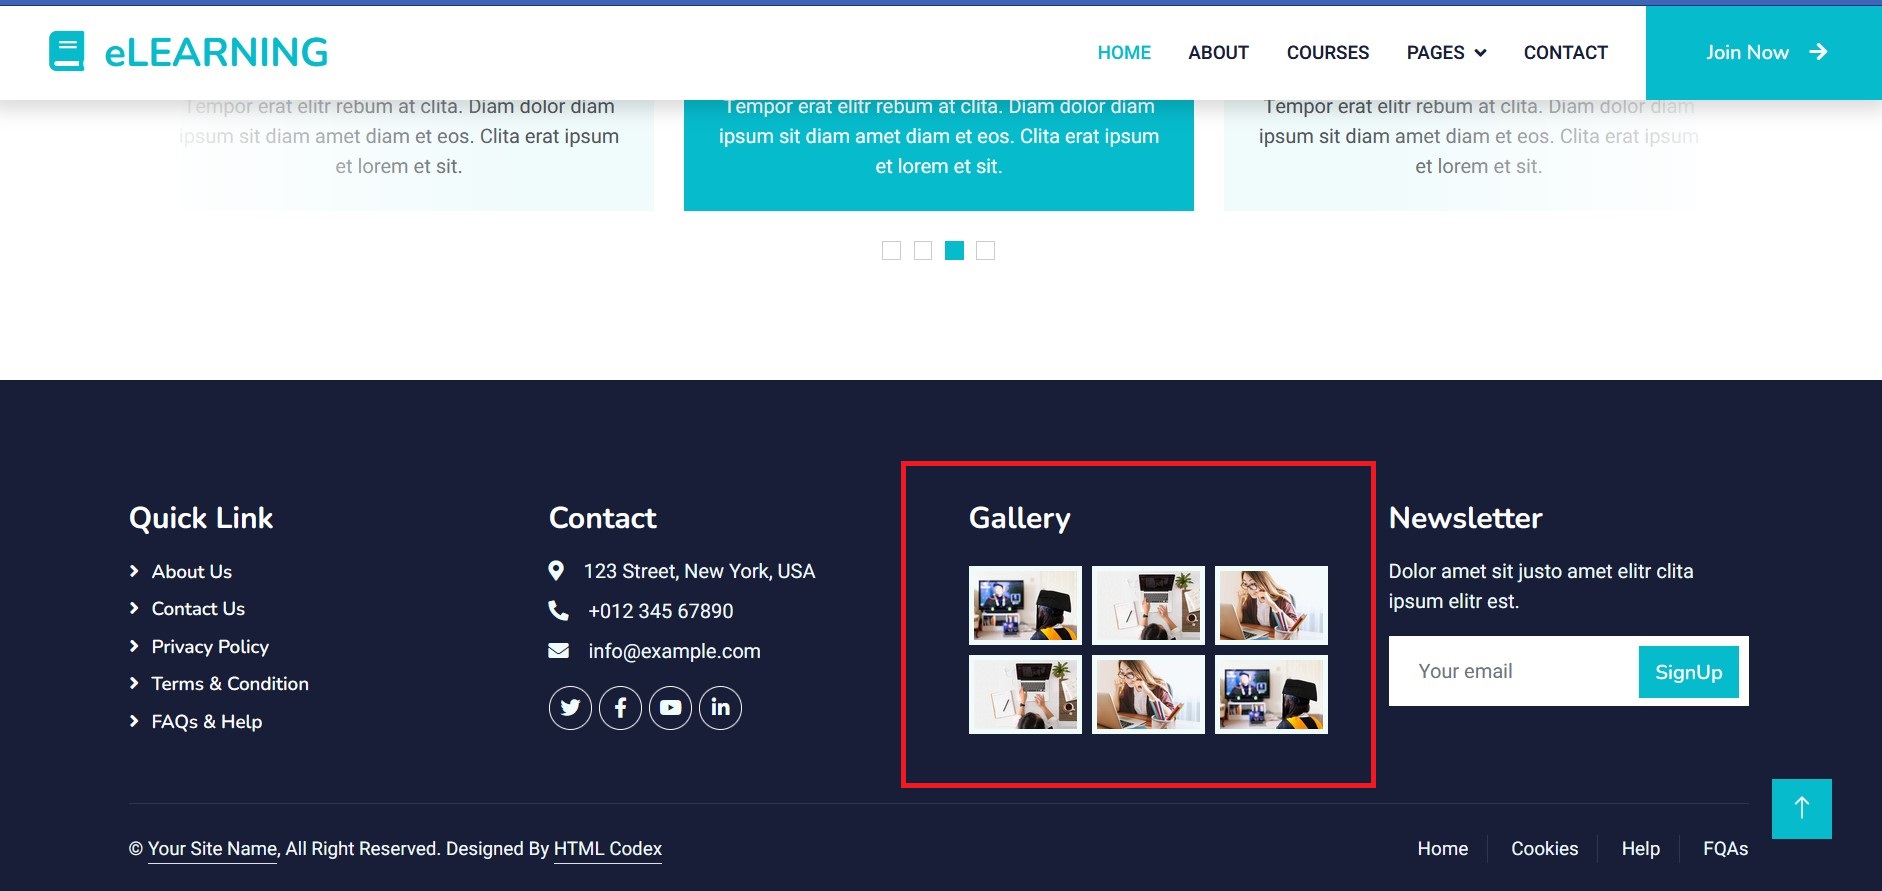
Why do we want to change the gallery, or rather, to insert a Leaflet map in its place? It seemed a good idea to replace the pretty looking pictures with a webmap since this website is for demonstration purposes only.
13.2 Embed Leaflet to standard html website
Since we want to integrate a Leaflet map to the eLearning website, we will have to load the requisite Leaflet links and scripts to the eLearning dummy website’s <head> element, just like we used to do to our map.html. Thereafter, we shall replace the entire gallery section with just one <div> that references one of our many Leaflet JavaScript files.
Ready? Let’s go.
Assuming you are working on VSCode, copy all the plugin files for Leaflet, such as the Leaflet.markercluster-master folder and all the others you have extracted at one point or another in previous chapters. The names of these folders are enclosed with a red border in the image below.
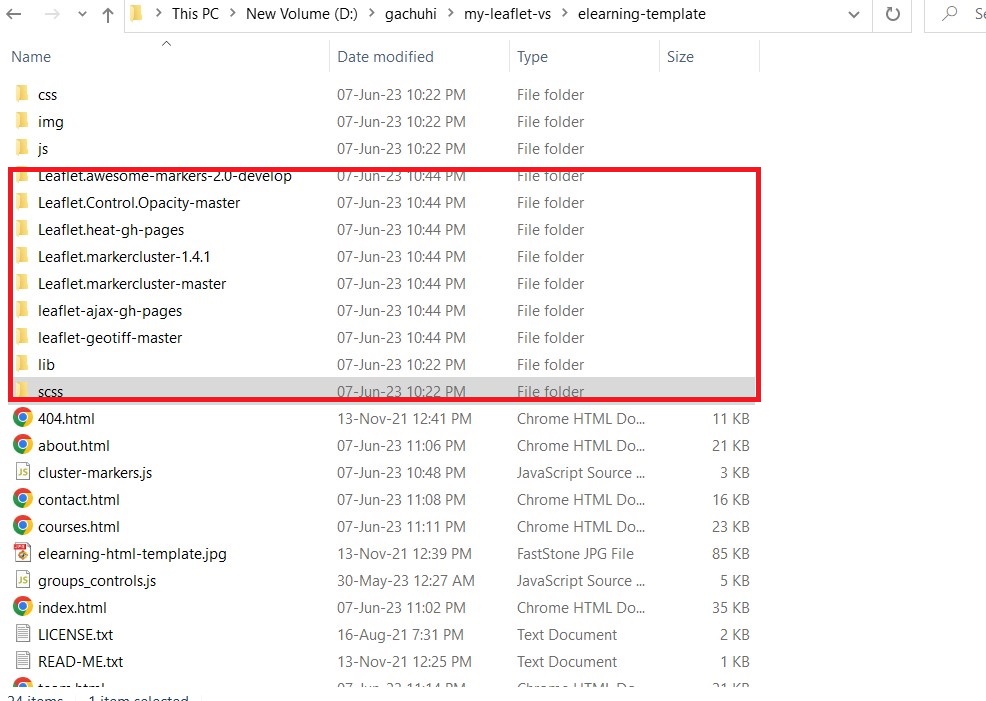
Why are we ensuring that the Leaflet plugin folders are in the same directory as our eLearning template files? It is because we want to avoid the need of tinkering with the relative path, which has to change if the (plugin) folders were located in a different directory from that of our eLearning website.
Go to the index.html file of your eLearning template. From the <head> to </head> tags, replace the existing code with the following:
<meta charset="utf-8">
    <!-- For leaflet and mobile compatibility -->
    <meta name="viewport" content="width=device-width, initial-scale=1.0, maximum-scale=1.0, user-scalable=no" />

    <title>eLEARNING - eLearning HTML Template</title>
    <meta content="width=device-width, initial-scale=1.0" name="viewport">
    <meta content="" name="keywords">
    <meta content="" name="description">

    <!-- Favicon -->
    <link href="img/favicon.ico" rel="icon">

    <!-- Google Web Fonts -->
    <link rel="preconnect" href="https://fonts.googleapis.com">
    <link rel="preconnect" href="https://fonts.gstatic.com" crossorigin>
    <link href="https://fonts.googleapis.com/css2?family=Heebo:wght@400;500;600&family=Nunito:wght@600;700;800&display=swap" rel="stylesheet">

    <!-- Icon Font Stylesheet -->
    <link href="https://cdnjs.cloudflare.com/ajax/libs/font-awesome/5.10.0/css/all.min.css" rel="stylesheet">
    <link href="https://cdn.jsdelivr.net/npm/bootstrap-icons@1.4.1/font/bootstrap-icons.css" rel="stylesheet">

    <!-- Libraries Stylesheet -->
    <link href="lib/animate/animate.min.css" rel="stylesheet">
    <link href="lib/owlcarousel/assets/owl.carousel.min.css" rel="stylesheet">

    <!-- Customized Bootstrap Stylesheet -->
    <link href="css/bootstrap.min.css" rel="stylesheet">

    <!-- Template Stylesheet -->
    <link href="css/style.css" rel="stylesheet">

    <!-- For leaflet -->
    <link rel="stylesheet" href="https://unpkg.com/leaflet@1.9.3/dist/leaflet.css"
        integrity="sha256-kLaT2GOSpHechhsozzB+flnD+zUyjE2LlfWPgU04xyI="
        crossorigin=""/>
    <link rel="stylesheet" href="Leaflet.Control.Opacity-master\Leaflet.Control.Opacity-master\dist\L.Control.Opacity.css">
    <!-- For Leaflet marker clusters -->
    <link rel="stylesheet" href="Leaflet.markercluster-master\Leaflet.markercluster-master\dist\MarkerCluster.Default.css">

    <!-- For leaflet scripts -->
    <script src="https://unpkg.com/leaflet@1.9.3/dist/leaflet.js"
        integrity="sha256-WBkoXOwTeyKclOHuWtc+i2uENFpDZ9YPdf5Hf+D7ewM="
        crossorigin=""></script>
    <script src="leaflet-ajax-gh-pages\dist\leaflet.ajax.js"></script>
    <script src="leaflet-ajax-gh-pages\dist\leaflet.ajax.min.js"></script>
    <script src="leaflet-ajax-gh-pages\example\leaflet.spin.js"></script>
    <script src="leaflet-ajax-gh-pages\example\spin.js"></script>
    <script src="Leaflet.heat-gh-pages\Leaflet.heat-gh-pages\dist\leaflet-heat.js"></script>
    <script src="https://ajax.googleapis.com/ajax/libs/jquery/2.1.4/jquery.min.js"></script>
    <!-- For leaflet cluster markers -->
    <script src="Leaflet.markercluster-1.4.1\Leaflet.markercluster-1.4.1\dist\leaflet.markercluster.js"></script>
    <script src="Leaflet.markercluster-1.4.1\Leaflet.markercluster-1.4.1\dist\leaflet.markercluster-src.js"></script>
The first alteration we will do to our eLearning website’s HTML folder is to add the relevant Leaflet <link> and <script> tags. These <link> and <script> tags have just been copy pasted from the map.html file we have been dealing with so far.
Now that we have the requisite <link> and <script> tags to embed Leaflet into our eLeaflet demo website, we only need to insert the path to our JavaScript file containing the Leaflet code. The JavaScript is of course responsible for firing up the Leaflet map in our eLearning website. For this exercise, we shall use the cluster_markers.js file we have had so much fun with. Copy paste this file into the same folder containing your eLeaflet website’s folders.
Alright.
Time to add the leaflet map. Where? At the gallery section.
As a reminder, it looks like this:
<div class="col-lg-3 col-md-6">
                    <h4 class="text-white mb-3">Gallery</h4>
                    <div class="row g-2 pt-2">
                        <div class="col-4">
                            <img class="img-fluid bg-light p-1" src="img/course-1.jpg" alt="">
                        </div>
                        <div class="col-4">
                            <img class="img-fluid bg-light p-1" src="img/course-2.jpg" alt="">
                        </div>
                        <div class="col-4">
                            <img class="img-fluid bg-light p-1" src="img/course-3.jpg" alt="">
                        </div>
                        <div class="col-4">
                            <img class="img-fluid bg-light p-1" src="img/course-2.jpg" alt="">
                        </div>
                        <div class="col-4">
                            <img class="img-fluid bg-light p-1" src="img/course-3.jpg" alt="">
                        </div>
                        <div class="col-4">
                            <img class="img-fluid bg-light p-1" src="img/course-1.jpg" alt="">
                        </div>
                    </div>
                </div>
You may have to scroll really down to locate it. Right under the <h4 class="text-white mb-3">Gallery</h4> tag, replace it with the following code, all the way to the <div> tag after <img class="img-fluid bg-light p-1" src="img/course-1.jpg" alt="">.
<div id="myMap">
                        <script src="cluster-markers.js">

                        </script>
                    </div>
Perhaps an image will clarify matters a bit. This is where you are to insert the path to your cluster-markers.js file.
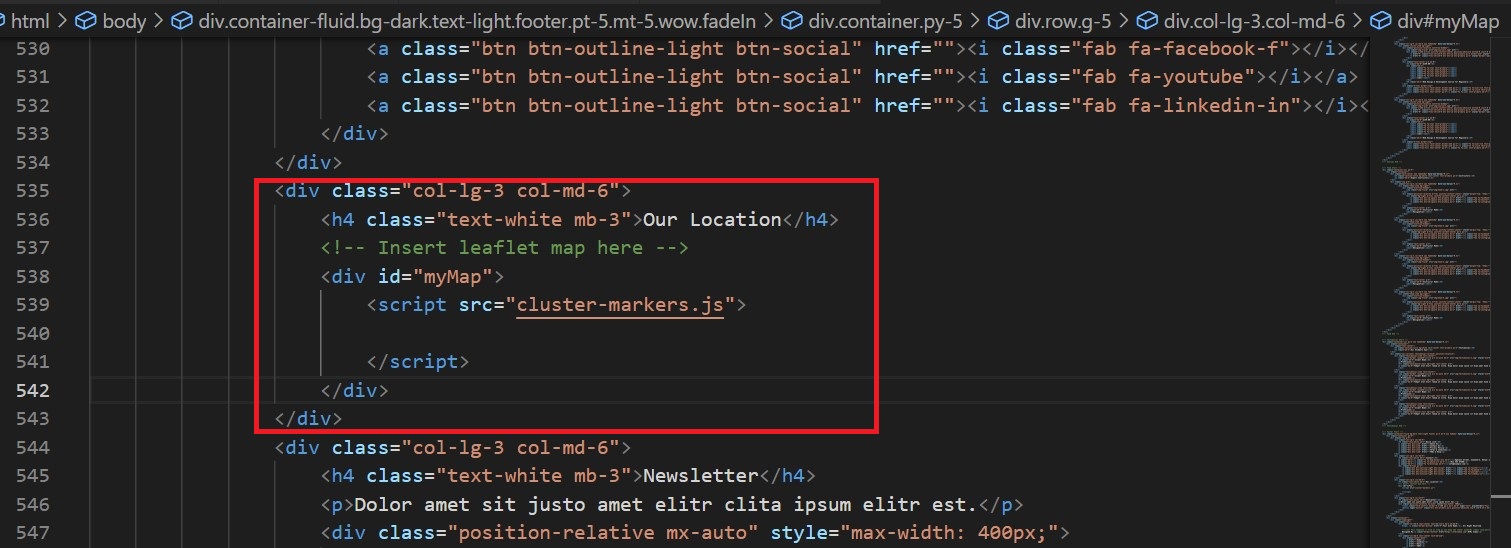
Also as a heads up, remember to replace the <h4> tags with the statement Our Location. It’s no longer a gallery but a webmap!
As if that was not enough, we also have to set the CSS properties for our Leaflet map.
13.3 Editing the CSS
Open the style.css file of your eLearning template in your text editor (such as VS code). The path to the CSS file is as follows:
elearning-template\css\style.cssScroll down to the very bottom of style.css and paste the following CSS properties for our Leaflet map.
#myMap {
    height: 400px;
    width: auto;
}
Remember the # and the text that follows references the specific name of that ID attribute from the countless HTML tags in index.html. The above CSS selector references the <div> with the ID– #myMap.
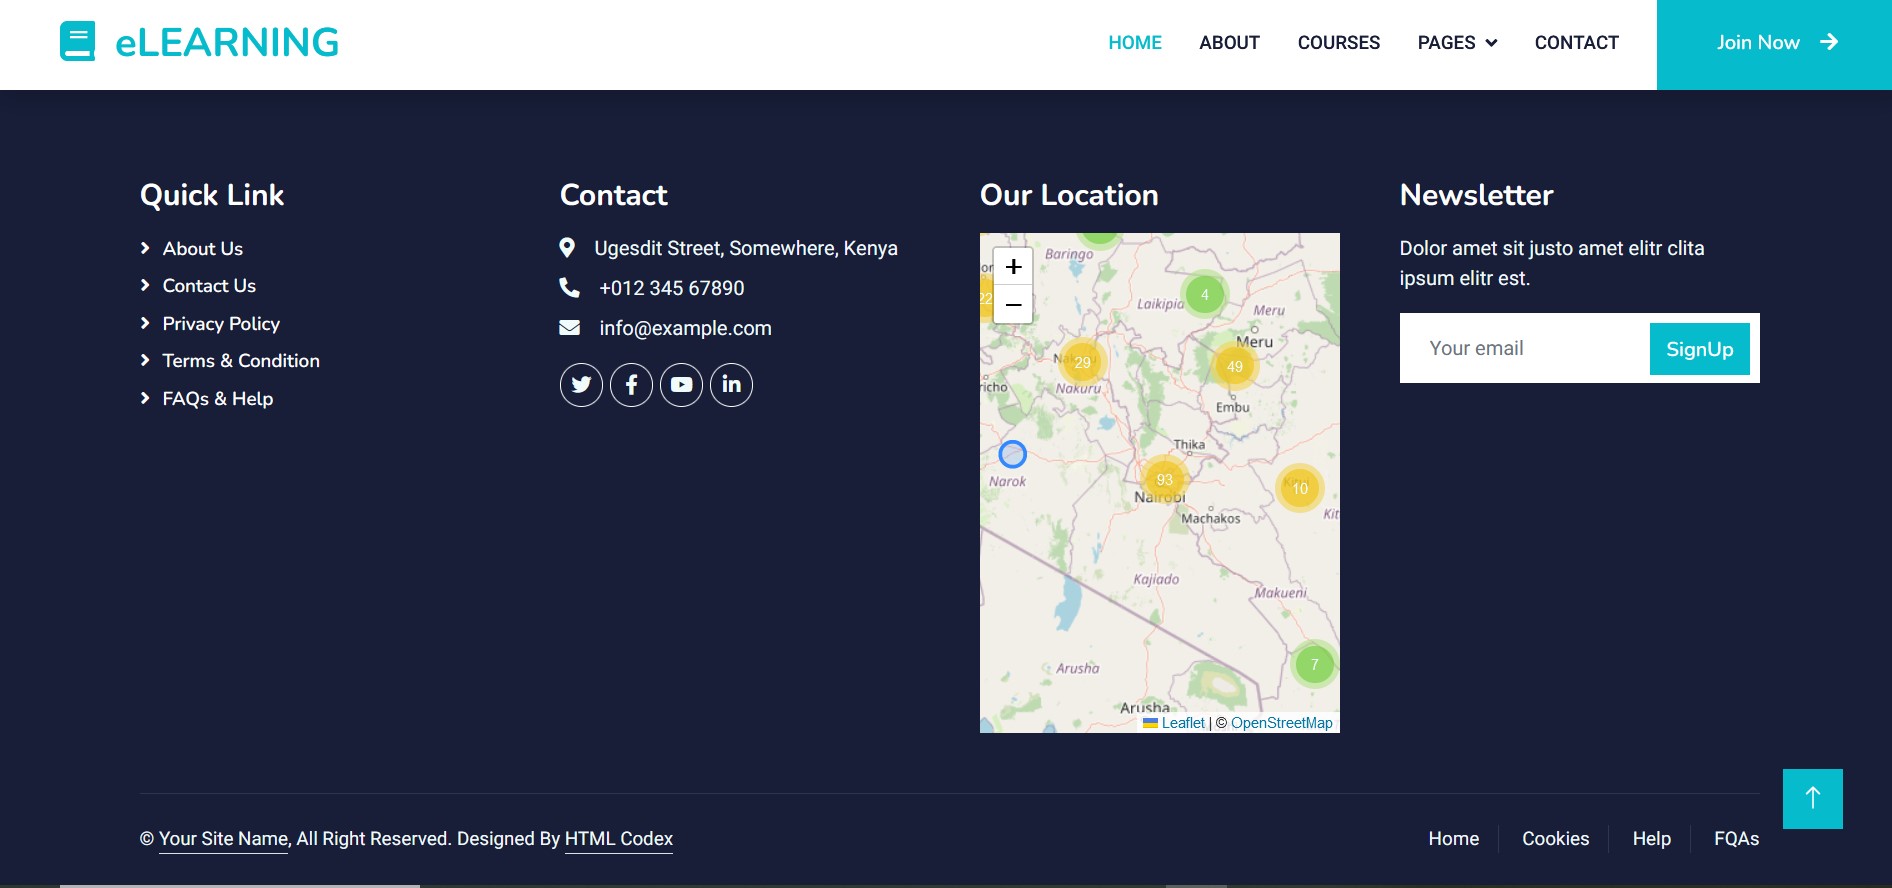
After reloading index.html, this is how our Leaflet map looks inside the eLearning template.
Good.
13.4 Embedding Leaflet to every webpage
Now click the About, Courses, Pages/Our Team, Pages/Testimonial and Contact web pages. Is the Leaflet map there in each case? No. It’s the same ol’ gallery. Imagine you will have to replace the <head> and Gallery <div> elements of the respective about.html, courses.html, team.html, testimonial.html and contact.html webpages here as well with the relevant Leaflet paths! Luckily, since you have hopefully got the gist of it, the following link contains the eLearning folder with Leaflet map embedded in all the aforementioned webpages.
13.5 Posting the Html website to the world
This chapter will leave out the details of saving your files to Github. Nevertheless, as mentioned in Chapter 11, the name index in your HTML file is automatically considered the root HTML file by Github. With that said, here is the link to our eLearning website with a Leaflet webmap embedded therein.
13.6 Summary
Having the necessary Leaflet folders in the same directory as your HTML website’s files prevents the Leaflet map from failing to load due to a broken path. Here are other lesson’s we have encountered.
In order to embed a Leaflet map into your website, you have to load the requisite Leaflet
<link>and<script>tags into your<head>and where necessary,<div>elements.Insert the JavaScript code that fires up your Leaflet using the
<script>tags. This was the method used to insert the JavaScript filecluster-markers.jsinto the eLeaflet dummy website.It is also important to ensure your Leaflet map appears in the right place in all the child webpages. For example, Leaflet also had to be embedded in the webpages of
about.html,courses.html,team.html,testimonial.htmlandcontact.htmlat the Gallery section just as it was done for their parent file–index.html.