1 Uploading Data
This section guides you through the seamless process of uploading and managing your data within the EGM Shiny Application.
1.1 Data Preparation
- Impact Evaluation and Systematic Review Data: Obtain these from the 3ie DEP portal, noting the application’s 20 MB file size limit. For larger datasets, consider filtering by specific project IDs or running the analysis locally.
- EGM coding mapping : Create separate sheets named ‘intervention_variable’ and ‘outcome_variable’. Each should contain two columns: ‘intervention’ for broad categories, and ‘intervention_combined’ for detailed subcodes.
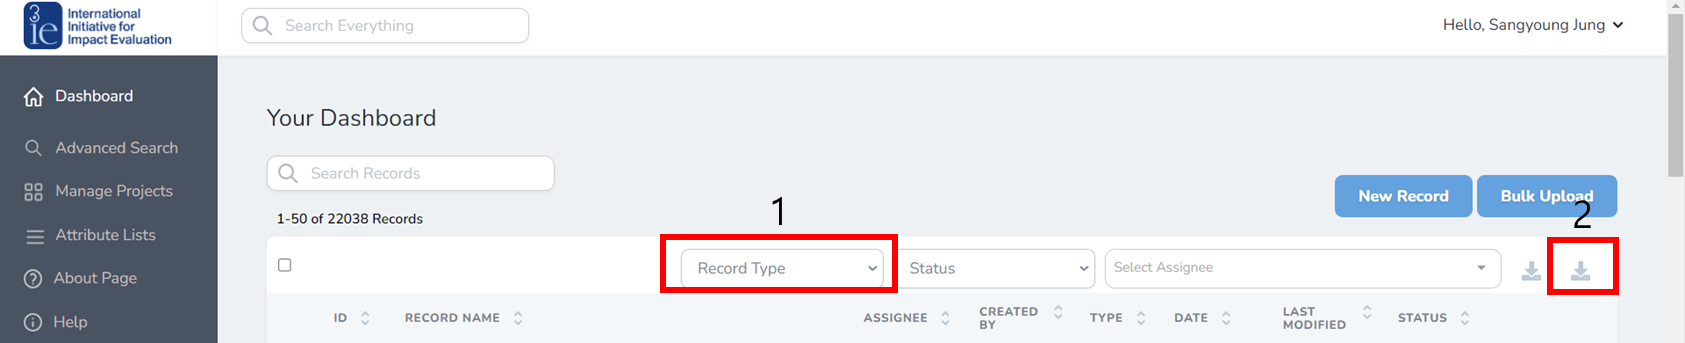
📝 Note 1 - 3iE record export
To extract data from 3iE, first choose ‘Impact Evaluation’ or ‘Systematic Review’ from the ‘Record Type’ dropdown menu. After making your selection, click the download icon located to the right to initiate the download process.
📝 Note 2 - Example of EGM coding
Ensure that you create sheets named ‘intervention_variable’ and ‘outcome_variable’. In the ‘intervention_variable’ sheet, there should be columns titled ‘intervention’ for broader intervention categories and ‘intervention_combined’ for detailed intervention subcodes. Similarly, the ‘outcome_variable’ sheet should have columns named ‘outcome’ and ‘outcome_combined’ for broader and more detailed outcome classifications, respectively.

1.2 Data Quality Assessment (Part A)
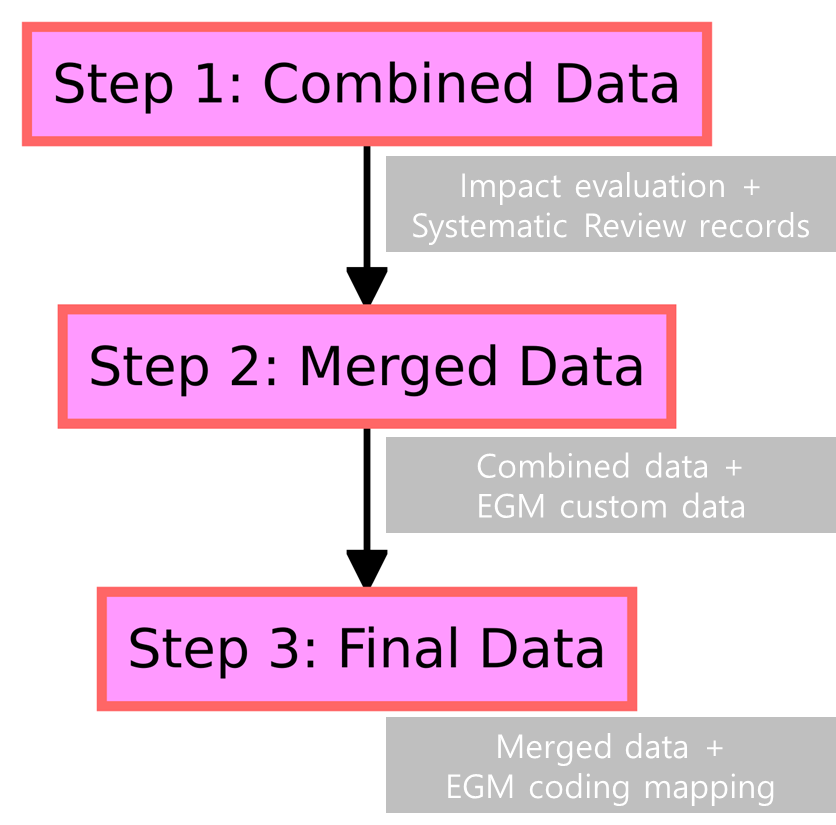
Step 1: Combine IER and SRR Data : Begin by merging Impact Evaluation (IER) and Systematic Review (SRR) records. This first step is essential if you’re starting the data merge from scratch. Upload your IER and SRR files, ensuring each is under the 20 MB limit, and then click “Use these data for the second step”.
Step 2: Merge DEP with EGM Data : Combine your DEP data (IER + SRR) with the EGM custom data. After processing your data in Step 1, upload the necessary files here and proceed by selecting “Use these data for the third step.”
Step 3: Applying EGM Coding : Utilize the combined dataset to apply your specific EGM coding map, finalizing the data preparation. If you already have a merged dataset ready, you can begin directly with this step. Simply add your EGM coding map to the existing data.
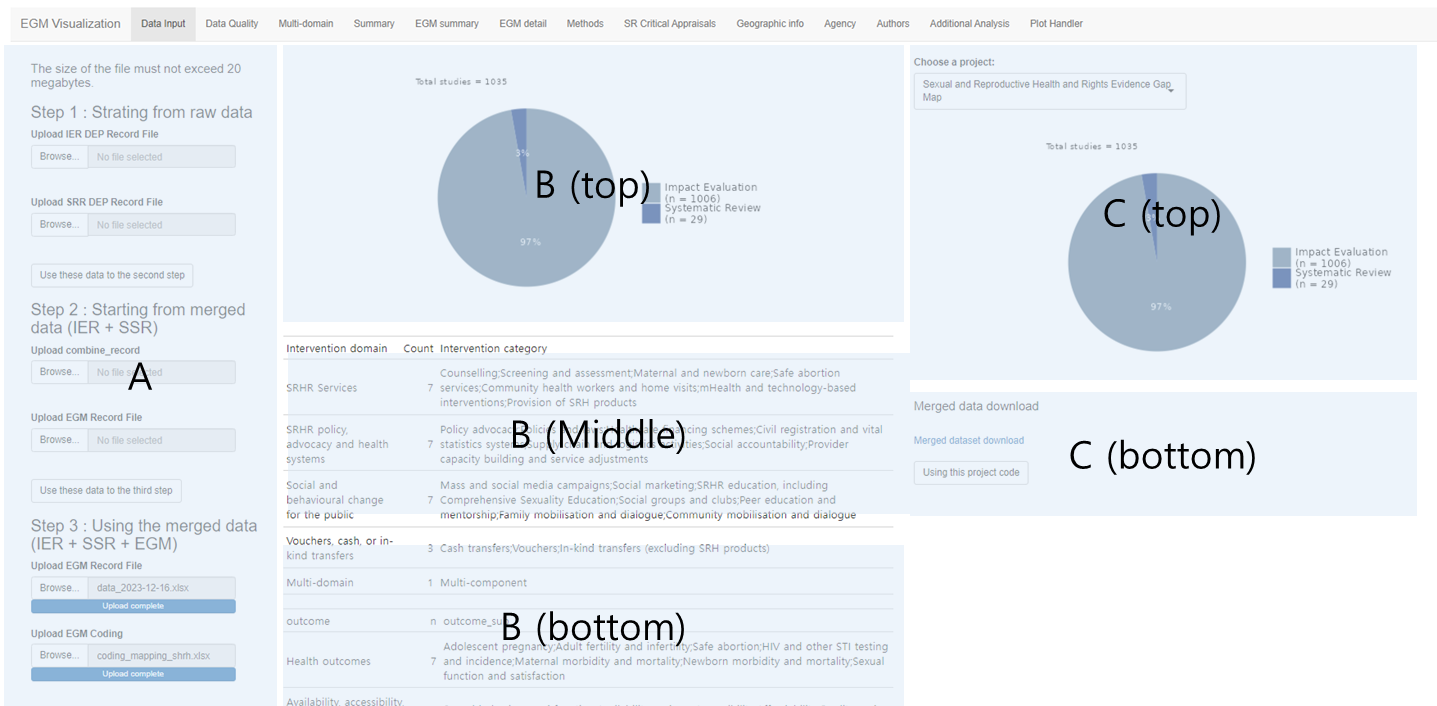
1.3 Monitoring the Merge Quality (Part B)
Part B top (Proportion Visualization) : This visual represents the ratio of Impact Evaluations to Systematic Reviews and aligns with the pie chart in the right panel if you are utilizing Step 3.
Part B middle (DEP and EGM Data Comparison) : Compare the merged DEP dataset with the EGM custom coding here. For quality assurance, the IDs should match across both datasets. Any discrepancies will be flagged in this section.
Part B bottom (EGM Coding Overview) : A summary table here displays the frequency counts for each intervention or outcome code within the EGM coding map, allowing for a quick data verification.
1.4 Project Selection and Data Export (Part C)
Part C top (Project Selection) : Choose a project from the list to view the corresponding data distribution between Impact Evaluation and Systematic Review.
Part C bottom (Project Confirmation and Data Export) : Upon choosing a project ID, the finalized dataset becomes ready for download. To finalize your project selection and proceed to the next stage of analysis, click the “Using this project” button. Activating this button will update the title to display the chosen project’s name, the count of studies included, and the unit of analysis selected.
📝 Note 3 - Missing values in intervention and outcome code
The error message indicates that there is an inconsistency in the dataset on the right bottom: certain records are lacking either intervention or outcome codes. The custom fields in the DEP require a corresponding number of intervention and outcome codes for each entry. When such a mismatch occurs — for instance, if a record contains an intervention code without an accompanying outcome code — this alert is triggered to signal the discrepancy. In this case, It specifically mentions that there are 87 records with missing information, providing a direct option to download the data that requires attention for further review and correction.

1.5 Takeaways
Ensure that input files are smaller than 20 MB
Use the middle panel to check the quality of the merged data.
Select your project and confirm by clicking “Using this project code.”
Export the data for subsequent analysis steps