3.8 Version Control and GitHub
The objective of this section is:
- Create create a GitHub repository for an R package
GitHub allows you to post and interact with online code repositories, where all repositories are under git version control. You can post R packages on GitHub and, with the install_github function from the devtools package, install R packages directly from GitHub. GitHub can be particularly useful for collaborating with others on R packages, as it allows all collaborators to push and pull code between their personal computers and a GitHub repository. While git historically required you to leave R and run git functions at a command line, RStudio now has a number of features that make it easier to interface directly with GitHub.
When using git and GitHub, there are three levels of tasks you’ll need to do:
- Initial set-up— these are things you will only need to do once (at least per computer).
- Download git
- Configure git with your user name and email
- Set up a GitHub account
- Set up a SSH key to link RStudio on your personal computer with your GitHub account
- Set-up of a specific repository— these are things you will need to do every time you create a new repository, but will only need to do once per repository.
- Initialize the directory on your personal computer as a git repository
- Make an initial commit of files in the repository
- Create an empty GitHub repository
- Add the GitHub repository as a remote branch of the local repository
- Push the local repository to the GitHub remote branch
- (If you are starting from a GitHub repository rather than a local repository, either clone the repository or fork and clone the repository instead.)
- Day-to-day workflow for a repository— these are things you will do regularly as you develop the code in a repository.
- Commit changes in files in the repository to save git history locally
- Push committed changes to the GitHub remote branch
- Pull the latest version of the GitHub remote branch to incorporate changes from collaborators into the repository code saved on your personal computer
- Write and resolve “Issues” with the code in the repository
- Fix any merge conflicts that come up between different collaborators’ code edits
- If the repository is a fork, keep up-to-date with changes in the upstream branch
Each of these elements are described in detail in this section. More generally, this section describes how to use git and GitHub for version control and collaboration when building R packages.
3.8.1 git
Git is a version control system. When a repository is under git version control, information about all changes made, saved, and committed on any non-ignored file in a repository is saved. This allows you to revert back to previous versions of the repository and search through the history for all commits made to any tracked files in the repository. If you are working with others, using git version control allows you to see every change made to the code, who made it, and why (through the commit messages).
You will need git on your computer to create local git repositories that you can sync with GitHub repositories. Like R, git is open source. You can download it for different operating systems.
After downloading git but before you use it, you should configure it. For example, you should make sure it has your name and email address. You can configure git from a bash shell (for Macs, you can use “Terminal,” while for PCs you can use GitBash, which comes with the git installation).
You can use git config functions to configure your version of git. Two changes you should make are to include your name and email address as the user.name and user.email. For example, the following code, if run in a bash shell, would configure a git account for a user named “Jane Doe” who has a generic email address:
git config --global user.name "Jane Doe"
git config --global user.email "jane.doe@university.edu"
Once you’ve installed git, you should restart RStudio so RStudio can identify that git is now available. Often, just restarting RStudio will be enough. However, in some cases, you may need to take some more steps to activate git in RStudio. To do this, go to “RStudio” -> “Preferences” -> “Git/SVN.” Choose “Enable version control.” If RStudio doesn’t automatically find your version of git in the “Git executable” box (you’ll known it hasn’t if that box is blank), browse for your git executable file using the “Browse” button beside that box. If you aren’t sure where your git executable is saved, try opening a bash shell and running which git, which should give you the filepath if you have git installed.
3.8.2 Initializing a git repository
You can initialize a git repository either using commands from a bash shell or directly from RStudio. First, to initialize a git repository from a bash shell, take the following steps:
- Use a shell (“Terminal” on Macs) to navigate to to that directory. You can use
cdto do that (similar tosetwdin R). - Once you are in the directory, first check that it is not already a git repository. To do that, run
git status. If you get the messagefatal: Not a git repository (or any of the parent directories): .git, it is not yet a git repository. If you do not get an error fromgit status, the directory is already a repository, so you do not need to initialize it. - If the directory is not already a git repository, run
git initto initialize it as a repository.
For example, if I wanted to make a directory called “example_analysis,” which is a direct subdirectory of my home directory, a git repository, I could open a shell and run:
cd ~/example_analysis
git init
You can also initialize a directory as a git repository through R Studio. To do that, take the following steps:
- Make the directory an R Project. If the directory is an R package, it likely already has an
.Rprojfile and so is an R Project. If the directory is not an R Project, you can make it one from RStudio by going to “File” -> “New Project” -> “Existing Directory,” and then navigate to the directory you’d like to make an R project. - Open the R project.
- Go to “Tools” -> “Version Control” -> “Project Setup.”
- In the box for “Version control system,” choose “Git.”
I> If you do not see “Git” in the box for “Version control system,” it means either that you do not have git installed on your computer or that RStudio was unable to find it. If so, see the earlier instructions for making sure that RStudio has identified the git executable.
Once you initialize the project as a git repository, you should have a “Git” window in one of your RStudio panes (top right pane by default). As you make and save changes to files, they will show up in this window for you to commit. For example, Figure ?? is what the Git window in RStudio looks like when there are changes to two files that have not yet been committed.
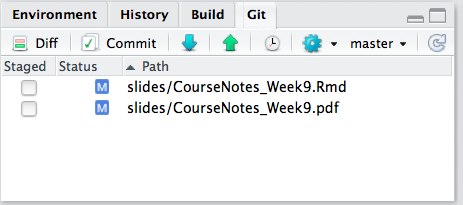
Example of a git window in RStudio when files in the repository have been changed and saved, but the changes haven’t yet been committed to git.
3.8.3 Committing
When you want git to record changes, you commit the files with the changes. Each time you commit, you have to include a short commit message with some information about the changes. You can make commits from a shell. However, the easiest workflow for an R project, including an R package directory, is to make git commits directly from the RStudio environment.
To make a commit from RStudio, click on the “Commit” button in the Git window. That will open a separate commit window that looks like Figure ??.
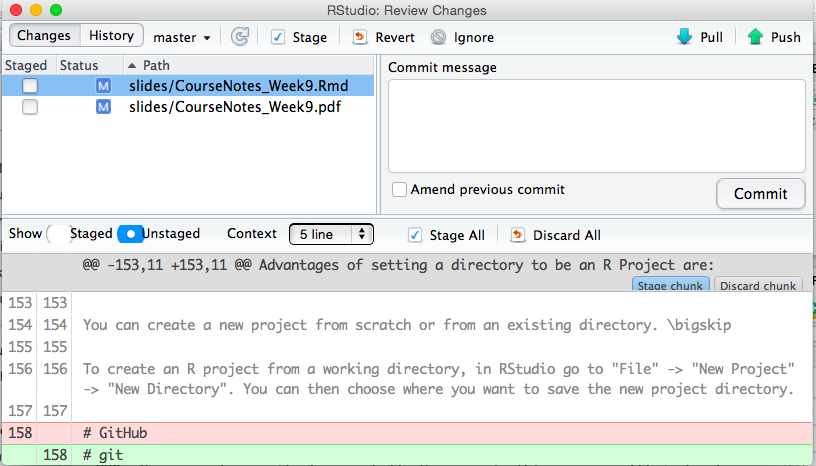
Example of an RStudio commit window.
In this window, to commit changes:
- Click on the boxes by the filenames in the top left panel to select the files to commit.
- If you’d like, you can use the bottom part of the window to look through the changes you are committing in each file.
- Write a message in the “Commit message” box in the top right panel. Keep the message to one line in this box if you can. If you need to explain more, write a short one-line message, skip a line, and then write a longer explanation.
- Click on the “Commit” button on the right.
Once you commit changes to files, they will disappear from the Git window until you make and save more changes.
3.8.4 Browsing history
On the top left of the Commit window, you can toggle to “History.” This window allows you to explore the history of commits for the repository. Figure ?? shows an example of this window. The top part of this window lists commits to the repository, from most recent to least. The commit message and author are shown for each commit. If you click on a commit, you can use the bottom panel to look through the changes made to that file with a specific commit.
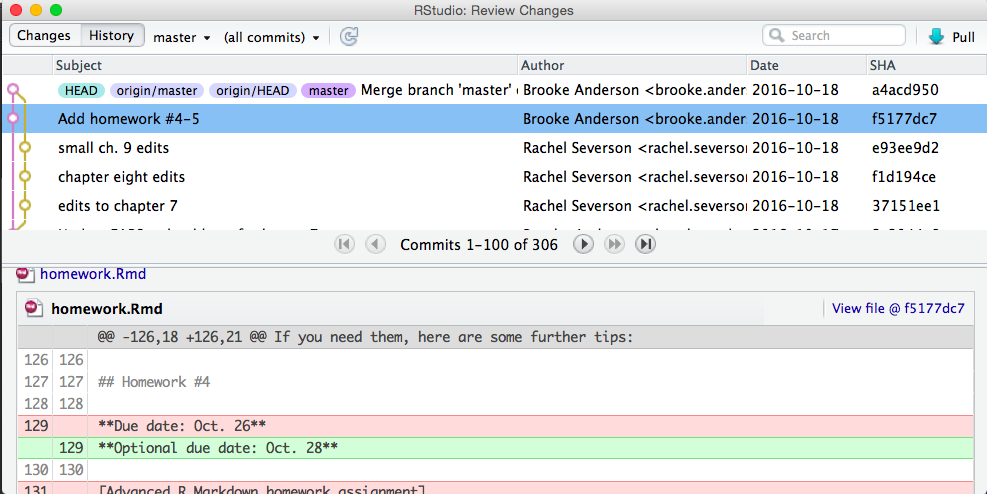
Example of the History window for exploring git commit history in RStudio.
3.8.5 Linking local repo to GitHub repo
GitHub allows you to host git repositories online. This allows you to:
- Work collaboratively on a shared repository
- Fork someone else’s repository to create your own copy that you can use and change as you want
- Suggest changes to other people’s repositories through pull requests
To do any of this, you will need a GitHub account. You can sign up at https://github.com. A free account is fine as long as you don’t mind all of your repositories being “Public” (viewable by anyone).
The basic unit for working in GitHub is the repository. A repository is a directory of files with some supplemental files saving some additional information about the directory. While R Projects have this additional information saved as an “.RProj” file, git repositories have this information in a directory called “.git.”
I> Because this pathname of the .git directory starts with a dot, it won’t show up in many of the ways you list files in a directory. From a bash shell, you can see files that start with . by running ls -a from within that directory.
If you have a local directory that you would like to push to GitHub, these are the steps to do it. First, you need to make sure that the directory is under git version control. See the previous notes on initializing a repository. Next, you need to create an empty repository on GitHub to sync with your local repository. To do that:
- In GitHub, click on the “+” in the upper right corner (“Create new”).
- Choose “Create new repository.”
- Give your repository the same name as the local directory you’d like to connect it to. For example, if you want to connect it to a directory called “example_analysis” on your computer, name the repository “example_analysis.” (It is not required for your GitHub repository name to be identical to your local repository name, but it will make things easier.)
- Leave everything else as-is (unless you’d like to add a short description in the “Description” box). Click on “Create repository” at the bottom of the page.
Now you are ready to connect the two repositories. First, you should change some settings in RStudio so GitHub will recognize that your computer can be trusted, rather than asking for you password every time. Do this by adding an SSH key from RStudio to your GitHub account with the following steps:
- In RStudio, go to “RStudio” -> “Preferences” -> “Git / svn.” Choose to “Create RSA key.”
- Click on “View public key.” Copy everything that shows up.
- Go to your GitHub account and navigate to “Settings.” Click on “SSH and GPG keys.”
- Click on “New SSH key.” Name the key something like “mylaptop.” Paste in your public key in the “Key box.”
3.8.6 Syncing RStudio and GitHub
Now you’re ready to push your local repository to the empty GitHub repository you created.
- Open a shell and navigate to the directory you want to push. (You can open a shell from RStudio using the gear button in the Git window.)
- Add the GitHub repository as a remote branch with the following command (this gives an example for adding a GitHub repository named “ex_repo” in my GitHub account, “geanders”):
git remote add origin git@github.com:geanders/ex_repo.gitAs a note, when you create a repository in GitHub, GitHub will provide suggested git code for adding the GitHub repository as the “origin” remote branch to a repository. That code is similar to the code shown above, but it uses “https://github.com” rather than “git@github.com”; the latter tends to work better with RStudio.
- Push the contents of the local repository to the GitHub repository.
git push -u origin masterTo pull a repository that already exists on GitHub and to which you have access (or that you’ve forked and so have access to the forked branch), first use cd from a bash shell on your personal computer to move into the directory where you want to put the repository. Then, use the git clone function to clone the repository locally. For example, to clone a GitHub repository called “ex_repo” posted in a GitHub account with the user name janedoe, you could run:
git clone git@github.com:janedoe/ex_repo.gitOnce you have linked a local R project with a GitHub repository, you can push and pull commits using the blue down arrow (pull from GitHub) and green up arrow (push to GitHub) in the Git window in RStudio (see Figure ?? to see examples of these arrows).
GitHub helps you work with others on code. There are two main ways you can do this:
- Collaborating: Different people have the ability to push and pull directly to and from the same repository. When one person pushes a change to the repository, other collaborators can immediately get the changes by pulling the latest GitHub commits to their local repository.
- Forking: Different people have their own GitHub repositories, with each linked to their own local repository. When a person pushes changes to GitHub, it only makes changes to his own repository. The person must issue a pull request to another person’s fork of the repository to share the changes.
3.8.7 Issues
Each original GitHub repository (i.e., not a fork of another repository) has a tab for “Issues.” This page works like a Discussion Forum. You can create new “Issue” threads to describe and discuss things that you want to change about the repository.
Issues can be closed once the problem has been resolved. You can close issues on the “Issue” page with the “Close issue” button. If a commit you make in RStudio closes an issue, you can automatically close the issue on GitHub by including “Close #[issue number]” in your commit message and then pushing to GitHub. For example, if issue #5 is “Fix typo in section 3,” and you make a change to fix that typo, you could make and save the change locally, commit that change with the commit message “Close #5,” and then push to GitHub, and issue #5 in “Issues” for that GitHub repository will automatically be closed, with a link to the commit that fixed the issue.
3.8.8 Pull request
You can use a pull request to suggest changes to a repository that you do not own or otherwise have the permission to directly change. Take the following steps to suggest changes to someone else’s repository:
- Fork the repository
- Make changes (locally or on GitHub)
- Save your changes and commit them
- Submit a pull request to the original repository
- If there are not any conflicts and the owner of the original repository likes your changes, he or she can merge them directly into the original repository. If there are conflicts, these need to be resolved before the pull request can be merged.
You can also use pull requests within your own repositories. Some people will create a pull request every time they have a big issue they want to fix in one of their repositories.
In GitHub, each repository has a “Pull requests” tab where you can manage pull requests (submit a pull request to another fork or merge in someone else’s pull request for your fork).
3.8.9 Merge conflicts
At some point, if you are using GitHub to collaborate on code, you will get merge conflicts. These happen when two people have changed the same piece of code in two different ways at the same time.
For example, say two people are both working on local versions of the same repository, and the first person changes a line to mtcars[1, ] while the second person changes the same line to head(mtcars, 1). The second person pushes his commits to the GitHub version of the repository before the first person does. Now, when the first person pulls the latest commits to the GitHub repository, he will have a merge conflict for this line. To be able to commit a final version, the first person will need to decide which version of the code to use and commit a version of the file with that code.
If there are merge conflicts, they’ll show up like this in the file:
<<<<<<< HEAD
mtcars[1, ]
=======
head(mtcars, 1)
>>>>>>> remote-branch
To fix them, search for all these spots in files with conflicts (Ctrl-F can be useful for this), pick the code you want to use, and delete everything else. For the example conflict, it could be resolved by changing the file from this:
<<<<<<< HEAD
mtcars[1, ]
=======
head(mtcars, 1)
>>>>>>> remote-branch
To this:
head(mtcars, 1)That merge conflict is now resolved. Once you resolve all merge conflicts in all files in the repository, you can save and commit the files.
These merge conflicts can come up in a few situations:
- You pull in commits from the GitHub branch of a repository you’ve been working on locally.
- Someone sends a pull request for one of your repositories, and you have updated some of the code between when the person forked the repository and submitted the pull request.
3.8.10 Summary
R code can be kept under version control using git, and RStudio offers convenient functionality for working with a directory under git version control. A directory under git version control can also be pushed to GitHub, which provides a useful platform for sharing and collaborating on code.