5 Saving the Results.
5.1 Plotting individual graphs.
Before plotting, the dummy variables are first re-calculated and the energy signatures are obtained, in a similar manner to before.
  # Recalculating Dummy Variables and Dummy*Temp.
  Dv <- ifelse(Temperatures <= as.numeric(Best_Model_List$X.Balance.Point.[i]), 1, 0)
  DTemp <- Temperatures * Dv

  # Energy Signature Predictions, for plotting.
  Opt_pred <- as.numeric(Best_Model_List$X.Base.[i]) +
    (as.numeric(Best_Model_List$X.Intercept.[i]) * Dv) +
    (as.numeric(Best_Model_List$X.Slope.[i]) * DTemp)
Now the change point models are ready for plotting.
Firstly, a file path should be defined for the graphs.
  # Folder location.
  my_path <- "./data/Raw_Graphs_CHP/"

  # New file name.
  all_paths <- paste0(my_path, "Building_ID_", i, "_Time_Period_", x, ".png")
Secondly, the plotting space and the title to appear on the graphs is generated.
  # Graph title
  name <- c(paste0("CHP Linear Model: ", Best_Model_List$X.Building.Name.[i]), "", paste(Period, "the Covid-19 Pandemic"))

  # Opening a new figure.
  png(all_paths, width = 3000, height = 3000, res = 500, pointsize = 9)
Finally, the measured and predicted data can be plotted via the “plot” and “points”
function.
“dev.off()” is called to close the plotting device.
Another important observation is that this is also the closing point for the
second loop, Buildings.
Therefore the code in the next section should only be indented into the time period
loop.
  plot(Current_Set$Temperature.C, Opt_pred,
    pch = 21, bg = "black", col = "black",
    cex = 1.5, main = name, ylab = "CHP [kW]", xlab = "Temperatures [C]", grid(), cex.lab = 1.25, cex.main = 1.5)

  points(Current_Set$Temperature.C, Current_Set$Energy.Signature, col = "orange", pch = 19, cex = 1.5)

  legend("topright",
    legend = c("Predicted", "Measured"),
    col = c("black", "orange"), cex = 1.25,
    inset = 0.025, box.lty = 0, pch = (16))

  dev.off()

} # End of building Looping.
Below is example of how these plots should now look in the destination folder.
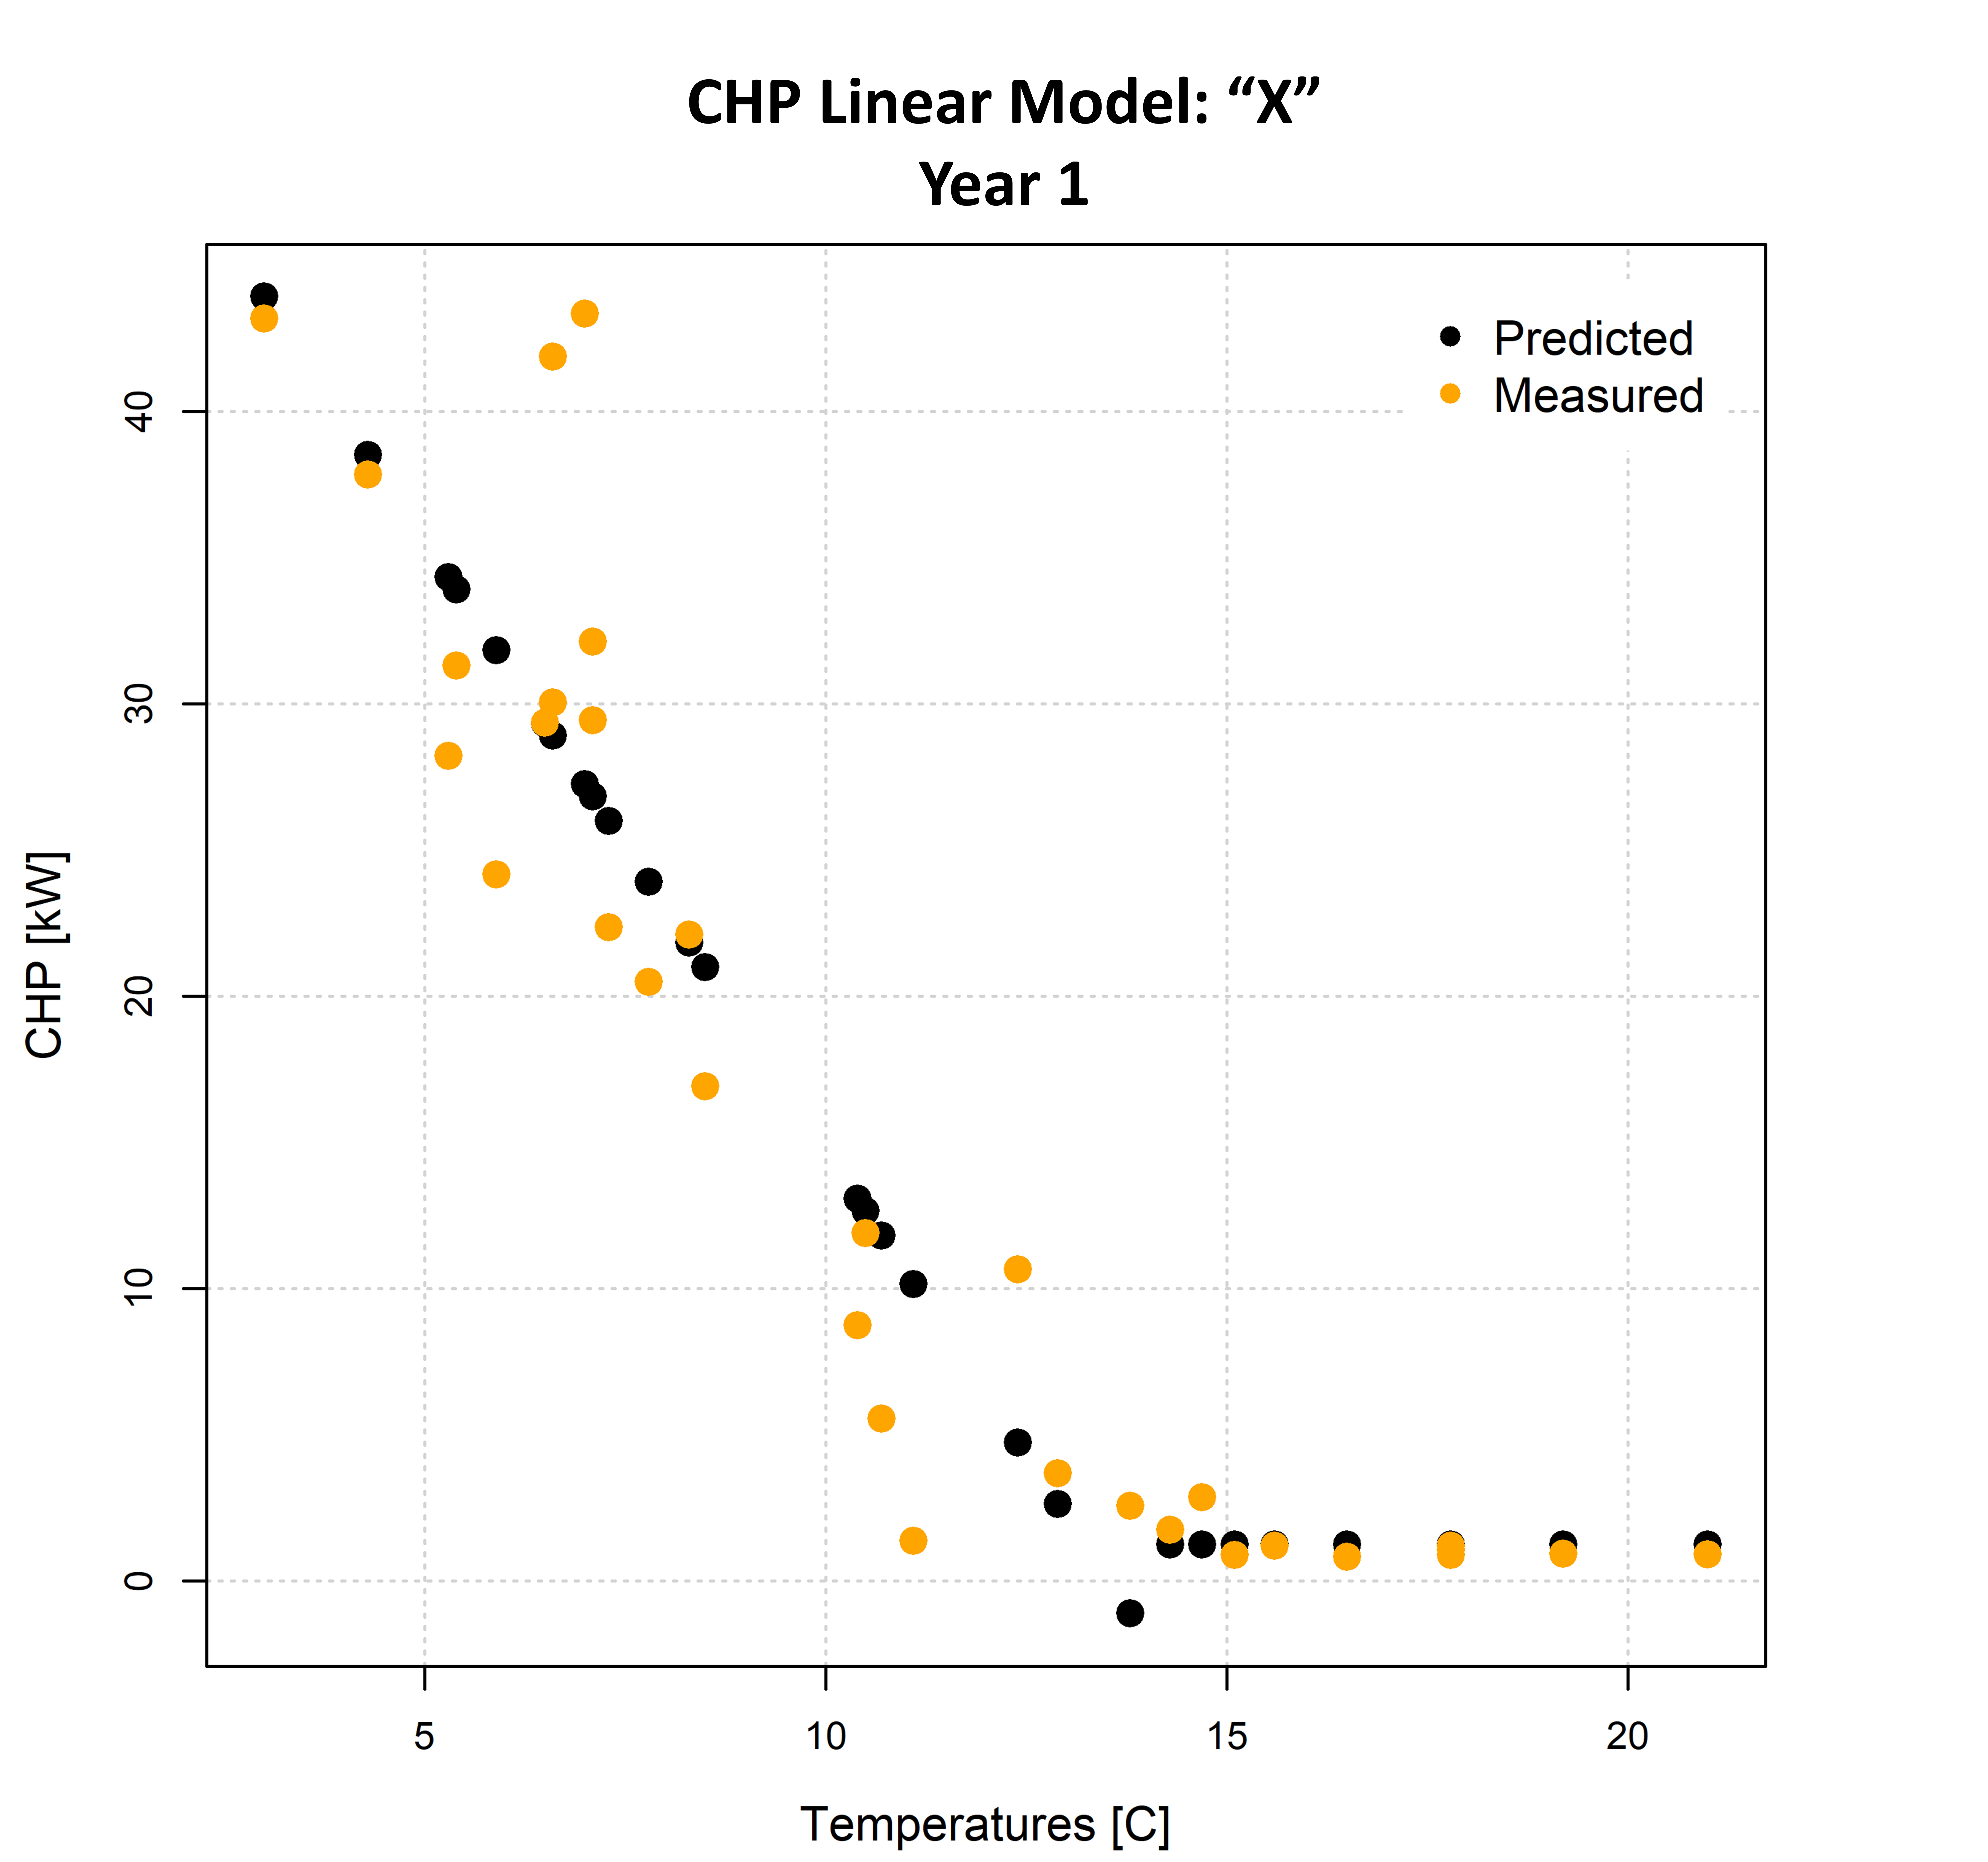
Figure 5.1: An example change point model.
5.2 saving the best models in a .csv.
In this section, the best fitting energy models will be saved as a csv file within
the current working directory.
Firstly, a column containing the time period is added to the data frame.
Additionally, this concludes the final loop of the project.
# Write a new column to include the Time Period.
Times <- rep(Period, times = kSets)

# Add the Time Period to the Best Model List and then save the data into the Final List.
Best_Model_List <- cbind(Best_Model_List[1:2], Times, Best_Model_List[3:10])
Final_List <- rbind(Final_List, Best_Model_List)

} # End of Time Period Looping.
The presentation of the output file then formatted correctly.
Column names can be adjusted and the data is then arranged so that all of the
data is sorted by ID.
The data values are also rounded to 4 decimal places by choice.
# Clarify the Column heading in "Final_List".
colnames(Final_List) <- c("ID", "Building Name", "Time Period", "Best Balance Point", "Base", "Intercept", "Slope", "RMSE", "CV(RMSE)", "R2", "NMBE")

# Rearranging the Final_List in ascending order of ID.
Final_List$ID <- as.numeric(as.character(Final_List$ID))
Final_List <- arrange(Final_List, ID)
rownames(Final_List) <- NULL

# Convert the specific columns to numeric
Final_List[, 5:11] <- lapply(Final_List[, 5:11], function(x) as.numeric(as.character(x)))

# Round the numeric columns to 2 decimal places
Final_List[, 5:11] <- round(Final_List[, 5:11], digits = 4)
# Write a .csv file containing the best fitting building models and their statistical indicators.
Finally, the csv is saved under the name “Best_Models_CHP.csv”.
# Write a .csv file containing the best fitting building models and their statistical indicators.
write.csv(Final_List, "Best_Models_CHP.csv")
After successfully running the code, a .csv should now be stored in your working directory which appears like the following.
# Open the saved csv.
Final_List <- read.csv("./Best_Models_CHP.csv", header = TRUE)
# Print some of the data from the first few columns.
head(Final_List[, 2:8])
## ID Building.Name Time.Period Best.Balance.Point Base Intercept Slope
## 1 1 Building 1 Before 14.0 0.0893 39.8983 -2.7262
## 2 1 Building 1 During 14.0 0.0791 31.7565 -2.0991
## 3 1 Building 1 After 14.0 0.0039 30.1048 -2.0290
## 4 2 Building 2 Before 14.0 11.0502 211.7649 -12.6792
## 5 2 Building 2 During 15.5 5.6859 263.0070 -15.9707
## 6 2 Building 2 After 14.0 3.2283 296.6037 -19.7097# Print the remaining columns.
head(Final_List[, c(2, 3, 9:12)])## ID Building.Name RMSE CV.RMSE. R2 NMBE
## 1 1 Building 1 5972.3585 25.0138 61.7318 0.3570
## 2 1 Building 1 3454.3152 49.0030 85.2968 0.4757
## 3 1 Building 1 929.8419 11.4170 98.1135 -0.0633
## 4 2 Building 2 34742.7865 20.8708 59.0283 0.0563
## 5 2 Building 2 21700.7881 31.2144 90.5957 0.0734
## 6 2 Building 2 13945.7788 16.4371 95.8141 0.07935.3 Concetanating the graphs.
In this Final section, code is provided for python, which can be used to combine
the images for every building from each time period.
As an overview the step are:
1. Define the input path.
2. Count the number of files to decide how many loops to do.
3. Loop through the folder and join images with the same Building ID.
4. Save these images in a separate folder.
import os
import PIL
from PIL import Image

# For testing the number of files in the directory.
count = 0

# Number of time periods assessed.
Time_Periods = 3

working_Directory = str(os.getcwd())

# *** Input the path to the folder containing the images created in R ***.
Source_folder_path = working_Directory + "\\data\\Raw_Graphs_CHP\\"
Output_folder_path = working_Directory + "\\data\\Final_Graphs_CHP\\"


# Checks the amount of files to be processed
for path in os.listdir(Source_folder_path):
    # check if current path is a file
    if os.path.isfile(os.path.join(Source_folder_path, path)):
        count += 1

# Loops through the number of buildings by using count / time periods.
# This is generalised incase future work uses more/less buildings or time periods.
for i in range(1, int((count/Time_Periods)+1)):

  # The Three image paths to be combined.
  T1 = Source_folder_path + "Building_ID_" + str(i) + "_Time_Period_1.png"
  T2 = Source_folder_path + "Building_ID_" + str(i) + "_Time_Period_2.png"
  T3 = Source_folder_path + "Building_ID_" + str(i) + "_Time_Period_3.png"

  # Open the images.
  images = [Image.open(x) for x in [T1, T2, T3]]
  widths, heights = zip(*(i.size for i in images))

  # Formatting.
  total_width = sum(widths)
  max_height = max(heights)
  new_im = Image.new('RGB', (total_width, max_height))

  # Combining the images.
  x_offset = 0
  for im in images:
    new_im.paste(im, (x_offset,0))
    x_offset += im.size[0]

  # Naming the file.
  filename = "Building_" + str(i) + "_Combined" + ".png"

  # Saving the final Image.
  new_im.save(Output_folder_path + filename, "PNG")

print("----End of Script!----")
The outputs should look like the following.

Figure 5.2: Concatenated images.
This concludes the project!