Chapter 4 Abilities and Rotation
A warrior’s resource is the finite, yet continuously generated, rage. Rage is capped at 100, and the Vanilla WoW Wiki (WoW Wiki 2019) tells us rage is generated by a successful white attack according to the following formula:
\[\begin{equation} Rage_{gen}\ =\ \left(\frac{D}{C}\right)\ \times\ 15 \tag{4.1} \end{equation}\]Where \(D\) is the damage dealt, and \(C\) is the rage conversion value. The rage conversion value varies by player character level and is dependent on other values such as the mob’s hit points and the warrior’s expected damage value against that mob. It can be calculated by the following formula:
\[\begin{equation} C\ =\ \left(0.0091107836\ \times\ Lvl^2\right)\ +\ \left(3.225598133\ \times\ Lvl\right)\ +\ 4.2652911 \tag{4.2} \end{equation}\]What this tells us is that very low damage attacks have an upper bound on how much they can be averaged up by the hit factor of the. Knowing this, we can calculate the conversion value for various level ranges:
| Player Level | Conversion Value |
|---|---|
| 10 | 37.4 |
| 20 | 72.4 |
| 30 | 109.3 |
| 40 | 147.9 |
| 50 | 188.3 |
| 60 | 230.6 |
In any given fight, we will only generate a finite amount of rage. This means that to deal as much damage as we can, in the most efficient way possible, we need to maximize the ratio between damage dealt and rage spent - the damage per rage (DPR). This can easily be calculated:
\[\begin{equation} DPR\ =\ \frac{Damage}{Rage} \tag{4.3} \end{equation}\]Although this is an easy concept to grasp, it’ll be an essential part of our discussions throughout this chapter from now on. This is because the DPR of our abilities is not constant - Whirlwind’s (WW) DPR varies depending on the number of enemies around and the damage and type of our weapon, Execute’s varies based on how much rage we consume when activating the ability, and Bloodthirst’s depends on our current attack power. Doing as much damage as possible in a fight, thus, is about calculating the DPR of each one of these abilities as the encounter progresses, and utilizing the one with the maximum DPR. We will revisit this concept in more depth in 4.10.
Note: For all of the following damage and DPR calculations, we will assume \(P(Crit) = 0.3\), \(P(Dodge) = 0.06\), and 305 weapon skill. This hidden multiplier will be applied to all subsequent damage and graph calculations.
4.1 Sunder Armor
Sunder armor (or just Sunder, from now on) reduces the target’s armor by 450 per application, stacking up to 5 for a total armor reduction of 2250. It is an essential toolkit of any warrior, and it is paramount that at least 7 (as we’ll see later) fury warriors in the raid utilize it in their first global cooldown in order to guaranteee maximum uptime, which will work to massively increase the physical damage done by the raid. First, let’s dive into how physical damage reduction is calculated for level 63 mobs in WoW Classic:
\[\begin{equation} \%\ reduction\ =\ \frac{armor}{armor+5882.5} \tag{4.4} \end{equation}\]We know that most bosses in WoW Classic have 3731 armor. To understand the impact of Sunder, let’s assume Curse of Recklessness (CoR, 640 armor reduction) and Faerie Fire (FF, 505 armor reduction) are also immediately applied. The resulting physical damage increase is shown graphically:
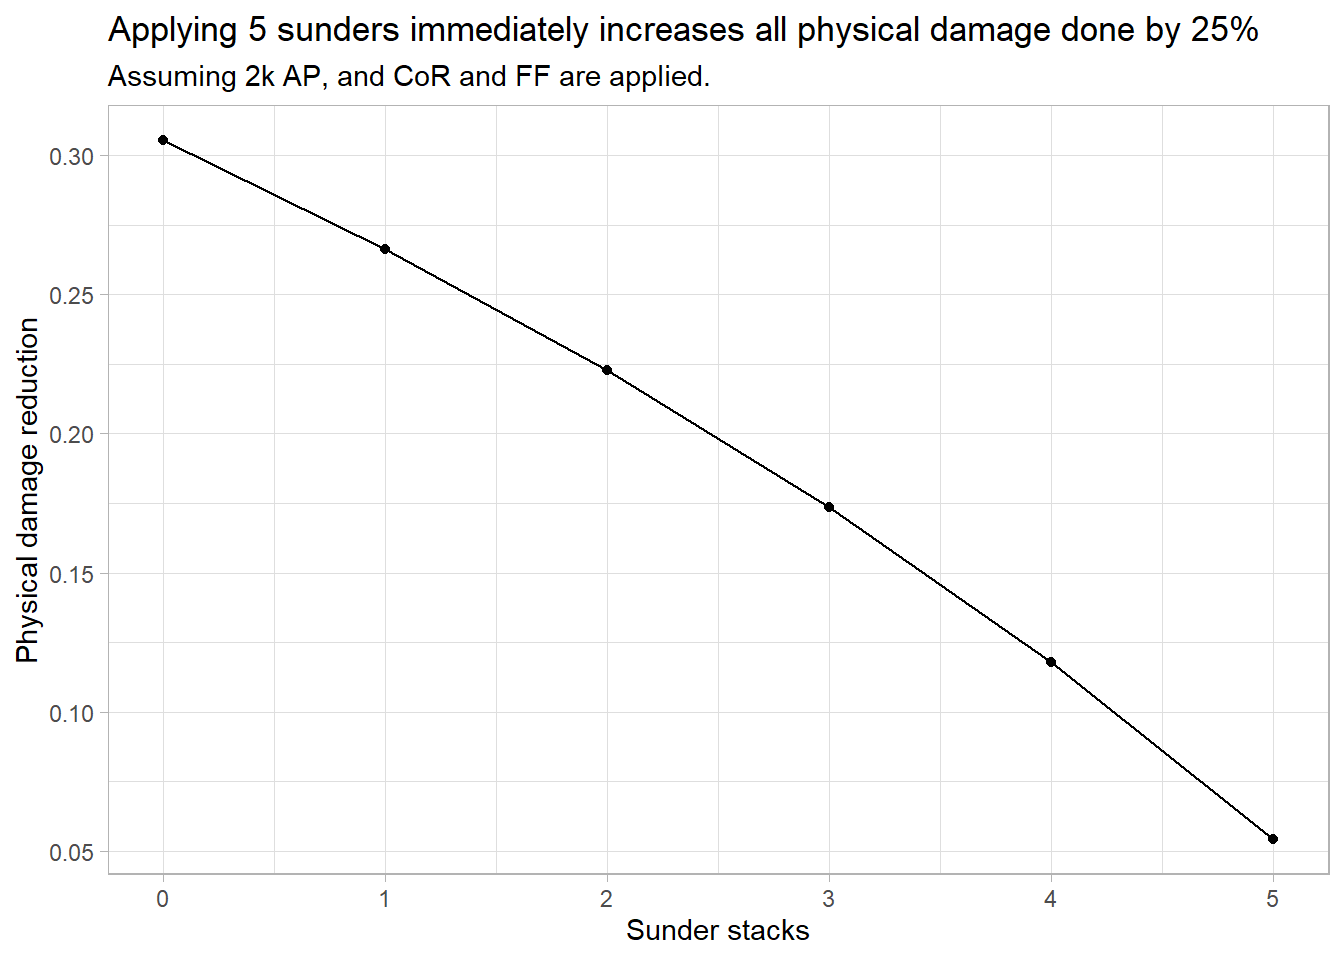
Not only does sundering in the first global cooldown massively increase physical damage done, it also drastically reduces the chance of ripping threat early from your main tank and possibly dying. It also allows tanks a small window during which they can get ahead (and stay ahead) in threat for the rest of the fight. But sunders, like any other physical attack, is subject to be dodges and parries (and therefore not applied). This begs the question: what is the minimum number of warriors needed to sunder in order for 5 stacks to be applied within the first GCD?
The application of sunder of follows a binomial distribution \(B(n,p)\), where the probability of having \(k\) or more successes in \(n\) independent Bernoulli trials is given by it’s cumulative distribution function:
\[F(x;p,n) = \sum_{k=0}^{x}{\left( \begin{array}{c} n \\ k \end{array} \right) (p)^{k}(1 - p)^{(n-k)}}\]
Knowing this, let’s calculate the probability that 5 sunders are successfully applied when 5, 6, and 7 warriors utilize it in their first global cooldown (assuming they attack from behind and have 305 weapon skill):
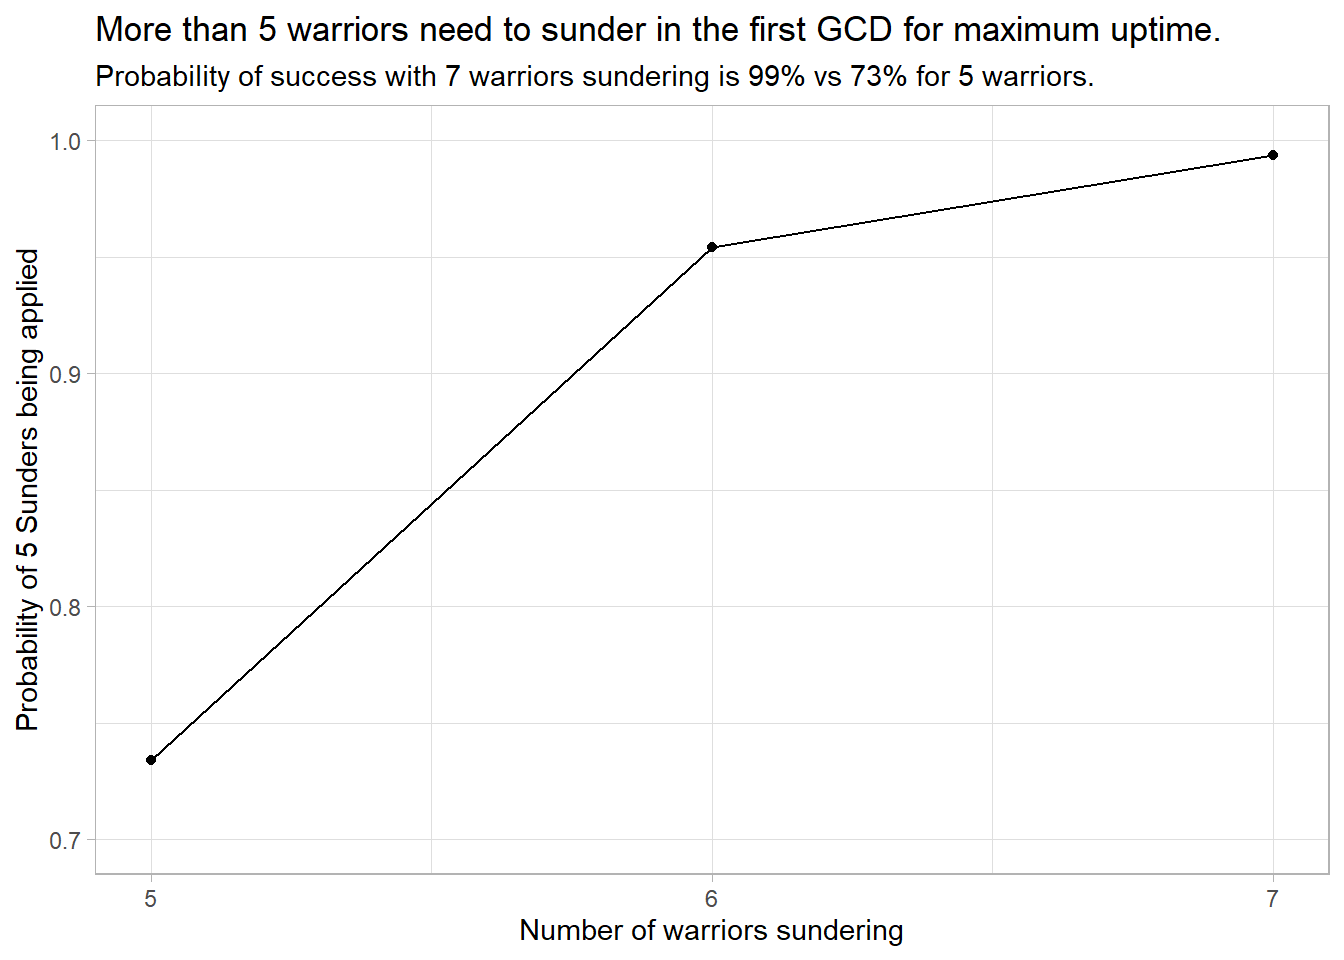
As we can see, there is an huge 22% difference in the probability of all 5 sunders being immediately applied from just having one extra warrior use it. At 7 warriors, this is virtually guaranteed at \(P(5 Stacks) = .99\).
4.2 Bloodthirst
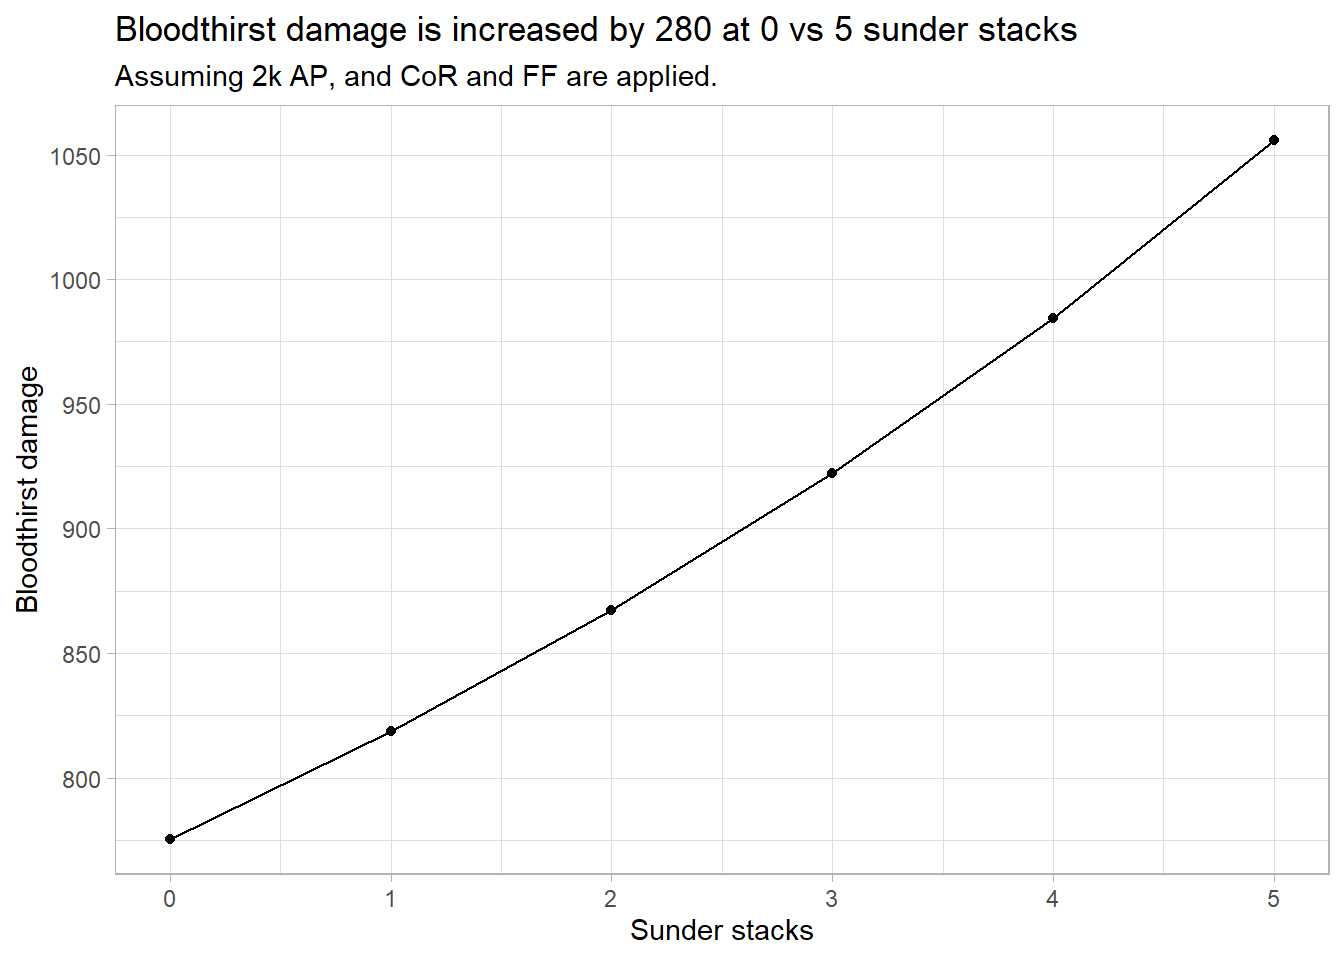
Bloodthirst (BT) is an instant ability on a 6 second cooldown that costs 30 rage and hits the enemy target for 45% of our attack power (AP). Mathematically, we can represent its damage as:
\[\begin{equation} BT_{dmg}\ =\ AP\ \times\ 0.45 \tag{4.5} \end{equation}\]It might not be immediately apparent, but this is one of the main reasons why fury warrior damage scales so well - no other ability in the game benefits from attack power as much as Bloodthirst. As we will soon see, at 30 rage it has the highest damage per rage of any of our abilities against a single target, and as such should be prioritized in most cases. The formula shows a linear increase in damage, which can be displayed graphically:
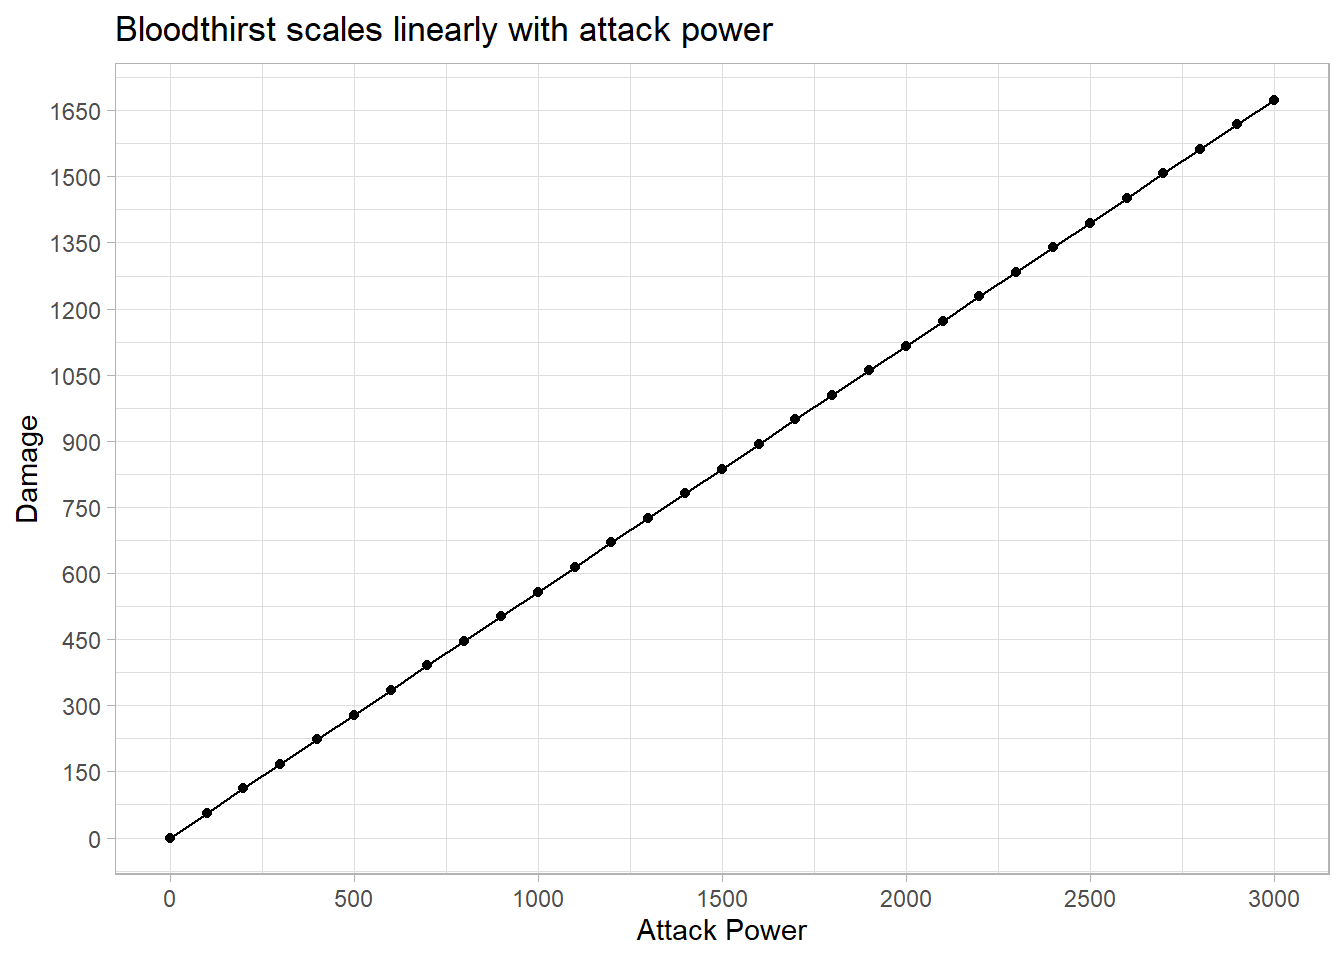
Figure 4.1: Bloodthirst scales linearly with attack power and is completely independent of weapon damage.
This complete dependence on AP has another important implication: it means Bloodthirst’s damage is completely weapon independent. Two warriors utilizing the same gear except for weapons - with one utilizing a 2 handed weapon and the other a dagger - will deal the same damage with Bloodthirst.
4.3 Whirlwind
Whirlwind is an area of effect ability (AoE) that hits four enemy mobs with your currently equipped main hand weapon, on a 10 second cooldown. Its damage can be calculated as:
\[\begin{equation} WW_{dmg}\ = Wep_{swing}\ +\ \left(AP\ \times\ \left(\frac{Wep_{speed}}{14}\right)\right) \tag{4.6} \end{equation}\]Where \(Wep_{swing}\) is the damage caused by your weapon swing, and the right term is the damage added to that swing by your AP.
The formula allows us to notice two differences between the damage scaling of Whirlwind when compared to Bloodthirst: while Whirlwind scales with weapon damage, it scales much more poorly with AP. Another important distinction between the two is that while Bloodthirst is a single target ability, Whirlwind scales off the number of opponents that are hit with it. Knowing that, we can calculate the DPR of both abilities at varying number of targets when wielding different types of weapons. In order to that, we assume the following:
| Weapon | Normalized Speed | Average Damage | Attack Power |
|---|---|---|---|
| Two Handed Weapon | 3.3 | 258 | 1750 |
| One Handed Weapon | 2.4 | 143 | 1750 |
| Dagger | 1.5 | 105 | 1750 |
Kowing this, we can calculate the DPR of one use of Whirlwind when hitting a varying number of targets, and compare it to the DPR of Bloodthirst at the same attack power threshold:
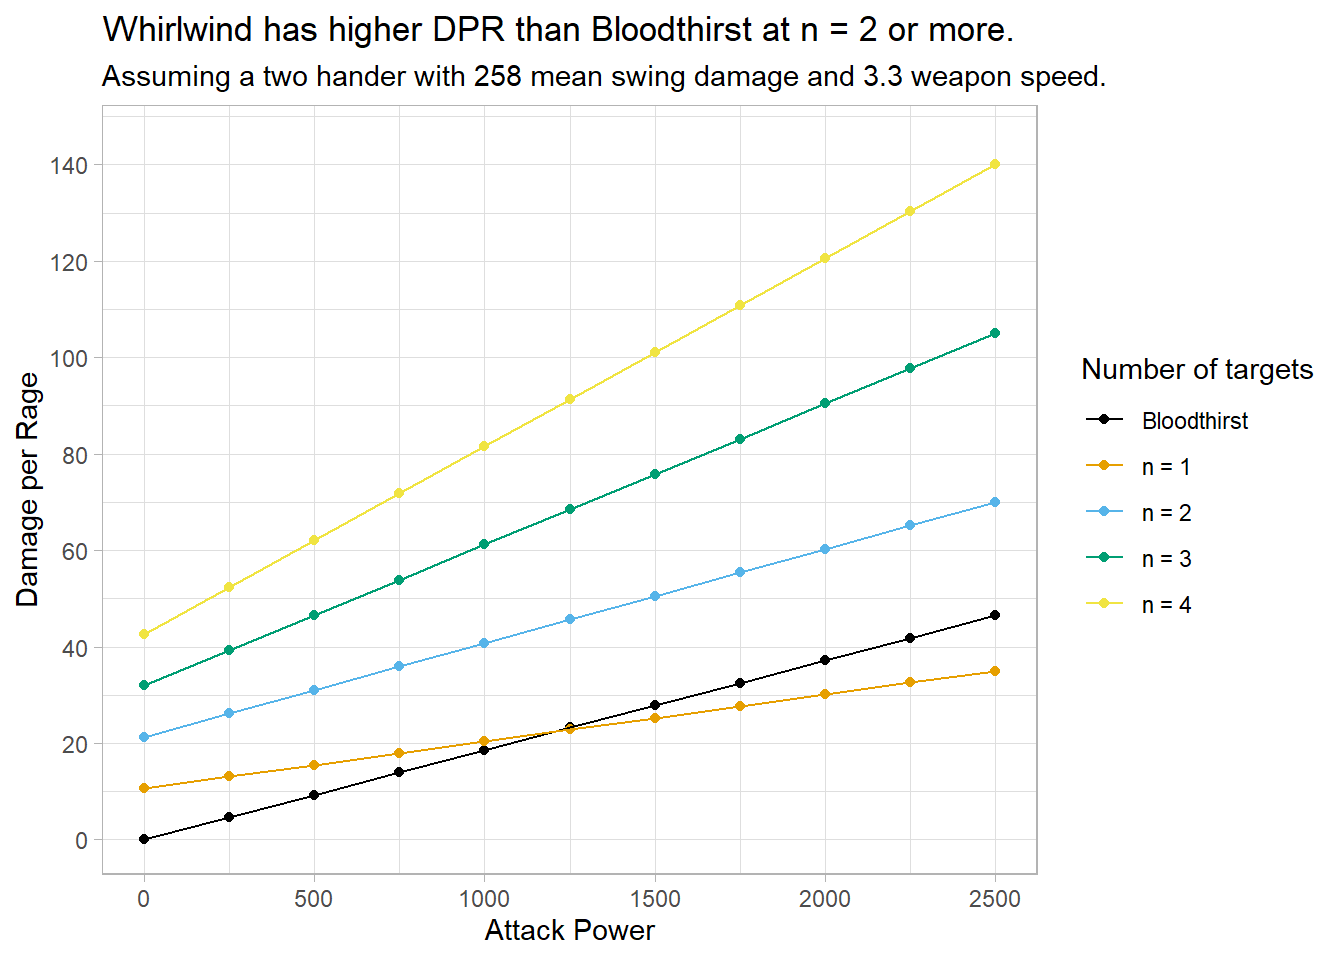
Figure 4.2: Comparison of the damage per rage efficiency between Bloodthirst and Whirlwind with a generic two handed weapon.
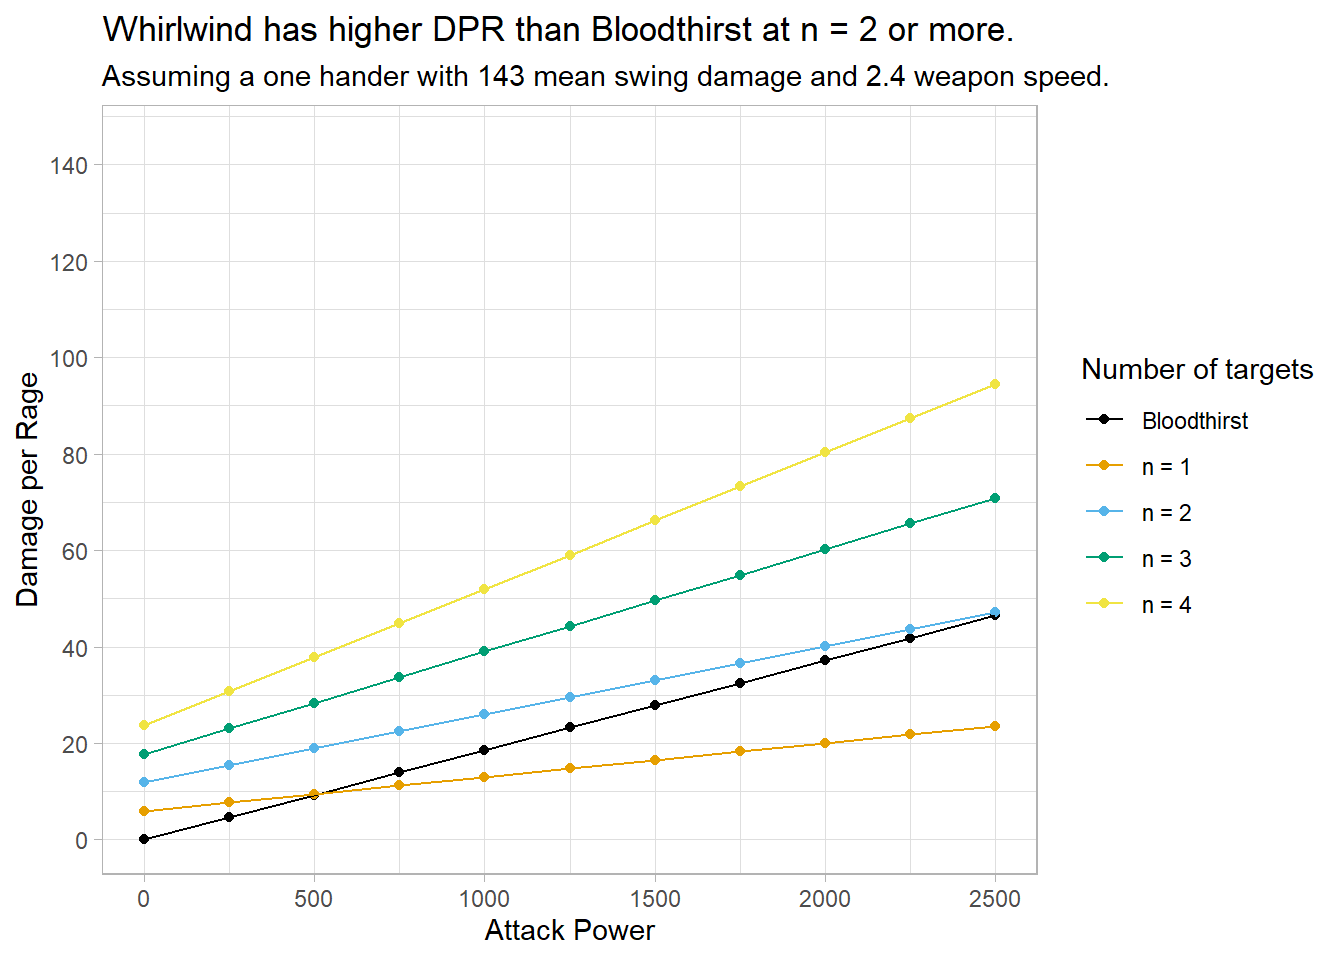
Figure 4.3: Comparison of the damage per rage efficiency between Bloodthirst and Whirlwind with a generic one handed sword.
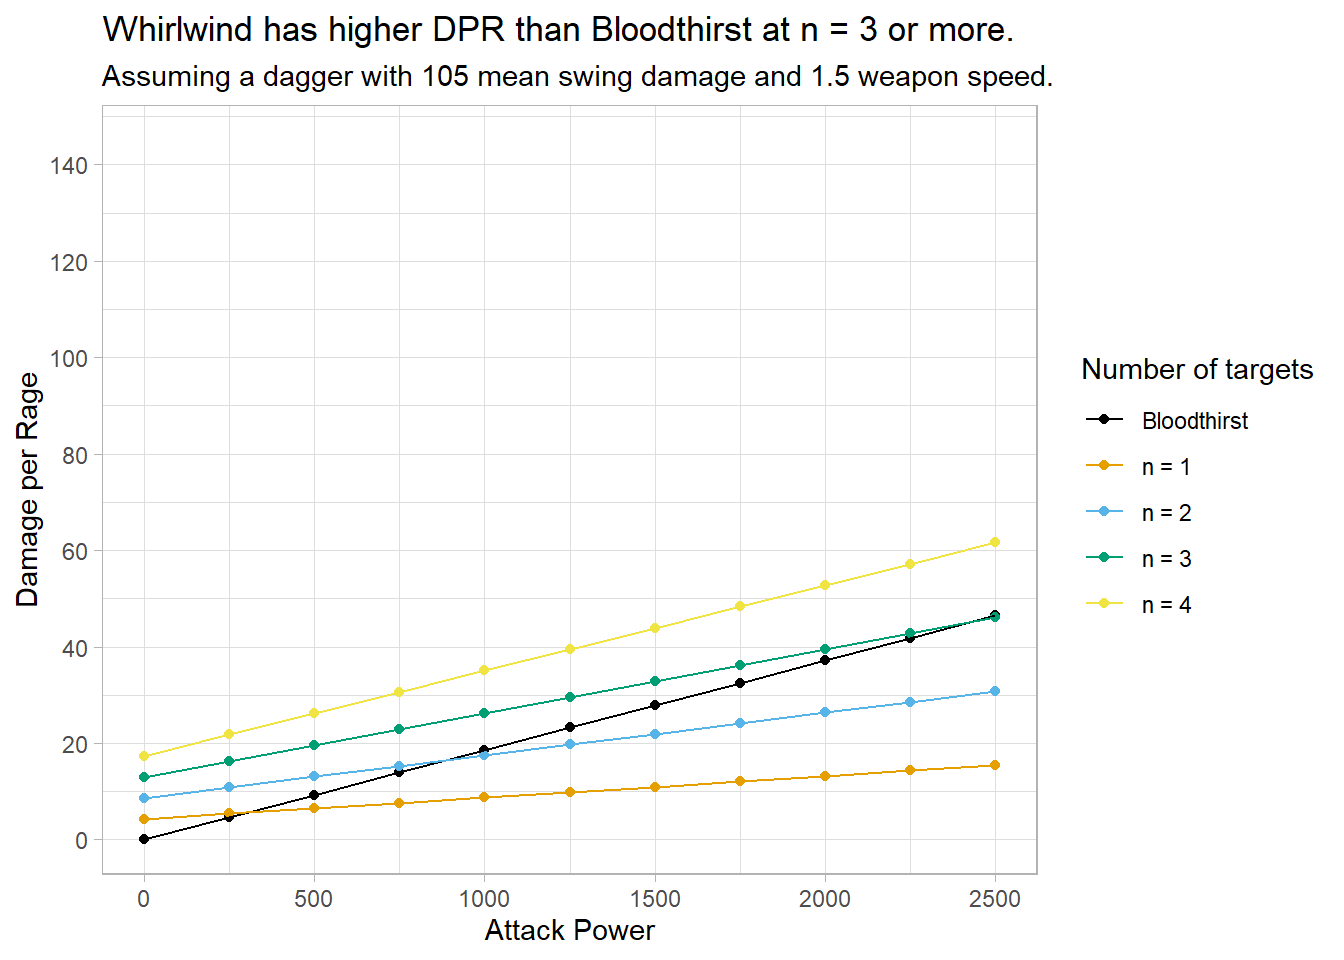
Figure 4.4: Comparison of the damage per rage efficiency between Bloodthirst and Whirlwind with a generic dagger.
The graphs above paint a clear picture: Whirlwind damage per rage increases linearly with number of targets being hit, and that together with the weapon type currently being wielded by the player, should inform when the skill should take priority over Bloodthirst at variable attack power thresholds.
4.4 Execute
Different from Whirlwind and Bloodthirst, Execute is an ability with no cooldown and variable rage cost, which can only be activated when the enemy is at 20% HP or lower. Each additional point of rage used in the activation of the ability past its activation cost adds 15 damage to the total damage dealt by the ability, and points into the Improved Execute talent decrease the activation cost of the ability per talent point. Therefore, we can calculate its damage as:
\[\begin{equation} Execute_{dmg}\ =\ 600\ +\ \left(\left(R-Ac\right)\ \times\ 15\right) \tag{4.7} \end{equation}\]Where \(R\) is the player’s current rage, \(Ac\) is the activation cost of the ability (dictated by how many points the player has in improved execute) and 15 is the damage multiplier per point of rage. Knowing this, we can quickly visualize the damage per rage efficiency of the ability at 0, 1, and 2 points into the Improved Execute talent:
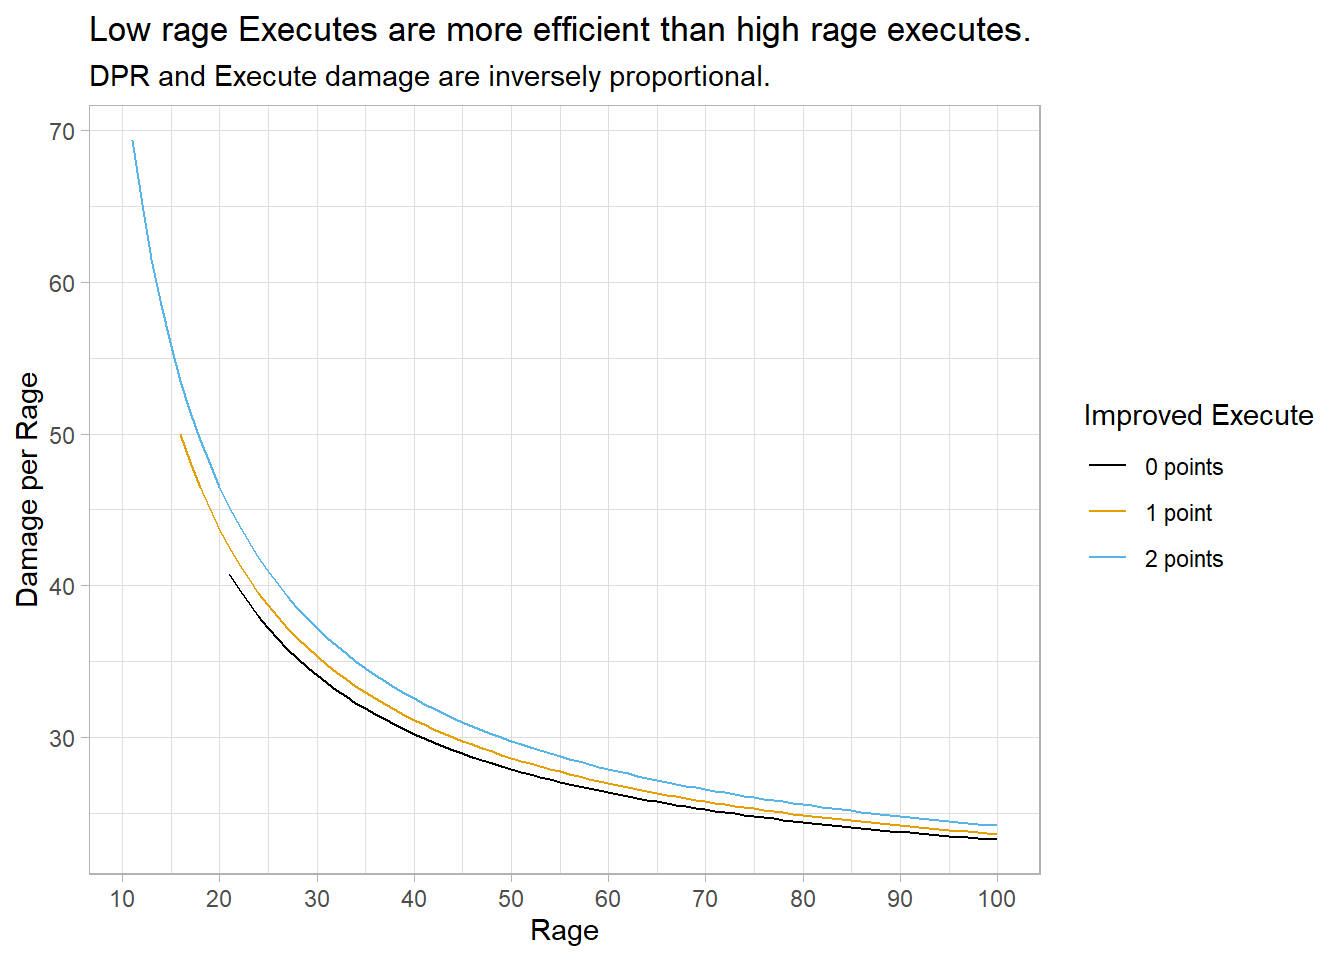
Figure 4.5: Comparison of rage consumed and Execute DPR by different talent point investments into the Improved Execute talent.
The graph enables us to visualize a big difference between Execute and our other abilities. While Bloodthirst and Whirlwind have a fixed rage cost, Execute’s rage cost is variable. Not only that, since damage dealt is calculated by the addition of the base damage and the amount of rage multiplied, this means that DPR and damage of Execute are inversely proportional. Practically speaking, this means that an Execute at 10 rage is much more efficient than an execute at 100 rage, despite the latter dealing more damage. This is because everytime Execute is activated, we gain “free” damage from the baseline ability, which does not scale with rage - meaning two 15 rage Execute activations will do more damage than one 30 rage Execute. Therefore, the most optimal way to spend rage during the Execute phase is to use it immediately at the lowest rage possible - resulting in higher DPR.
4.4.1 Execute vs Bloodthirst
We have now seen how both abilities work, and there is a distinct difference between them - while Execute does not scale (and in fact gets worse the more rage is spent to activate it), Bloodthirst is our best scaling ability. Therefore, it stands to reason that there might exist a point where Bloodthirst outscales Execute, both in terms of DPR and damage. Let’s investigate this.
The lowest activation cost possible for Bloodthirst is 30 rage. Therefore, to find out at which point Bloodthirst has higher DPR than Execute, all we need to do is find out:
- What the Execute damage at 30 rage is:
\[Execute_{dmg}\ =\ 600\ +\ \left(\left(30-10\right)\ \times\ 15\right)\] \[Execute_{dmg}\ =\ 900\]
- What Bloodthirst AP level we require to achieve that damage:
\[\frac{900}{0.45}\ =\ AP\ \]
\[AP\ =\ 2000\]
This means that, if the player has over 2000 AP and 30 or more rage, he or she should prioritize Bloodthirst over Execute, as it’ll result in higher DPR.
4.4.2 Execute Switch
As we now understand the relationship between rage spent and Execute DPR, it becomes clear that activating Execute at its rage minimum cost will maximize our DPR. Therefore, it stands to reason that weapons that enable us to Execute more often while just going over the ability’s activation cost are the best candidates for this. Let’s compare our three types of weapons again (4.2), assuming the following:
- The player has 305 weapon skill for all weapon types.
- The player has two points into Improved Execute.
- For the one hander and dagger comparisons, we assume an offhand generating an average of 5 rage per every 1.6 second swing.
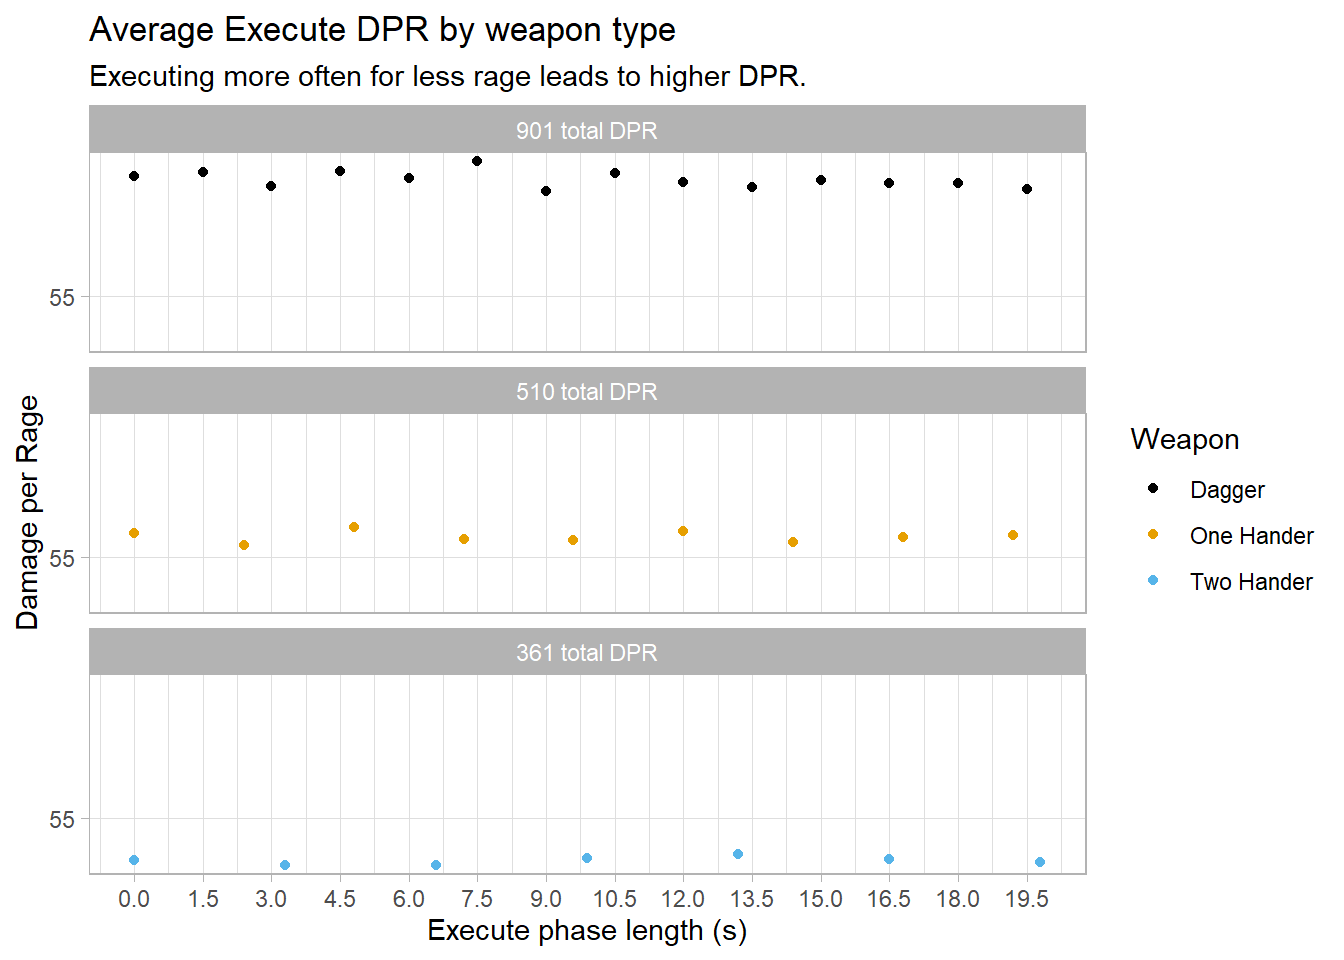
Figure 4.6: Comparison between the total DPR achieved by utilizing Execute after each attack, with varying weapon types.
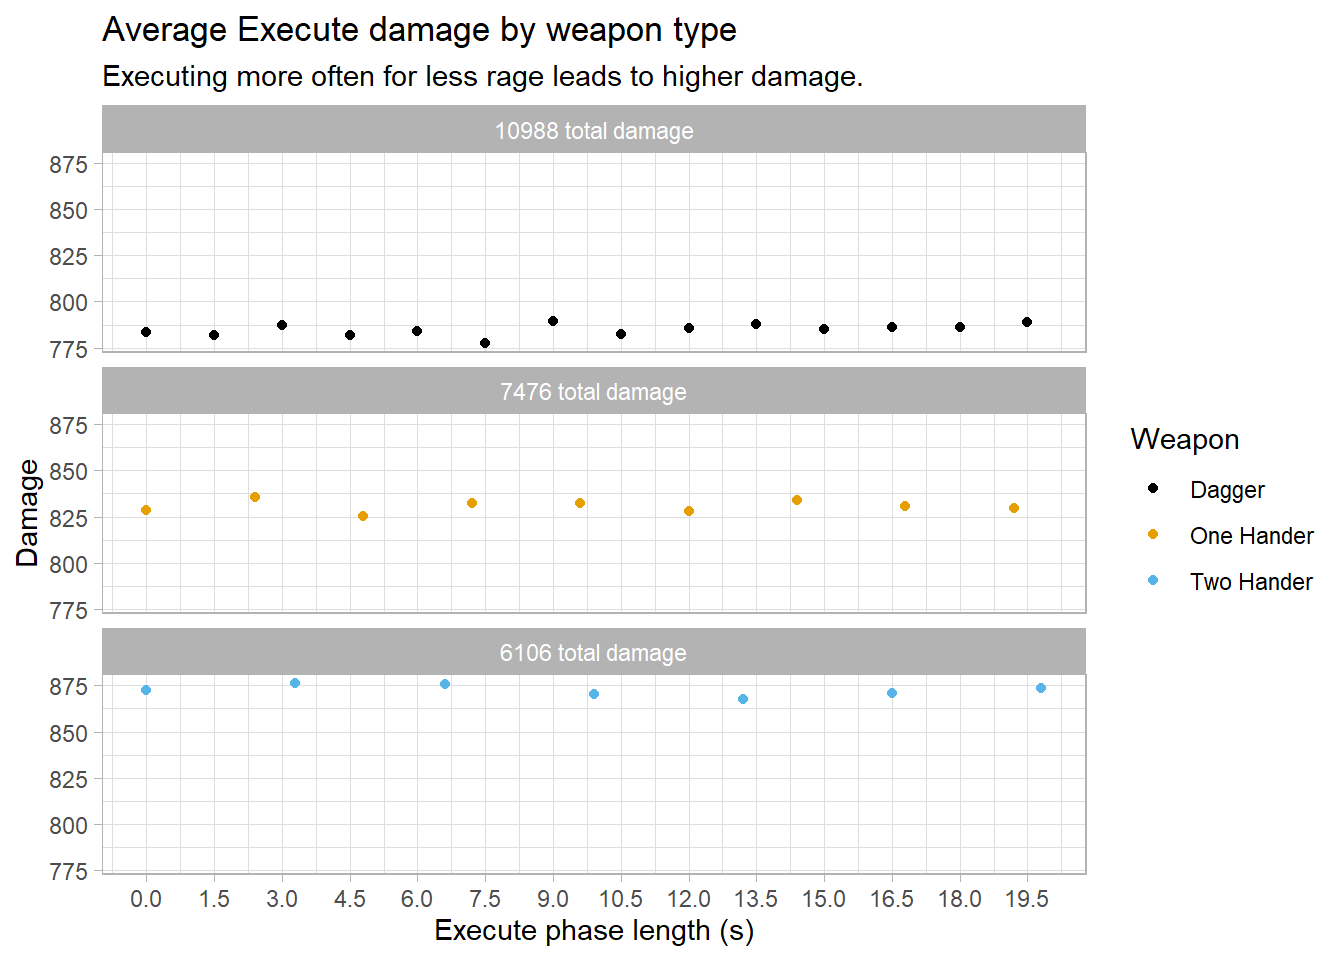
Figure 4.7: Comparison between the total damage achieved by utilizing Execute after each attack, with varying weapon types.
The graph is clear: utilizing daggers during the execute phase leads to much higher DPR efficiency than the alternatives. It is important to note, however, that the dagger could be replaced by any fast single handed weapon, provided it has high DPS. Knowing this, it stands to reason that switching to a fast weapon with comparable DPS just before the Execute phase would lead to higher overall DPR, and thus damage. This is what is called execute switching, and while it was highly effective on private servers, it is not as effective on World of Warcraft Classic for a few reasons:
- Execute phase lengths were much longer on private servers due to higher boss armor and HP pool. This increased the effectiveness of execute switching, as we can see in 4.8.
- Execute in Classic is batched. This means that the game calculates how much rage you have upon the ability activation (and thus damage), but the damage is only dealt 400ms after that calculation. This means any rage generated in that window will not be taken into account when damage is dealt, but will be lost as if it did.
The biggest factor determining the viability of Execute switching is the Execute phase length (EPL). While the difference between the Execute DPR of different weapon types and speeds is small in short EPLs, this effect becomes more noticeable as the EPL increases. This is, again, because the longer the duration of the EPL, the more opportunities we have to gain “free” damage from the activation of the Execute ability. This behavior can be observed in the graph below:

Figure 4.8: Total DPR achieved by utilizing Execute after every weapon swing with different weapons.
4.5 Heroic Strike and Cleave
Heroic Strike (HS) and Cleave are unique abilities in a warrior’s toolkit. While all of the abilities we’ve looked at so far are instant - meaning they occur immediately upon activation - HS and Cleave instead take place on the player’s next melee main hand swing. This has two important consequences:
- Since the player’s next melee attack becomes a yellow attack, it also gains the properties of one. This means HS and Cleave cannot glance.
- Similarly, since the player’s next melee swing is now a yellow attack, it does not generate rage. Therefore, HS and Cleave are utilized as rage dumps in order to prevent rage capping.
Because these abilities do not generate rage, their activation cost and damage are deceptive - we need to factor in the opportunity cost of a regular melee attack. Likewise, the damage dealt by these abilities has to account for the \(P(Glance)\) reduction they incur. Therefore, from now on when we refer to HS and Cleave’s cost and damage, we’ll be speaking in terms of effective cost and effective damage. Beanna and Vilius (Beanna et al. 2019) have derived this formulas as:
Effective HS cost:
\[\begin{equation} HS_{cost}\ = 15\ +\ \left(Rage\left(Dmg_{auto}\ \right)\right)-HS_{imp} \tag{4.8} \end{equation}\]Effective HS damage:
\[\begin{equation} \small HS_{dmg}\ =\ \left(1+P\left(Crit\right)-P\left(Doge\right)\times Damage\ +\ P\left(Glancing\right)\left(Damage_{auto}-Damage_{glance}\right)\right) \tag{4.9} \end{equation}\]Analogously, we can define Cleave’s effective cost as:
\[\begin{equation} Cleave_{cost}\ = 20\ +\ \left(Rage\left(Dmg_{auto}\ \right)\right) \tag{4.10} \end{equation}\]And its damage as:
\[\begin{equation} \scriptsize Cleave_{dmg}\ =\ \left(1+P\left(Crit\right)-P\left(Dodge\right) \times \left(Dmg_{auto}+\ \left(2\ \times\ Cleave_{bonus}\ \right)\right)+\ \left(P\left(Glance\right)\times\left(Dmg_{auto}\ -\ Dmg_{glance}\right)\right)\right) \tag{4.11} \end{equation}\]It’s important to note that, due to the player’s weapon swing ultimately affecting the effective cost of both abilities, their DPR also changes according to the weapon’s average damage. We can visualize this behavior through violin plots:
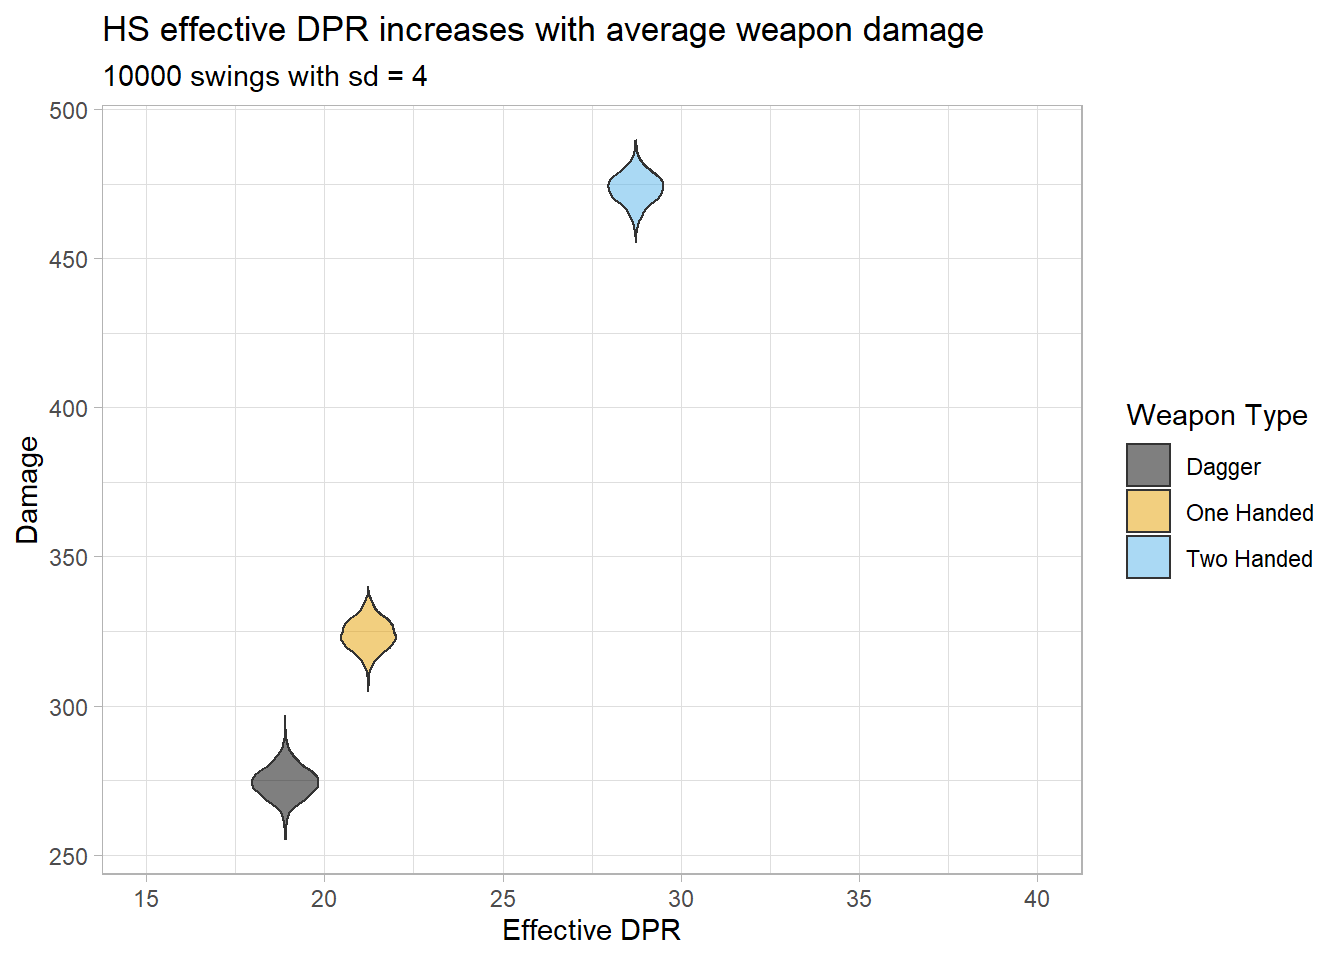
Figure 4.9: Visualization of the effective HS damage and DPR density for different weapon types.
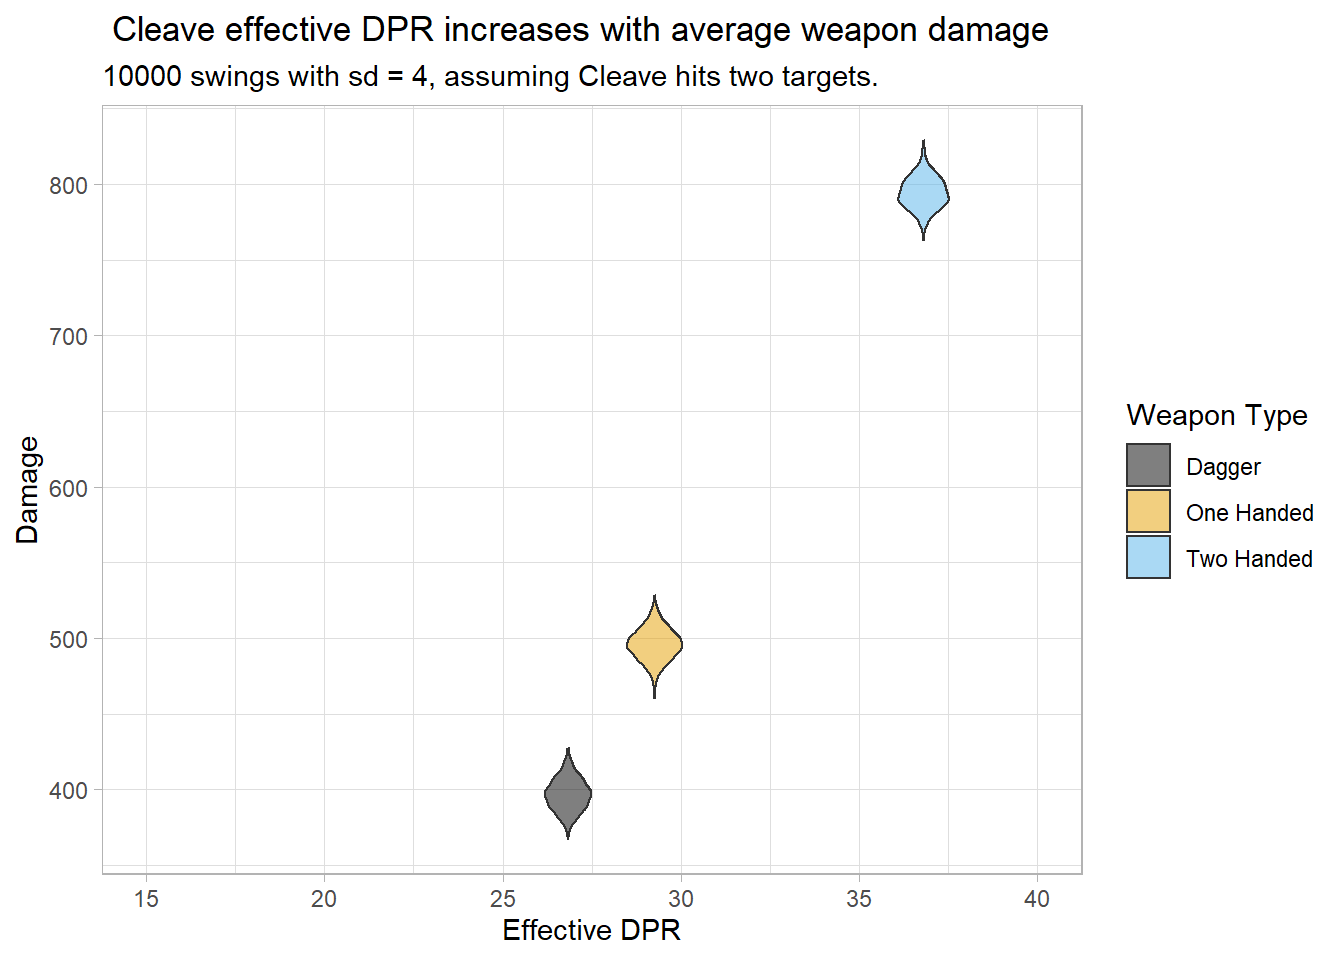
Figure 4.10: Visualization of the effective Cleave damage and DPR density for different weapon types.
4.5.1 HS Queuing
In Classic World of Warcraft, the act of queueing a “on next attack” ability such as HS and Cleave introduces another mechanic. When this occurs, the DW penalty on your OH swing is removed (3.3), which essentially makes the player’s OH swing as if he only had one one-handed weapon equipped. This introduces another layer of nuance in the warrior’s rotation - repeatedly queueing and cancelling your HS queue will lead to an increase in OH hits, and therefore rage and DPS. It is important to note, however, that with world buffs most warriors are already able to HS every swing. Therefore, it is only recommended that one attempts this HS queue weaving when rage starved, as abilities and items such as Windfury Totem and Hand of Justice may result in the HS inadvertently going off - which may render the player unable to BT or WW on cooldown, resulting in a DPS loss.
4.6 Slam
Slam is a 1.5 second cast time ability that costs 15 rage and deals your weapon damage plus an additional 87 damage. Its cast time reduced by 0.1 for each point in the Improved Slam talent, and it is important to note that unlike Whirlwind, Slam is not speed normalized - meaning slower weapons will increase the ability’s damage. Slam has been historically shunned as an ability in the warrior toolkit, largely due to its cast time: this posed significant usage problems in movement and damage heavy fights, as the player is unable to move and suffers damage pushback when casting. Moreover, even under ideal circumstances, Slam had the potential to be actively detrimental - mistiming it after your white swing landed meant that you’d clip your next auto, incurring a DPS loss.
\[\begin{equation} Slam_{dmg}\ = Wep_{swing}\ +\ \left(AP\ \times\ \left(\frac{Wep_{speed}}{14}\right)\right) + 87 \tag{4.12} \end{equation}\]At the release of Classic, there was a bug that caused activating Slam when its cast time is equal to or less than the remaining time on your autoattack effectively lets the player bypass anything that would reset his swingtimer, resulting in the enemy being struck by both the auto attack and Slam upon a finished cast. This was achieved through the following macro:
#showtooltip
/stopattack
/cast Slam
/startattack
This bug was fixed (Blizzard 2020), and Slam now works like it did on most private servers - meaning it is best utilized immediately after landing a white hit. Keep in mind that while the calculations below assume perfect Slam usage - i.e no auto attack clipping as a result of the activation of the ability - this is unrealistic. As such, Slam is significantly worse than it’s pre-fix state, but still a better alternative than Hamstring spam if utilized correctly.
In order to assert the ability priority when utilizing Slam, let’s first look at its DPR when used with two “tiers” of two handed weapons available to us in Phase 1 and 2 of World of Warcraft Classic:
- Tier 1, which includes Spinal Reaper, Hand of Ragnaros, and Bonereaver’s Edge
- Tier 2, which includes Obsidian Edged Blade, Earthshaker, and The Unstoppable Force.
4.6.1 Slam vs Bloodthirst
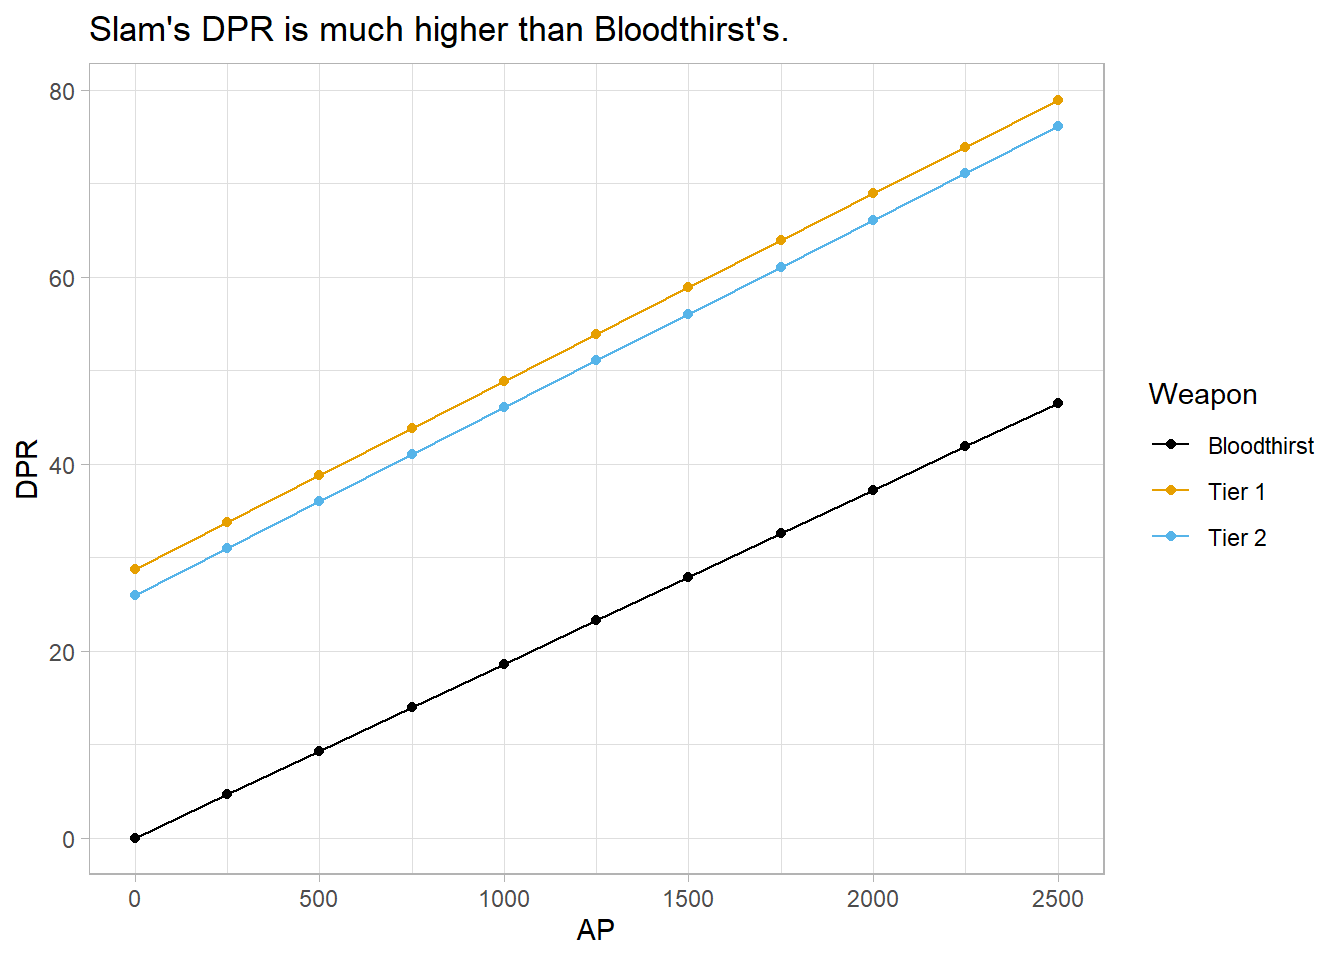
Figure 4.11: Comparison between Bloodthirst and Slam DPR with two different tiers of weapons.
As we can see, Slam’s DPR is much higher than Bloodthirst’s, particularly at lower attack power levels. This means in rage starved situations, the player should prioritize utilizing Slam over Bloodthirst. It is important to note, however, that just because Slam’s DPR is higher even at very large attack power levels, that doesn’t mean that its damage is also higher than Bloodthirst’s. We can visualize this behavior with the following graph:
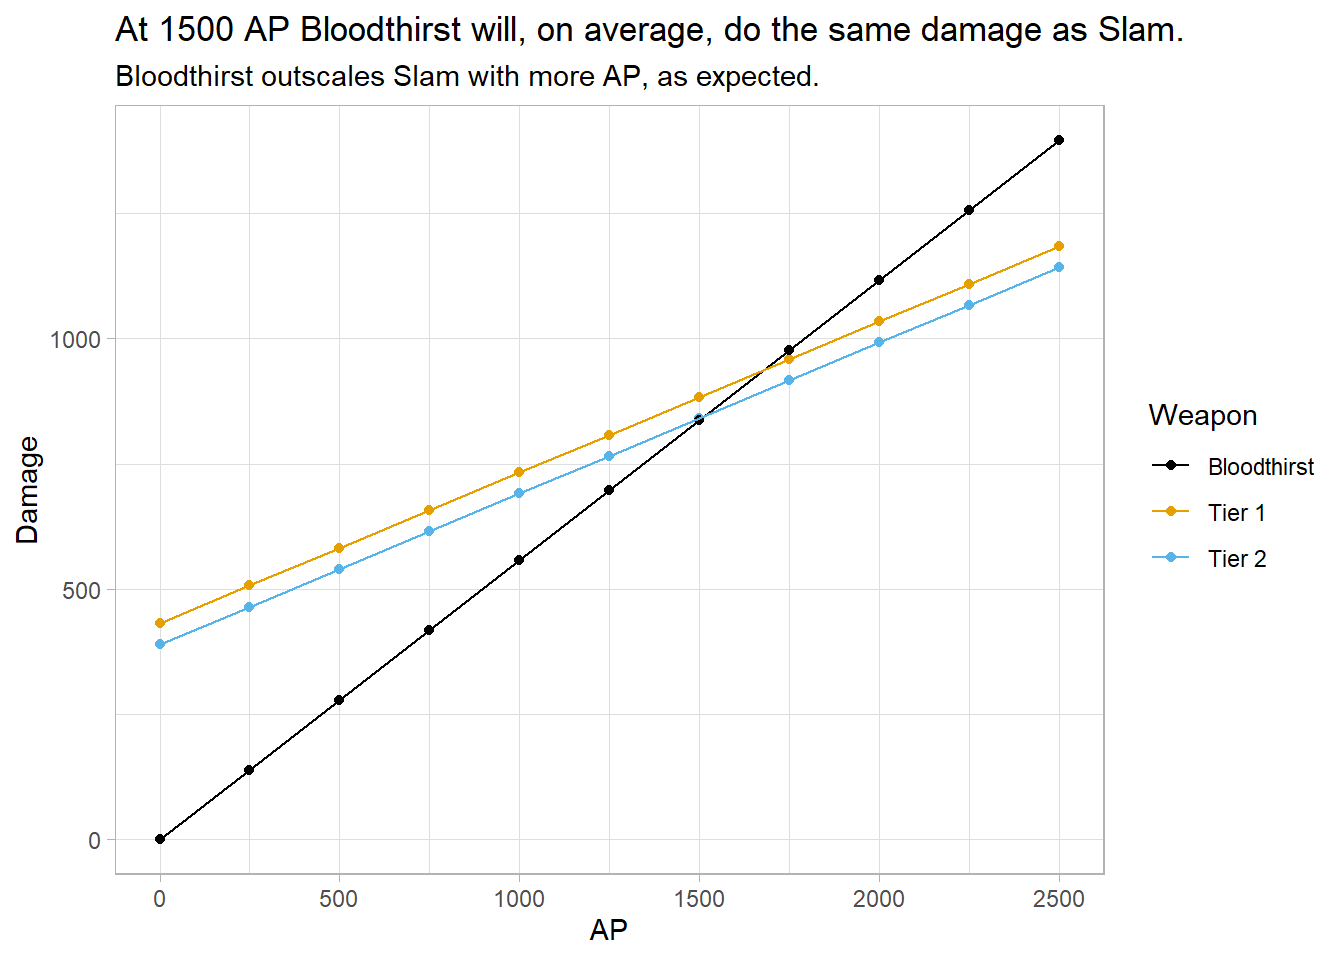
Figure 4.12: Comparison between Bloodthirst and Slam damage with two different tiers of weapons.
The graphs clearly show that while always more cost effective, Slam’s damage is lower than Bloodthirst’s past 1500 attack power when wielding a Tier 2 weapon, and and past 1700 when wielding a Tier 1 weapon - both easily achievable thresholds. What this effectively means is that Bloodthirst should be utilized as a priority if the player has over 1500 AP, keeping the previously understood ability priority. If the player is rage starved, however, Slam should be utilized as the more cost effective choice.
4.6.2 Slam vs Execute
Slam’s high DPR, combined with Execute’s poor DPR while wielding a two-handed weapon, begs the question: which one is more effective? We can visualize and investigat this scenario through the following graph:
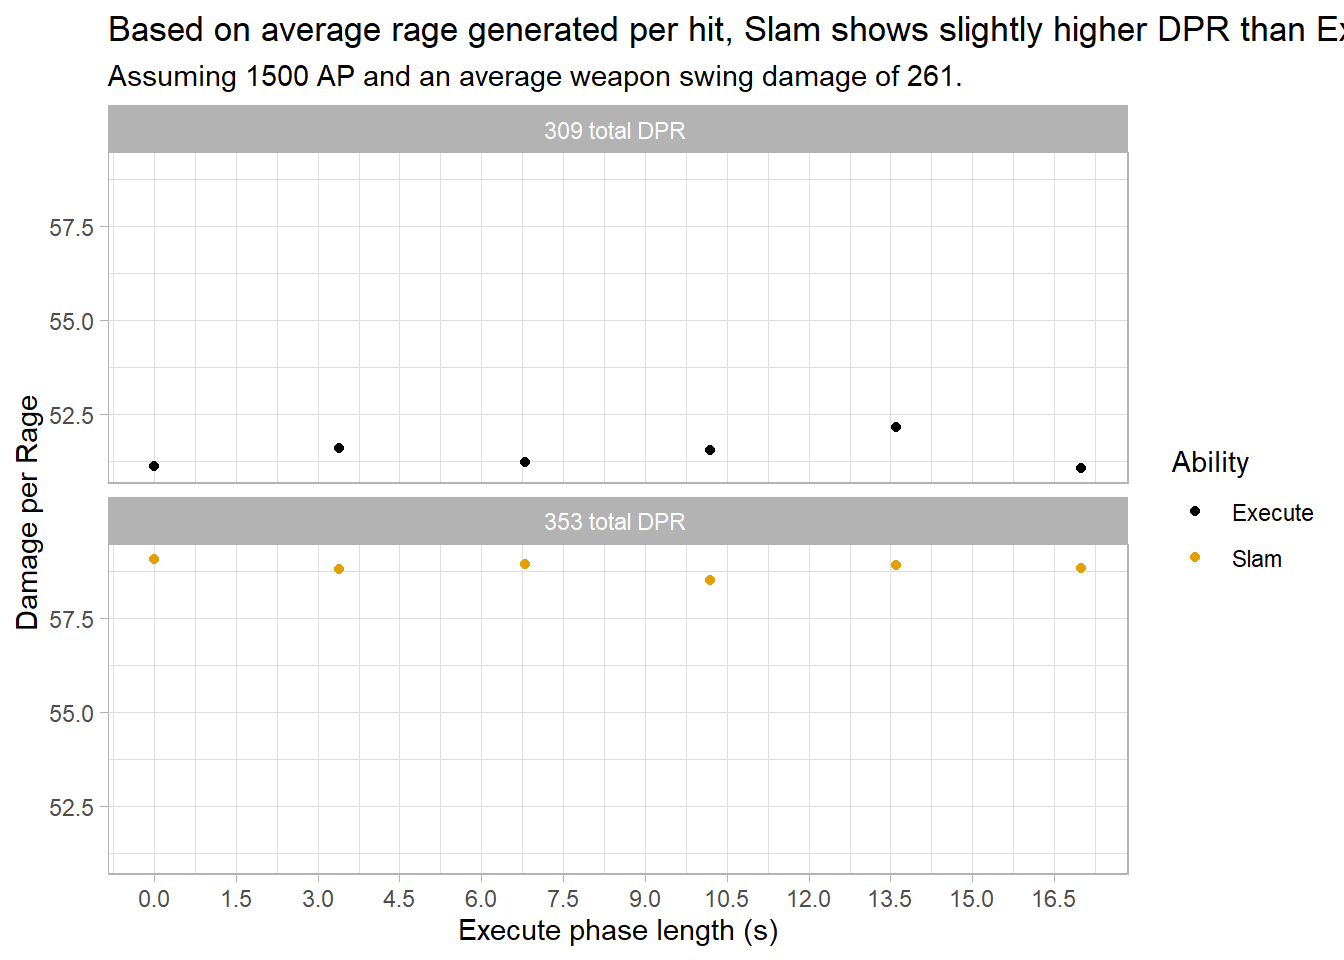
Figure 4.13: Comparison between Slam and Execute DPR during a 20 second long execute phase.
The dots represent an ability usage. The large auto attack damage resulting from a two handed weapon swing also results in more rage, reducing the overall DPR in the time period. We know, however, that DPR and Damage are not strictly proportional. Therefore, under the same circumstances, let’s look at the damage dealt in the same time interval:
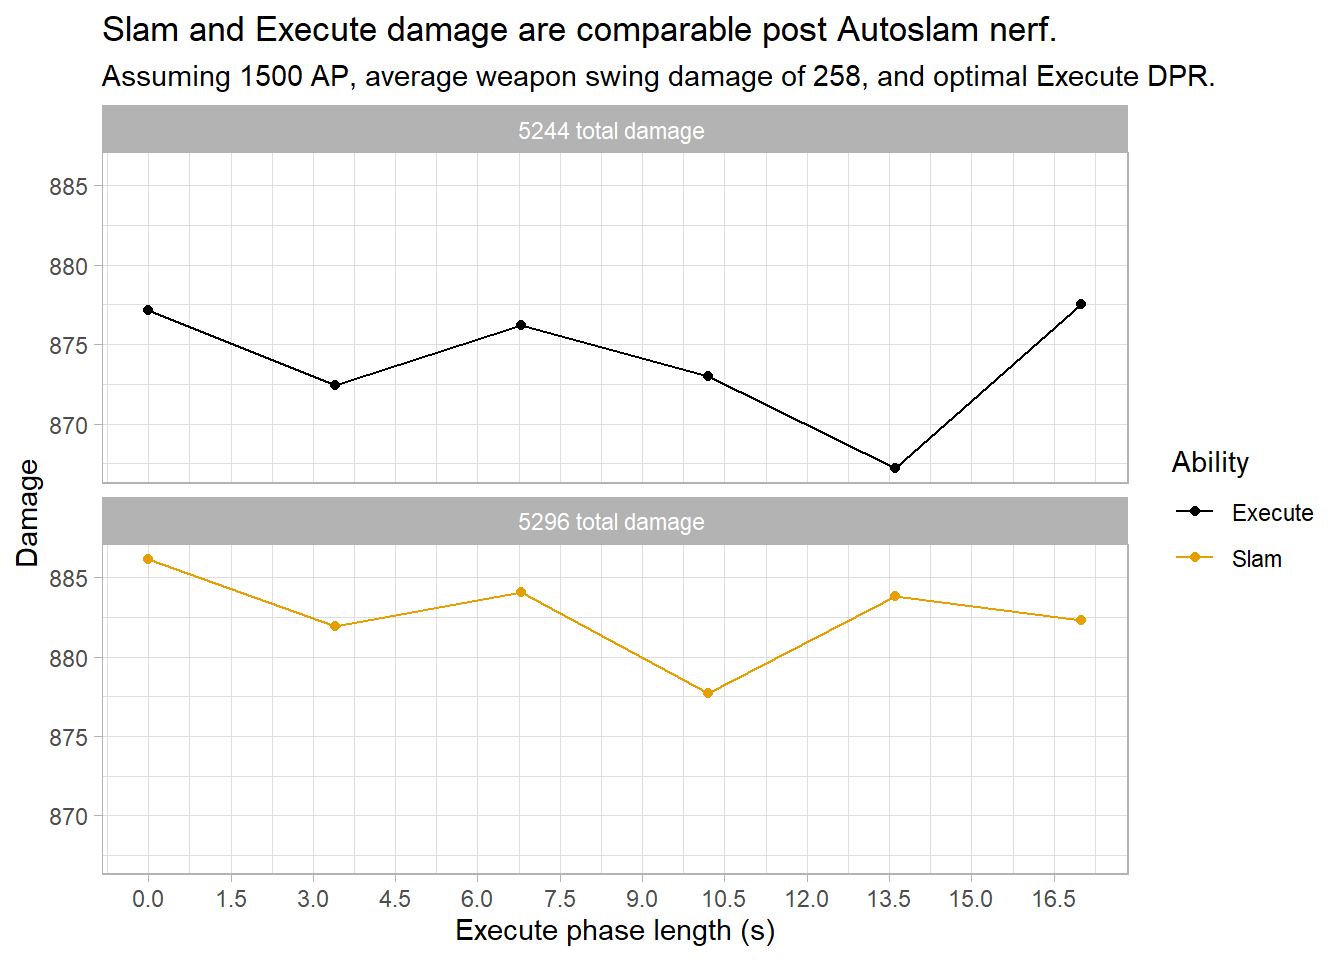
Figure 4.14: Comparison between the total damage dealt by Slam and Execute while wielding a two handed weapon during a 20 second long execute phase.
The graph shows Slam and Execute dealing virtually the same damage. However, it is important to note that Slam scales with attack power and weapon swing damage, and the graph does not account for possible Bloodthirsts that could be weaved in given enough rage. This effectively means the at lower gear levels, the player should still Slam over Execute throughout the execute phase - even if the difference between the two abilities is now much smaller. An important note is that if the boss is about to die and the player has a large surplus of rage, the potential damage of Execute is much higher than that of Slam and it should therefore be the ability of choice.
4.6.3 Slam vs Cleave and Heroic Strike
The same damage and DPR comparison can be made between Cleave, Heroic Strike, and Slam. Let’s first compare the effective DPR of these abilities:
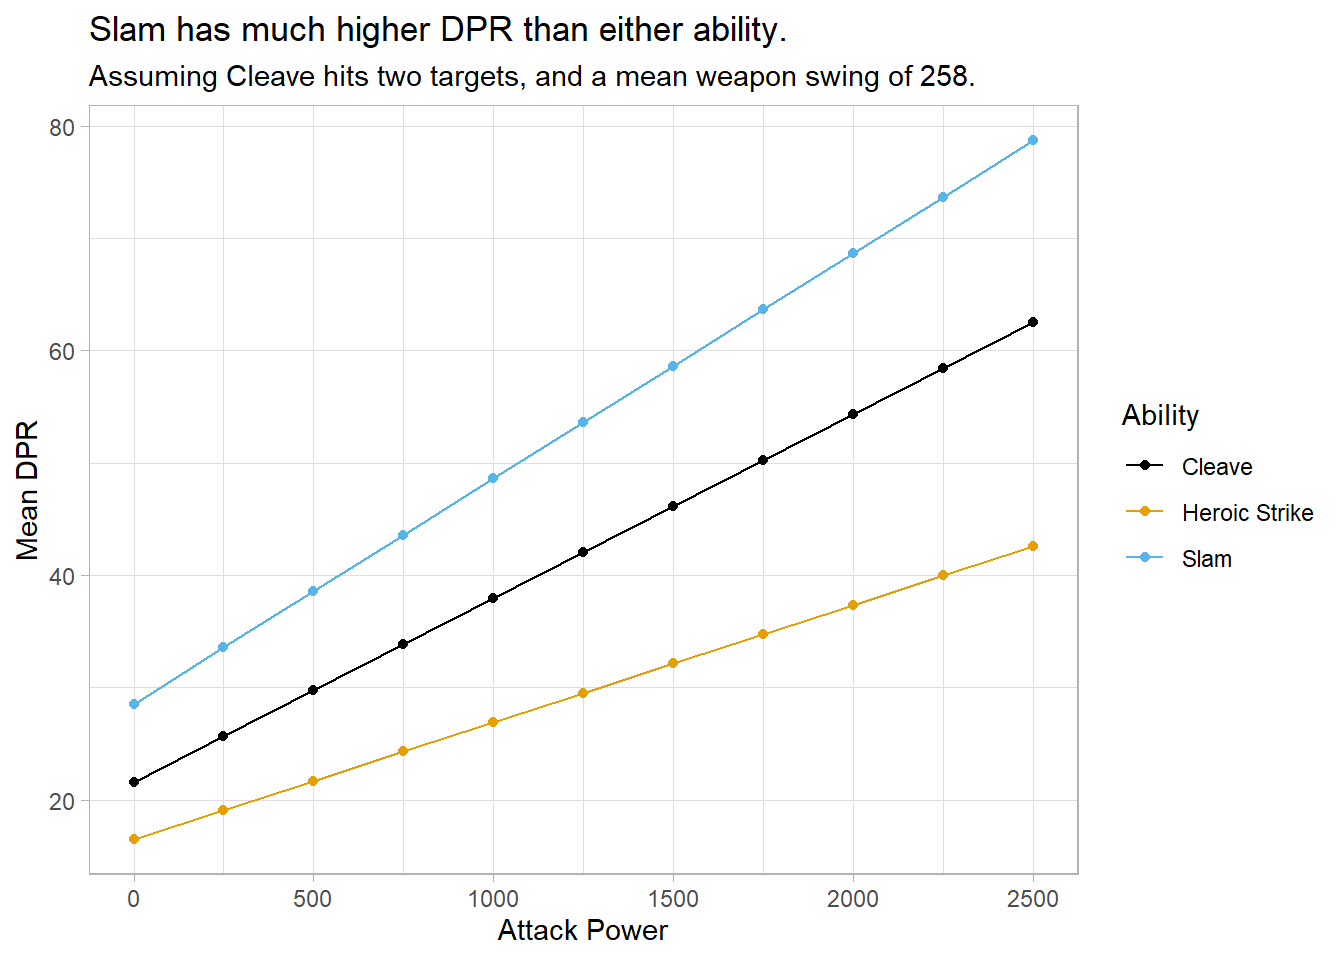
Figure 4.15: Comparison between Cleave, Heroic Strike, and Slam mean DPR at varying attack power levels.
It should not be surprising by now that Slam is the clear winner when it comes to DPR. It is important to note, however, that the context under which these abilities are utilized is different: Cleave and Heroic Strike are abilities utilized to dump extra rage with while Slam, due to its low rage cost, is not utilized in the same fashion. Let’s instead look at the damage dealt by these abilities, under the same circumstances:
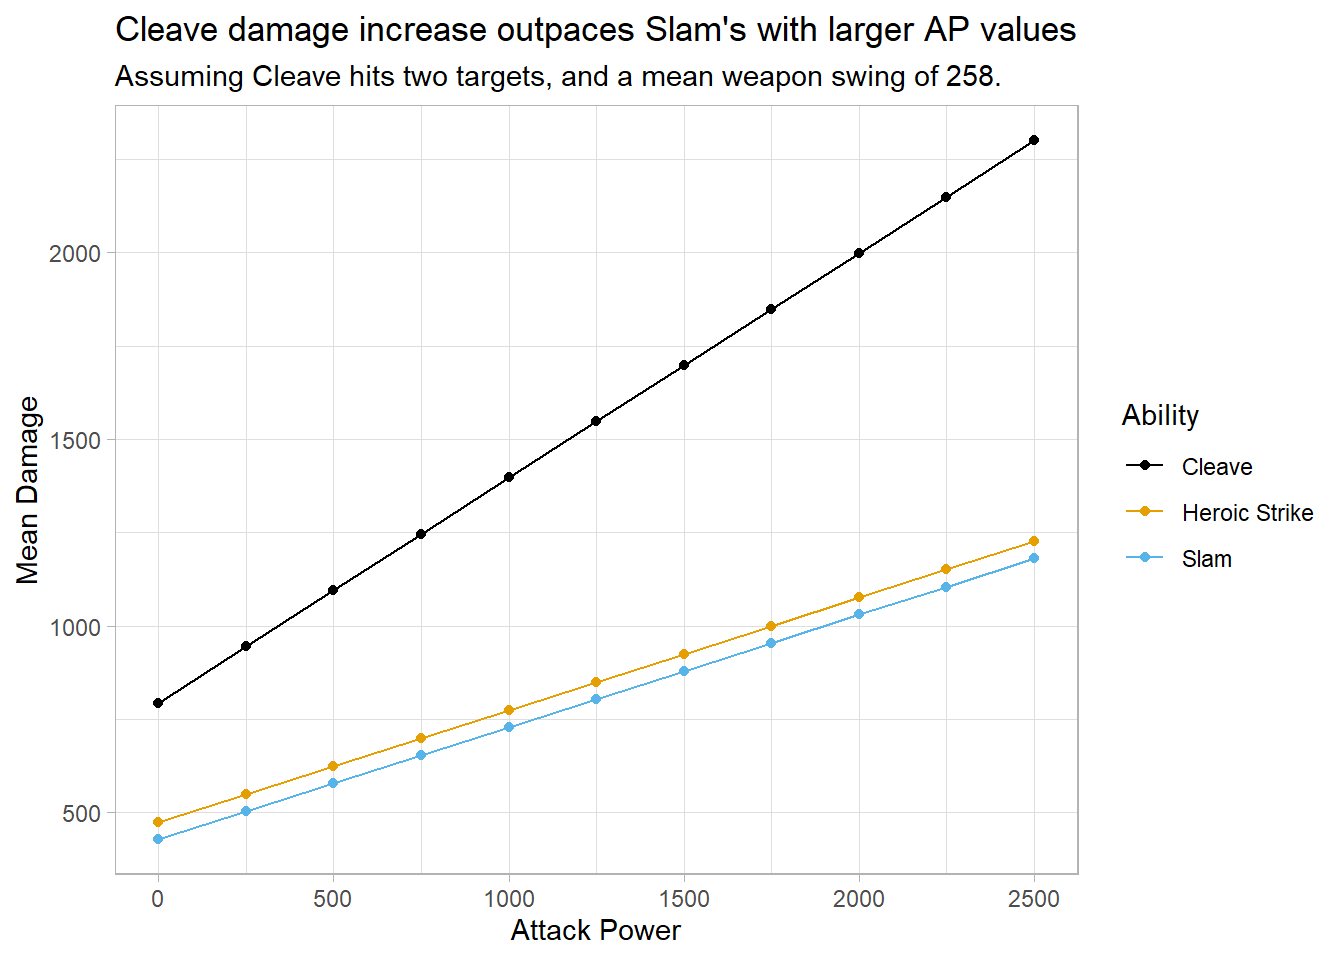
Figure 4.16: Comparison between Cleave, Heroic Strike, and Slam mean damage at varying attack power levels.
There’s a lot to take away from these two graphs:
- Slam is, by far, the your highest DPR ability while wielding a two handed weapon. As such, it should be prioritized in low-rage situations.
- Although Slam’s DPR is higher than that of Cleave’s, its damage is significantly lower in a two-target situation. Therefore, Cleave should be prioritized when the player has sufficient rage and 2 or more targets.
- While the damage difference between Heroic Strike and Slam is small, the DPR gap is very high. This means HS should never be utilized while wielding a two handed weapon when the player could otherwise Slam.
4.7 Hamstring
- Intro to Hamstring
- Why use Hamstring?
4.8 Overpower
- Intro to Overpower
- Should you use OP? If so, when?
4.9 Battle Shout
- Intro to battle shout
- How much does battle shout add, on average, to our abilities
- Improved battle shout, how good is it?
4.10 Damage per Rage
- Damage per Rage comparison between main rotational abilities (BT, WW, Exec, Slam)
- The impact of scaling on DPR, and how that affects your rotation
4.11 The Warrior Priority System
- The Warrior Priority System
References
Beanna, SAKUJ0, Skiz, Vilius, and DiscreteChi. 2019. “Fight Club Dpr Spreadsheet.”
Blizzard. 2020. “Autoslam Hotfix.” https://us.forums.blizzard.com/en/wow/t/wow-classic-hotfixes-updated-jan-7/361448/108.
WoW Wiki, Vanilla. 2019. “Rage in Vanilla World of Warcraft.” https://vanilla-wow.fandom.com/wiki/Rage.