An error has occurred!
Downloading Google Font files requires either the curl package or capabilities('libcurl').
6 Layouts, themes, HTML
6.1 Introduction
Chapter section list
6.2 Single page layouts
Layout functions provide the high-level visual structure of an app. Layouts are created by a hierarchy of function calls, where the hierarchy in R matches the hierarchy in the generated HTML. This helps you understand layout code.
R Code 6.1 : Single page layout
#| '!! shinylive warning !!': |
#|   shinylive does not work in self-contained HTML documents.
#|   Please set `embed-resources: false` in your metadata.
#| standalone: true
#| viewerHeight: 400
#| components: [editor, viewer]

ui <- fluidPage(
  titlePanel("Hello Shiny!"),
  sidebarLayout(
    sidebarPanel(
      sliderInput("obs", "Observations:", min = 0, max = 1000, value = 500)
    ),
    mainPanel(
      plotOutput("distPlot")
    )
  )
)

server <- function(input, output, session) {

}

shinyApp(ui, server)
6.2.1 Page functions
The most important, but least interesting, layout function is fluidPage(), which you’ve seen in pretty much every example so far. But what’s it doing and what happens if you use it by itself? Figure 6.1 shows the results: it looks like a very boring app but there’s a lot going behind the scenes, because fluidPage() sets up all the HTML, CSS, and JavaScript that Shiny needs.
R Code 6.2 : An UI consisting just of fluidPage()
#| '!! shinylive warning !!': |
#|   shinylive does not work in self-contained HTML documents.
#|   Please set `embed-resources: false` in your metadata.
#| standalone: true
#| components: [editor, viewer]


ui <- fluidPage()

server <- function(input, output, session) {}

shinyApp(ui, server)
In addition to fluidPage(), Shiny provides a couple of other page functions that can come in handy in more specialized situations: fixedPage() and fillPage().
-
fixedPage()works likefluidPage()but has a fixed maximum width, which stops your apps from becoming unreasonably wide on bigger screens. -
fillPage()fills the full height of the browser and is useful if you want to make a plot that occupies the whole screen.
Resource 6.1 : Page functions
- fluidPage(): Create a page with fluid layout.
- fixedPage(): Create a page with a fixed layout.
- fillPage(): Create a page that fills the window.
6.2.2 Page with sidebar
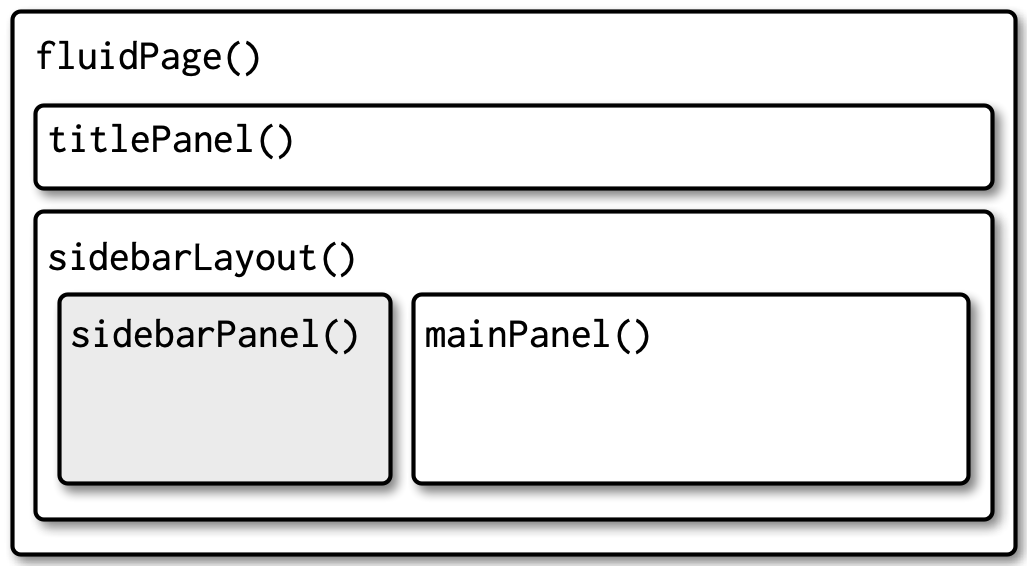
To make more complex layouts, you’ll need call layout functions inside of fluidPage(). For example, to make a two-column layout with inputs on the left and outputs on the right you can use sidebarLayout() (along with its friends titlePanel(), sidebarPanel(), and mainPanel()).
-
sidebarLayout(): Layout a sidebar and main area. Create a layout (
sidebarLayout()) with a sidebar (sidebarPanel()) and main area (mainPanel()) - titlePanel(): Create a panel containing an application title.
#| '!! shinylive warning !!': |
#|   shinylive does not work in self-contained HTML documents.
#|   Please set `embed-resources: false` in your metadata.
#| standalone: true
#| viewerHeight: 200
#| components: [editor, viewer]
#| layout: vertical

# Define UI
ui <- fluidPage(

    titlePanel("Hello Shiny!"),

    sidebarLayout(
        sidebarPanel("sidebarPanel"),
        mainPanel("mainPanel")
    )
)

# Server logic
server <- function(input, output) {}

# Complete app with UI and server components
shinyApp(ui, server)
I had to choose a slightly wider page width. Otherwise Shiny would have stacked the two panels.
#| '!! shinylive warning !!': |
#|   shinylive does not work in self-contained HTML documents.
#|   Please set `embed-resources: false` in your metadata.
#| standalone: true
#| viewerHeight: 500
#| components: [editor, viewer]
#| layout: vertical


ui <- fluidPage(
  titlePanel("Central limit theorem"),
  sidebarLayout(
    sidebarPanel(
      numericInput("m", "Number of samples: (1-100)", 2, min = 1, max = 100),
      "Increase the number of samples to see the distribution become more normal."
    ),
    mainPanel(
      plotOutput("hist")
    )
  )
)
server <- function(input, output, session) {
  output$hist <- renderPlot({
    req("m")
    means <- replicate(1e4, mean(runif(input$m)))
    hist(means, breaks = 20)
  }, res = 96)
}

shinyApp(ui, server)
Rendering the app (or reloading the web page) results for a moment with the error message “figure margins too large”. I do not know why this happens and how to prevent it.
6.2.3 Multi-row
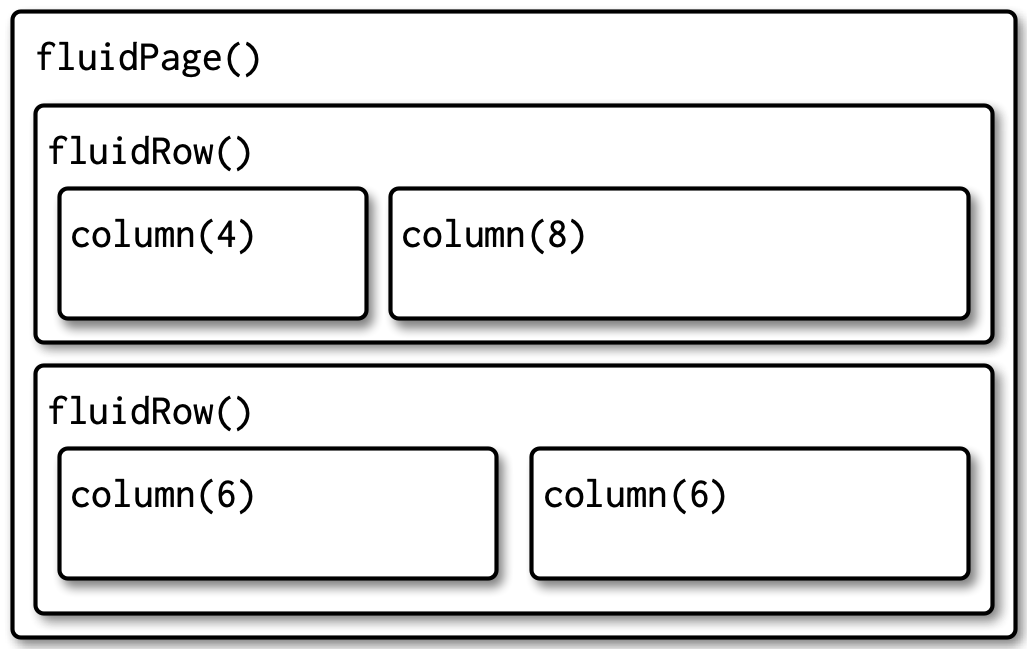
Under the hood, sidebarLayout() is built on top of a flexible multi-row layout, which you can use directly to create more visually complex apps. As usual, you start with fluidPage(). Then you create rows with fluidRow(), and columns with column().
Resource 6.3 : Multi-row functions
A fluid page layout consists of rows which in turn include columns.
- fluidRow(): Rows exist for the purpose of making sure their elements appear on the same line (if the browser has adequate width).
- column(): Columns exist for the purpose of defining how much horizontal space within a 12-unit wide grid it’s elements should occupy.
Each row is made up of 12 columns and the first argument to column() gives how many of those columns to occupy. A 12 column layout gives you substantial flexibility because you can easily create 2-, 3-, or 4-column layouts, or use narrow columns to create spacers. You can see an example of this layout in Section 4.4.
If you’d like to learn more about designing using a grid system, I highly recommend the classic text on the subject: “Grid systems in graphic design” by Josef Müller-Brockman (1998).
6.2.4 Exercises
6.3 Multi-page layout
As your app grows in complexity, it might become impossible to fit everything on a single page. In this section you’ll learn various uses of tabPanel() that create the illusion of multiple pages. This is an illusion because you’ll still have a single app with a single underlying HTML file, but it’s now broken into pieces and only one piece is visible at a time.
Multi-page apps pair particularly well with modules, which you’ll learn about in Chapter 19. Shiny modules allow you to partition up the server function in the same way you partition up the user interface, creating independent components that only interact through well defined connections.
6.3.1 Tabsets
The simple way to break up a page into pieces is to use tabsetPanel() and its close friend tabPanel(). As you can see in the code below, tabsetPanel() creates a container for any number of tabPanels(), which can in turn contain any other HTML components.
tabsetPanel() can be used anywhere in your app; it’s totally fine to nest tabsets inside of other components (including tabsets!) if needed.
Code Collection 6.2 : Using tabsets: tabsetPanel() and tabPanels()
R Code 6.5 : A simple tabset example
#| '!! shinylive warning !!': |
#|   shinylive does not work in self-contained HTML documents.
#|   Please set `embed-resources: false` in your metadata.
#| standalone: true
#| viewerHeight: 400
#| components: [editor, viewer]
#| layout: vertical

ui <- fluidPage(
  tabsetPanel(
    tabPanel("Data",
      fileInput("file", "Data", buttonLabel = "Upload..."),
      textInput("delim", "Delimiter (leave blank to guess)", ""),
      numericInput("skip", "Rows to skip", 0, min = 0),
      numericInput("rows", "Rows to preview", 10, min = 1)
    ),
    tabPanel("Parameters"),
    tabPanel("Results")
  )
)

server <- function(input, output, session) {}

shinyApp(ui, server)
R Code 6.6 : Tabset with location detection (via ID)
#| '!! shinylive warning !!': |
#|   shinylive does not work in self-contained HTML documents.
#|   Please set `embed-resources: false` in your metadata.
#| standalone: true
#| viewerHeight: 200
#| components: [editor, viewer]
#| layout: vertical

ui <- fluidPage(
  sidebarLayout(
    sidebarPanel(
      textOutput("panel")
    ),
    mainPanel(
      tabsetPanel(
        id = "tabset",
        tabPanel("panel 1", "one"),
        tabPanel("panel 2", "two"),
        tabPanel("panel 3", "three")
      )
    )
  )
)


server <- function(input, output, session) {
  output$panel <- renderText({
    paste("Current panel: ", input$tabset)
  })
}


shinyApp(ui, server)6.4 Bootstrap
Bootstrap is a collection of HTML conventions, CSS styles, and JS snippets bundled up into a convenient form.
It’s good to know that Bootstrap exists because then:
- You can use
bslib::bs_theme()to customize the visual appearance of your code, Section 6.5. - You can use the
classargument to customize some layouts, inputs, and outputs using Bootstrap class names, as you saw in - You can make your own functions to generate Bootstrap components that Shiny doesn’t provide, as explained in “Utility classes”.
Resource 6.4 : Shiny CSS frameworks
- {bslib} by Posit based on Bootstrap (Sievert, Cheng, and Aden-Buie 2025).
- {shiny.semantics} by Appsilon, builds on top of Fomantic UI (Stachura et al. 2024). Appsilon also developed {rhino}, an R package designed for professional developers to help building high quality, enterprise-grade Shiny applications at speed (Żyła et al. 2025).
- {shinyMobile} by RInteRface, builds on top of framework 7, and is specifically designed for mobile apps (Granjon et al. 2024).
- {shinymaterial} by Eric Anderson, is built on top of Google’s Material design framework.
- {shinydashboard} also by Posit, provides a layout system designed to create dashboards.
You can find a fuller, and actively maintained, list at Awesome Shiny Extension.
6.5 Themes
Bootstrap is so ubiquitous within the R community that it’s easy to get style fatigue: after a while every Shiny app and Rmd start to look the same. The solution is theming with the {bslib} package. {bslib}1 is a relatively new package that allows you to override many Bootstrap defaults in order to create an appearance that is uniquely yours.
{bslib} has several advantages:
- It is designed not only to work for Shiny but also for other contexts, like R Markdown.
- It provides custom theming, even interactively in real-time.
- It uses newer versions of Bootstrap and Bootswatch, whereas Shiny and R Markdown currently default to Bootstrap 3 and may continue to do so to maintain backwards compatibility.
Resource 6.5 : {bslib} layout design
- {bslib} package documentation for custom bootstrap SASS themes for Shiny and R Markdown
- New Shiny application layout guide based on {bslib}
- Bootstrap is a free and open-source CSS framework designed for responsive, mobile-first front-end web development.
- Bootswatch is a collection of pre-built themes that can be easily applied to a Bootstrap project, simplifying the process of achieving a polished and professional look.
6.5.1 Getting started
Create a theme with bslib::bs_theme() then apply it to an app with the theme argument of the page layout function:
fluidPage(
  theme = bslib::bs_theme(...)
)
If not specified, Shiny will use the classic Bootstrap v3 theme that it has used basically since it was created. By default, bslib::bs_theme(), will use Bootstrap v5. Using Bootstrap v5 instead of v3 will not cause problems if you only use built-in components. There is a possibility that it might cause problems if you’ve used custom HTML, so you can force it to stay with v3 with version = 3.
6.5.2 Shiny themes
The easiest way to change the overall look of your app is to pick a premade “bootswatch” theme using the bootswatch argument to bslib::bs_theme().
Code Collection 6.4 : Title for code collection
R Code 6.9 : Shiny with a bslib predefined theme
#| '!! shinylive warning !!': |
#|   shinylive does not work in self-contained HTML documents.
#|   Please set `embed-resources: false` in your metadata.
#| standalone: true
#| viewerHeight: 450
#| components: [editor, viewer]


ui <- fluidPage(
  theme = bslib::bs_theme(bootswatch = "darkly"),
  sidebarLayout(
    sidebarPanel(
      textInput("txt", "Text input:", "text here"),
      sliderInput("slider", "Slider input:", 1, 100, 30)
    ),
    mainPanel(
      h1(paste0("Theme: darkly")),
      h2("Header 2"),
      p("Some text")
    )
  )
)

server <- function(input, output, session) {

}

shinyApp(ui, server)
R Code 6.10 : Shiny with custom theme changes
#| '!! shinylive warning !!': |
#|   shinylive does not work in self-contained HTML documents.
#|   Please set `embed-resources: false` in your metadata.
#| standalone: true
#| viewerHeight: 450
#| components: [editor, viewer]
#| error: true

ui <- fluidPage(
  theme = bslib::bs_theme(
  bg = "#0b3d91",
  fg = "white",
  base_font = "Source Sans Pro"
  ),
  sidebarLayout(
    sidebarPanel(
      textInput("txt", "Text input:", "text here"),
      sliderInput("slider", "Slider input:", 1, 100, 30)
    ),
    mainPanel(
      h1(paste0("Theme: darkly")),
      h2("Header 2"),
      p("Some text")
    )
  )
)

server <- function(input, output, session) {

}

shinyApp(ui, server)
In my first trials I got always the error message “Text to be written must be a length-one character vector”. After googling the error message I found out that the error message comes from {htmltools}:
This error occurs in htmltools::WSTextWriter (see here and CTRL+F to look for “writeImpl”). This function is in charge of properly writing text to your display when you display a raw text in any UI function. It raises the mentioned error when the
writeImpl()function receives more than one character string (aka element of acharacter()vector). To correct this, make sure you never provide two character strings to a Shiny UI function asking for only one character argument. (From Eli Ker Ano, the first comment under the StackOverflow question Text to be written must be a length-one character vector).
I tried to follow this advice but to no avail. Even if I deleted all lines between sidebarPanel() and mainPanel() the error persisted. Could it be that {bslib} has changed in the meanwhile and requires other layout commands? This means that it would not be fully compatible with Shiny anymore. That seems unlikely.
=instead of <- required for theme = bslib::bs_theme()
After several hours I finally found the problem. The <- operator works fine without additional parameters (allowed is only bootswatch = "<theme name>") but with (additional) other arguments you have to use the = operator.
I copied the code snippet from the book and that was wrong! In the code chunk of 6.5.1 Shiny Themes is the correct = operator used, but in the code snippet below not.
With shinylive in the Quarto document it works with the <- operator as well!
6.5.3 Plot themes
If you’ve heavily customized the style of your app, you may want to also customize your plots to match. Luckily, this is really easy thanks to the {thematic} package which automatically themes {ggplot2}, {lattice}, and base plots. Just call thematic::thematic_shiny() in your server function. This will automatically determine all of the settings from your app theme.
6.5.4 Exercises
The suggested bslib::bs_themer() function worked in my case only with a native theme. Real-time theming worked but I had always to start with the fresh standard theme. I couldn’t succeed to incorporate already those changes that I have already made to the theme.
I learned two other live theme changing procedures that allows to start from an already specified theme:
-
bslib::bs_theme_preview(theme)as recommended in the book. It is important that you fix those theme changes that you are satisfied with. For this you could use the functiontheme = bslib::bs_theme(<here include the changes you already made>) -
bslib::run_with_themer(shinyApp(ui, server))as explained in Outstanding User Interfaces with Shiny. Replace theshinyApp(ui, server)code line withrun_with_themer(shinyApp(ui, server))and start the app. Therun_with_themer()function allows you to work on the app and to modify the theme at the same time.
Watch out! 6.1: Compiled {curl} package for webR not available
I can’t run this app in shinyliv because there is no WASM compatible compilation of the {curl} package available.
Running capabilities('libcurl') in the console returns true but trying to install the packages in the webR demo page with
install.packages('curl',
  repos = c('https://tidyverse.r-universe.dev', 'https://repo.r-wasm.org'))
returns
Warning message: In install.packages(“curl”, repos = c(“https://tidyverse.r-universe.dev”, : Requested package curl not found in webR binary repo.
In this special case the problem is connected with the download of Google font with font_google(<font name>). A way around the problem is to download the Google fonts and integrate them into the operating system. In that case shinylive have access to these fonts and downloading fonts with font_google(<font name>) is not necessary anymore.
For more information on the issue missing compiling WASM compatible R packages see Resource 9.5.
Resource 6.6 : How to download Google fonts and integrate them into macOS
To download and install Google font see the article by Junian Triajianto: How to Install ALL Google Fonts on macOS: A simple guide to install the entire Google Fonts library on macOS. He explains two different ways to accomplish the same: one procedure uses the terminal, the other not. Both are easy to understand and the written explanation is supported by two videos: One for the terminal way, the other without terminal.
6.6 Under the hood
There’s no magic behind all the input, output, and layout functions: they just generate HTML. (The magic is done by JavaScript, which is outside the scope of the book.)
You can see that HTML by executing UI functions directly in the console:
shiny::fluidPage(
  shiny::textInput("name", "What's your name?")
)

<div class="container-fluid">
  <div class="form-group shiny-input-container">
    <label for="name">What's your name?</label>
    <input id="name" type="text" class="form-control" value=""/>
  </div>
</div>
Note that this is the contents of the <body> tag; other parts of Shiny take care of generating the <head>. If you want to include additional CSS or JS dependencies you’ll need to learn htmltools::htmlDependency(). Two good places to start are https://blog.r-hub.io/2020/08/25/js-r/#web-dependency-management and https://unleash-shiny.rinterface.com/htmltools-dependencies.html.
It’s possible to add your own HTML to the ui. There are two different ways:
- One way to do so is by including literal HTML with the
htmltools::HTML()function. In the example below, the “raw character constant”,r"()"is used, to make it easier to include quotes in the string. You can even skipfluidPage()altogether and supply raw HTML for the whole UI. See Build your entire UI with HTML for more details. - Alternatively, you can make use of the HTML helper that Shiny provides via import of {htmltools} functions. There are regular functions for the most important elements like
h1()andp(), and all others can be accessed via the othertagshelper2. Named arguments become attributes and unnamed arguments become children, so we can recreate the above HTML with these regular functions.
Code Collection 6.5 : Raw HTML for the UI
R Code 6.13 : Add HTML raw code snippets to the Shiny UI
#| '!! shinylive warning !!': |
#|   shinylive does not work in self-contained HTML documents.
#|   Please set `embed-resources: false` in your metadata.
#| standalone: true
#| viewerHeight: 400
#| components: [editor, viewer]


ui <- shiny::fluidPage(
  htmltools::HTML(r"(
    <h1>This is a heading</h1>
    <p class="my-class">This is some text!</p>
    <ul>
      <li>First bullet</li>
      <li>Second bullet</li>
    </ul>
  )")
)

server <- function(input, output, session) {}

shinyApp(ui, server)
R Code 6.14 : Numbered R Code Title (Tidyverse)
#| '!! shinylive warning !!': |
#|   shinylive does not work in self-contained HTML documents.
#|   Please set `embed-resources: false` in your metadata.
#| standalone: true
#| viewerHeight: 400
#| components: [editor, viewer]

ui <- fluidPage(
  h1("This is a heading"),
  p("This is some text", class = "my-class"),
  tags$ul(
    tags$li("First bullet"),
    tags$li("Second bullet")
  )
)

server <- function(input, output, session) {}

shinyApp(ui, server)
One advantage of generating HTML with code is that you can interweave existing Shiny components into a custom structure. For example, the code below makes a paragraph of text containing two outputs, one which is bold:
tags$p(
  "You made ",
  tags$b("$", textOutput("amount", inline = TRUE)),
  " in the last ",
  textOutput("days", inline = TRUE),
  " days "
)
Note the use of inline = TRUE; the textOutput() default is to produce a complete paragraph.
To learn more about using HTML, CSS, and JavaScript to make compelling user interfaces, I highly recommend David Granjon’s Outstanding User Interfaces with Shiny.
Resource 6.7 : HTML, CSS, and JavaScript to make compelling user interfaces
6.7 Glossary Entries
| term | definition |
|---|---|
| Appsilon | Appsilon is a company that specializes in data science and visualization services. They offer R Shiny application development, enterprise dashboard solutions, and machine learning implementations. Additionally, they provide services such as UI/UX design, full-stack engineering support, DevOps for Posit products, and the creation of custom R packages for Shiny applications. <https://www.appsilon.com/> |
| Bootstrap | Bootstrap is a free and open-source CSS framework designed for responsive, mobile-first front-end web development. The framework provides HTML, CSS, and JavaScript-based design templates for various interface components such as typography, forms, buttons, navigation, and more. It aims to simplify the process of creating responsive and mobile-friendly websites by offering pre-styled components and a grid system. |
| Bootswatch | Bootswatch is a collection of themes for Bootstrap. It provides pre-built themes that can be easily applied to a Bootstrap project, simplifying the process of achieving a polished and professional look. |
| Positx | Posit is an open-source data science software company that was formerly known as RStudio Inc. Posit's rebranding was aimed at expanding its offerings beyond R to include support for other languages, reflecting a shift towards a more language-agnostic approach to data science tools. The RStudio IDE, which is now part of Posit, remains a popular tool for data scientists who develop in R and Python. There are many other important software products developed and maintained by Posit such as, Quarto, Shiny, tidymodels, tidyverse, and many other popular packages. <https://posit.co/> |
| RinteRface | RinteRface aims at bringing the most famous open source HTML templates to R. <https://rinterface.com/> |
| RMarkdown | RMarkdown is a file format for creating dynamic documents that combine text written in markdown with chunks of embedded R code. This allows users to weave together narrative text and code to produce elegantly formatted output, such as HTML, PDF, or Microsoft Word documents, among others. |
| SASS | SASS (Syntactically Awesome Style Sheets) is a CSS preprocessor that extends CSS with additional features to make styling easier and more efficient. Some key extensions include variables, nesting, and mixins. Variables allow you to store values like colors and fonts, making it easier to update styles across your stylesheet. Nesting enables you to write CSS selectors in a hierarchical manner, similar to HTML structure, reducing redundancy. Mixins let you define reusable blocks of CSS properties. Additionally, SASS supports functions and modules, which help organize and manage complex stylesheets more effectively. SCSS, short for Sassy CSS, is the main syntax used in SASS and is a superset of CSS, meaning all valid CSS is also valid SCSS. It uses the .scss file extension and includes all the features mentioned above. |
| WASM | WASM stands for WebAssembly which allows software that’s normally compiled for a specific computer system to instead run anywhere, including in web browsers. It is a binary instruction format for a stack-based virtual machine. |
Session Info
Session Info
Code
sessioninfo::session_info()#> ─ Session info ───────────────────────────────────────────────────────────────
#> setting value
#> version R version 4.5.1 (2025-06-13)
#> os macOS Sequoia 15.5
#> system aarch64, darwin20
#> ui X11
#> language (EN)
#> collate en_US.UTF-8
#> ctype en_US.UTF-8
#> tz Europe/Vienna
#> date 2025-07-19
#> pandoc 3.7.0.2 @ /opt/homebrew/bin/ (via rmarkdown)
#> quarto 1.8.4 @ /usr/local/bin/quarto
#>
#> ─ Packages ───────────────────────────────────────────────────────────────────
#> package * version date (UTC) lib source
#> cli 3.6.5 2025-04-23 [1] CRAN (R 4.5.0)
#> codetools 0.2-20 2024-03-31 [1] CRAN (R 4.5.0)
#> commonmark 2.0.0 2025-07-07 [1] CRAN (R 4.5.0)
#> curl 6.4.0 2025-06-22 [1] CRAN (R 4.5.0)
#> dichromat 2.0-0.1 2022-05-02 [1] CRAN (R 4.5.0)
#> digest 0.6.37 2024-08-19 [1] CRAN (R 4.5.0)
#> evaluate 1.0.4 2025-06-18 [1] CRAN (R 4.5.0)
#> farver 2.1.2 2024-05-13 [1] CRAN (R 4.5.0)
#> fastmap 1.2.0 2024-05-15 [1] CRAN (R 4.5.0)
#> glossary * 1.0.0.9003 2025-06-08 [1] local
#> glue 1.8.0 2024-09-30 [1] CRAN (R 4.5.0)
#> htmltools 0.5.8.1 2024-04-04 [1] CRAN (R 4.5.0)
#> htmlwidgets 1.6.4 2023-12-06 [1] CRAN (R 4.5.0)
#> httpuv 1.6.16 2025-04-16 [1] CRAN (R 4.5.0)
#> jsonlite 2.0.0 2025-03-27 [1] CRAN (R 4.5.0)
#> kableExtra 1.4.0 2024-01-24 [1] CRAN (R 4.5.0)
#> knitr 1.50 2025-03-16 [1] CRAN (R 4.5.0)
#> later 1.4.2 2025-04-08 [1] CRAN (R 4.5.0)
#> lifecycle 1.0.4 2023-11-07 [1] CRAN (R 4.5.0)
#> litedown 0.7 2025-04-08 [1] CRAN (R 4.5.0)
#> magrittr 2.0.3 2022-03-30 [1] CRAN (R 4.5.0)
#> markdown 2.0 2025-03-23 [1] CRAN (R 4.5.0)
#> mime 0.13 2025-03-17 [1] CRAN (R 4.5.0)
#> promises 1.3.3 2025-05-29 [1] CRAN (R 4.5.0)
#> R6 2.6.1 2025-02-15 [1] CRAN (R 4.5.0)
#> RColorBrewer 1.1-3 2022-04-03 [1] CRAN (R 4.5.0)
#> Rcpp 1.1.0 2025-07-02 [1] CRAN (R 4.5.0)
#> rlang 1.1.6 2025-04-11 [1] CRAN (R 4.5.0)
#> rmarkdown 2.29 2024-11-04 [1] CRAN (R 4.5.0)
#> rstudioapi 0.17.1 2024-10-22 [1] CRAN (R 4.5.0)
#> rversions 2.1.2 2022-08-31 [1] CRAN (R 4.5.0)
#> scales 1.4.0 2025-04-24 [1] CRAN (R 4.5.0)
#> sessioninfo 1.2.3 2025-02-05 [1] CRAN (R 4.5.0)
#> shiny * 1.11.1.9000 2025-07-08 [1] Github (rstudio/shiny@f752856)
#> stringi 1.8.7 2025-03-27 [1] CRAN (R 4.5.0)
#> stringr 1.5.1 2023-11-14 [1] CRAN (R 4.5.0)
#> svglite 2.2.1 2025-05-12 [1] CRAN (R 4.5.0)
#> systemfonts 1.2.3 2025-04-30 [1] CRAN (R 4.5.0)
#> textshaping 1.0.1 2025-05-01 [1] CRAN (R 4.5.0)
#> vctrs 0.6.5 2023-12-01 [1] CRAN (R 4.5.0)
#> viridisLite 0.4.2 2023-05-02 [1] CRAN (R 4.5.0)
#> xfun 0.52 2025-04-02 [1] CRAN (R 4.5.0)
#> xml2 1.3.8 2025-03-14 [1] CRAN (R 4.5.0)
#> xtable 1.8-4 2019-04-21 [1] CRAN (R 4.5.0)
#> yaml 2.3.10 2024-07-26 [1] CRAN (R 4.5.0)
#>
#> [1] /Library/Frameworks/R.framework/Versions/4.5-arm64/library
#> [2] /Library/Frameworks/R.framework/Versions/4.5-arm64/Resources/library
#> * ── Packages attached to the search path.
#>
#> ──────────────────────────────────────────────────────────────────────────────References
Granjon, David, Veerle van Leemput, Victor Perrier, and Isabelle Rudolf. 2024. “shinyMobile: Mobile Ready ’Shiny’ Apps with Standalone Capabilities.” https://doi.org/10.32614/CRAN.package.shinyMobile.
Mülller-Brockmann, Josef. 1998. Grid Systems in Graphic Design A Visual Communication Manual for Graphic Designers Typographers and Three Dimensional Designers Hardcover 1 Jan 1999. Generic.
Sievert, Carson, Joe Cheng, and Garrick Aden-Buie. 2025. “Bslib: Custom ’Bootstrap’ ’Sass’ Themes for ’Shiny’ and ’Rmarkdown’.” https://doi.org/10.32614/CRAN.package.bslib.
Stachura, Filip, Dominik Krzeminski, Krystian Igras, Adam Forys, Paweł Przytuła, Jakub Chojna, Olga Mierzwa-Sulima, Jakub Nowicki, and Tymoteusz Makowski. 2024. “Shiny.semantic: Semantic UI Support for Shiny.” https://doi.org/10.32614/CRAN.package.shiny.semantic.
Żyła, Kamil, Jakub Nowicki, Leszek Siemiński, Marek Rogala, Recle Vibal, Tymoteusz Makowski, and Rodrigo Basa. 2025. “Rhino: A Framework for Enterprise Shiny Applications.” https://doi.org/10.32614/CRAN.package.rhino.
Therefore the name:
bslibis an acronym for bootstrap library.↩︎Because Shiny imports {htmltools} it is therefore not necessary to write
htmltools::h1(),htmltools::p()etc. Whenlibrary(shiny)is loaded justh1() or,p()is enough.↩︎