第 6 章 Shiny
Shiny 包(Chang等,2021年)构建了由 R 驱动的交互式 Web 应用程序。要从 R Markdown 文档中调用 Shiny 代码,在 YAML 元数据添加 runtime: shiny 即可。Shiny 是用于构建基于 R 的 Web 应用程序的功能非常强大的框架。本书不全面介绍 Shiny(这是一个太大的话题),超出了本书的范围。 我们建议不熟悉 Shiny 的读者在阅读本章之前,先从 https://shiny.rstudio.com 网站了解有关它的更多信息。
与创建静态报告的传统工作流不同,你可以创建允许读者更改分析基础参数的文档,并在 Shiny 的 R Markdown 文档中立即看到结果。
一张图片胜过千言万语,当你与它互动时,一份 Shiny 文档可能会向你展示上千张图片。读者不再被报告中固定的分析和结论所束缚。他们可能会自己探索其他可能性,可能会有新的发现或得出不同的结论。
6.1 入门指南
你可以通过在 YAML 元数据中加入 runtime: shiny,这样就可以把任何面向 html 的 R Markdown 文档变成 Shiny 文档了,例如:
---
title: "Shiny Document"
output: html_document
runtime: shiny
---
注意,R Markdown 文档的输出格式必须是 HTML 格式。也就是说,文档最后生成的是一个 web 页面(*.html 文件)。
注意: 非 html 格式,如
pdf_document和word_document将不能与 Shiny 同时运行。另外,一些演示格式也是 HTML 格式,比如ioslides_presentation和slidy_presentation。
你也通过RStudio构建一个新的Shiny文档。步骤如下:File -> new File -> R Markdown 并选择Shiny,具体见图6.1。
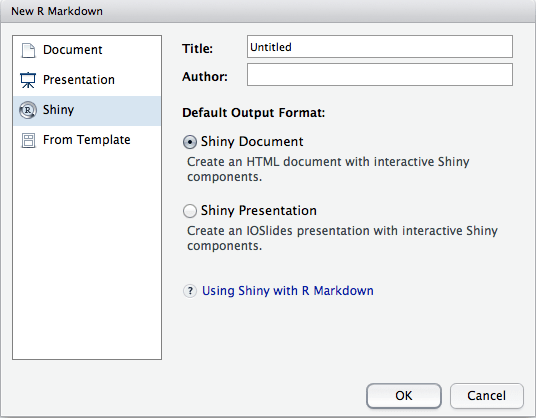
图 6.1: Create a new Shiny document in RStudio.
要在 RStudio 中运行 Shiny 文档,你需要单击编辑器工具栏上的 “Run Document” 按钮(当 RStudio 检测到这是 Shiny 文档时,它会自动将 Knit 按钮替换为 run document)。如果你没使用 RStudio,或者想在 R 控制台运行文档进行故障排除,你可以调用函数 rmarkdown::run() 并将文件名传递给它。
你可以在文档中嵌入 Shiny 的输入和输出。输入发生变化时,输出将自动更新。在下面的示例中,我们创建一个名称为 rows 的数字输入( numericInput ),然后在生成输出时通过 input$rows 引用其值:
```{r, echo=FALSE}
numericInput("rows", "How many cars?", 5)

renderTable({
  head(cars, input$rows)
})
```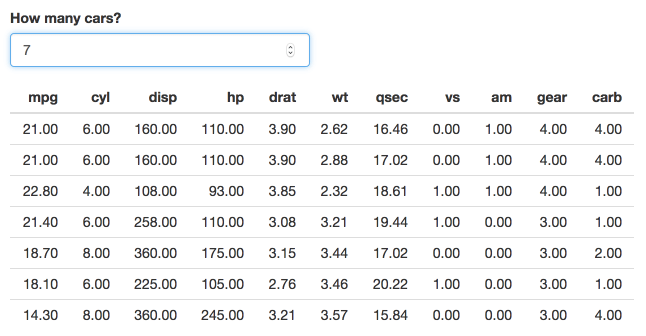
图 6.2: Increase the number of rows in the table in a Shiny document.
在上面的示例中,输出代码包装在对 renderTable() 的调用中。 Shiny 中还有许多其他渲染功能可用于绘图、打印的 R 输出等。 本示例使用 renderPlot() 创建动态绘图输出:
```{r, echo=FALSE}
sliderInput("bins", "Number of bins:", 30, min = 1, max = 50)

renderPlot({
  x    = faithful[, 2]  # Old Faithful Geyser data
  bins = seq(min(x), max(x), length.out = input$bins + 1)

  # draw the histogram with the specified number of bins
  hist(x, breaks = bins, col = 'darkgray', border = 'white')
})
```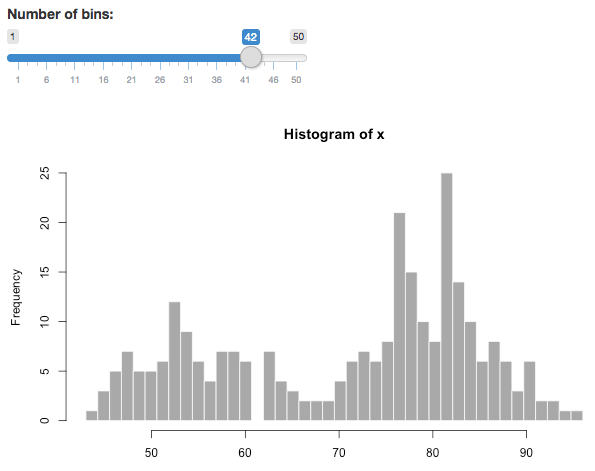
图 6.3: Change the number of bins of a histogram in a Shiny document.
6.2 部署
Shiny 文档必须由后台实时 R 会话支持。当你在本地运行一个 Shiny 文档时,它会使用你的本地 R 会话。通常只有你才能看到文档并与之交互。如果你希望与没有安装 R 的用户共享文档,或者不希望在本地运行文档,则必须将文档部署到服务器上,并共享文档的 URL。那么其他人只需要一个 web 浏览器就可以访问你的文档。
有两种方法可以部署 Shiny 文档。你可以使用 RStudio 提供的托管服务,也可以设置自己的服务器。
第一种方法从技术上来说比较容易,但是有时你可能不被允许使用外部托管服务,因此莫必须在自己的服务器上安装必需的软件(Shiny Server 或 RStudio Connect) 才能部署 Shiny 文档。
6.2.1 ShinyApps.io
你可以把 Shiny 文档发布到 ShinyApps (https://shinyapps.io) 进行托管服务。
要做到这一点,就应该确保你有:
在 ShinyApps 上注册一个账号(使用注册表单申请一个账号)。
最新版本的 rsconnect 包。你可以按照如下方式安装它
install.packages("rsconnect")
然后,从包含文档的工作目录中执行:
rsconnect::deployApp()如果你使用的是 RStudio,那么在运行一个 Shiny 文档时,还可以使用窗口右上角的 Publish 按钮(参见图 6.4)。
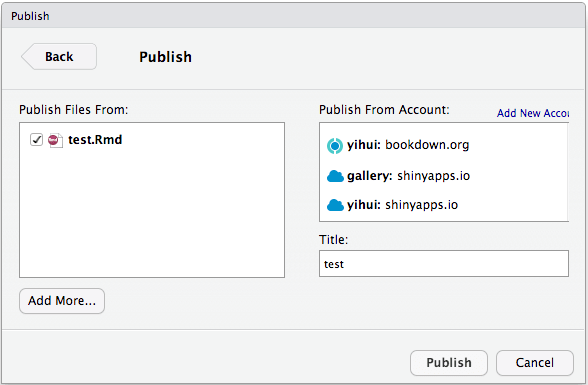
图 6.4: Deploy a Shiny document to ShinyApps.io.
如果目录中有一个名为 index.Rmd 的文件,它将用作该目录的默认文档,否则,如果要访问此 Rmd 文档,则应在 URL 中指定 Rmd 文件的显式路径。
例如,部署到 ShinyApps 的 index.Rmd 的 URL 可以采用以下形式 https://example.shinyapps.io/appName/,并且 test.Rmd 的 URL 可以采用以下形式 https://example.shinyapps.io/appName/test.Rmd。
6.2.2 Shiny Server / RStudio Connect
Both Shiny Server (https://www.rstudio.com/products/shiny/shiny-server/) and RStudio Connect (https://www.rstudio.com/products/connect/) can be used to publish Shiny documents. They require knowledge about Linux. Installing and configuring them should normally be a task for your system administrator if you are not familiar with Linux or do not have the privilege.
Shiny Server (https://www.rstudio.com/products/shiny/shiny-server/) 和 RStudio Connect (https://www.rstudio.com/products/connect/)都可以发布 Shiny 文档。 但是他们需要有关 Linux 的知识,如果你不熟悉 Linux 或没有特权,则安装和配置它们通常应该是系统管理员的任务。
6.3 嵌入 Shiny 应用程序
除了在 R Markdown 中嵌入单个 Shiny 的输入和输出外,还可以在文档中嵌入一个独立的 Shiny 应用程序。有两种方法可以做到这一点:
使用
shinyApp()函数内联定义应用程序;使用
shinyApp()函数引用外部应用程序目录。
这两个函数在 shiny 包中都是可用的(不是 rmarkdown),当在YAML元数据指定 runtime: shiny 时,它们会被自动加载。因此,你不必调用 library(shiny) 来加载 shiny。
6.3.1 内联应用程序
这个例子使用了内联定义:
```{r, echo=FALSE}
shinyApp(

  ui = fluidPage(
    selectInput("region", "Region:",
                choices = colnames(WorldPhones)),
    plotOutput("phonePlot")
  ),

  server = function(input, output) {
    output$phonePlot = renderPlot({
      barplot(WorldPhones[,input$region]*1000,
              ylab = "Number of Telephones", xlab = "Year")
    })
  },

  options = list(height = 500)
)
```
注意,使用 height 参数来确定嵌入式应用程序应该占用多少垂直空间。
6.3.2 外联应用程序
这个示例嵌入了一个定义在另一个目录中的 Shiny 应用程序。
```{r, echo = FALSE}
shinyAppDir(
  system.file("examples/06_tabsets", package="shiny"),
  options = list(width = "100%", height = 700)
)
```
注意,在上面的所有代码块中,都使用了 echo = FALSE 的选项。这是为了防止块中的 R 代码与 Shiny 组件一起呈现到输出文档中。
6.4 Shiny 小部件
Shiny 小部件使你能够使用一个函数调用创建包含在 R Markdown 文档中的可重复使用的 Shiny 组件。还可以直接从控制台调用 Shiny 小部件(在创作过程中很有用),并在 RStudio Viewer 窗格或外部 web 浏览器中显示它们的输出。
6.4.1 shinyApp() 函数
Shiny 窗口小部件的核心是使用 shinyApp() 函数创建的微型应用程序。 你无需像经典的 Shiny 应用程序那样创建 ui.R 和 server.R(或 app.R),而是将 UI 和服务器定义作为参数传递给 shinyApp() 函数。 我们在第 6.3.1 节中给出了一个示例。
最简单的 Shiny 小部件类型只是一个返回 shinyApp() 的 R 函数。
6.4.2 例子:k - means 聚类
rmdexamples 包 (https://github.com/rstudio/rmdexamples) 包括一个以上面所诉形式实现的Shiny小部件示例。 kmeans_cluster() 函数接受单个数据集(dataset)参数,并返回一个小部件来显示k-Means聚类的结果。你可以像这样在 R Markdown 文档中使用它:
```{r, echo = FALSE}
library(rmdexamples)
kmeans_cluster(iris)
```
图 6.5 显示了在运行文档时小部件的样子。
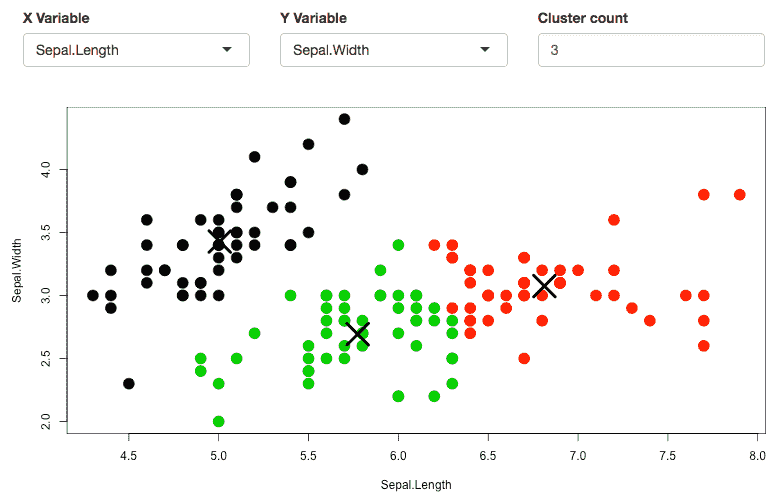
图 6.5: A Shiny widget to apply k-Means clustering on a dataset.
下面是 kmeans_cluster() 函数的源代码:
kmeans_cluster = function(dataset) {

  library(shiny)
  vars = names(dataset)

  shinyApp(
    ui = fluidPage(
      fluidRow(style = "padding-bottom: 20px;",
        column(4, selectInput('xcol', 'X Variable', vars)),
        column(4, selectInput('ycol', 'Y Variable', vars,
                              selected = vars[2])),
        column(4, numericInput('clusters', 'Cluster count', 3,
                               min = 1, max = 9))
      ),
      fluidRow(
        plotOutput('kmeans', height = "400px")
      )
    ),
    server = function(input, output, session) {
      # Combine the selected variables into a new data frame
      selectedData = reactive({
        dataset[, c(input$xcol, input$ycol)]
      })
      clusters = reactive({
        kmeans(selectedData(), input$clusters)
      })
      output$kmeans = renderPlot(height = 400, {
        res = clusters()
        par(mar = c(5.1, 4.1, 0, 1))
        plot(selectedData(),
             col = res$cluster, pch = 20, cex = 3)
        points(res$centers, pch = 4, cex = 4, lwd = 4)
      })
    },
    options = list(height = 500)
  )
}
6.4.3 小部件的大小和布局
Shiny 小部件可以嵌入在不同的地方,包括标准的全宽页面、页面内的小列,甚至在 HTML5 幻灯片中。为了让小部件的大小和布局在所有这些上下文中都能很好地工作,我们建议小部件的总高度不大于500像素。这并不是一个硬性的规则,但是在HTML5幻灯片中,通常只能显示低于500px的内容,所以如果你想让你的小部件在演示中可用,这是一个很好的建议。
当然,你还可以在创建小部件的函数中添加一个显式的 height 参数(默认值为500)。
6.5 多页
你可以使用 Markdown 链接语法并指定文档的相对路径,链接到其他 Shiny 文档上,例如: [另一个Shiny文档](another.Rmd)。如果在一个页面上单击指向另一个 Rmd 文档的链接,该 Rmd 文档将作为当前交互式闪亮文档启动。
目前,一次只能激活一个文档,因此尽管可以通过 R 脚本 global.R 进行一些原始的全局共享,但文档无法轻易共享状态(请参阅帮助页面 ?rmarkdown::run)。
默认情况下,只能链接到调用 rmarkdown::run() 的文件所在目录子树中的 R Markdown 文件(例如,你无法连接到 ../foo.Rmd)。 但是,你可以使用 rmarkdown::run() 的 dir 参数来定义根目录。
6.6 延迟渲染
一个 Shiny 文档通常在每次显示时都被呈现,并且在呈现完成之前不会显示给用户。因此,较大或包含昂贵计算的文档可能需要一些时间来加载。
如果你的文档包含不需要立即渲染的交互式 Shiny 组件,你可以在 rmarkdown::render_delayed() 函数中封装 Shiny 代码。这个函数保存它的参数,直到文档呈现完成并显示给用户,然后计算它,并在计算完成时将其注入输出文档。
下面我们将演示 render_delayed()是如何工作的。 render_delayed() 调用中包含的代码只有在加载了文档并显示给用户之后才会执行
```{r, echo = FALSE}
numericInput("rows", "How many cars?", 5)

rmarkdown::render_delayed({
  renderTable({
    head(cars, input$rows)
  })
})
```
6.7 渲染函数的输出参数
在一个典型的 Shiny 应用程序中,你可以使用 plotOutput() 和 verbatimTextOutput()等函数在 UI 中指定输出元素,并使用 renderPlot() 和 renderPrint() 等函数呈现其内容。
相比之下,在一个 Shiny 文档中,UI 元素通常是在调用 renderXXX() 函数时隐式和自动创建的。例如,你可能希望使用 renderPlot() 函数,而预先没有创建对应的 plotOutput()。在这种情况下,Shiny 将相应的输出对象与每个 renderXXX() 函数关联起来,让你可以在一个完整的 Shiny 应用程序之外使用 Shiny 代码。但是,在这个过程中可能会丢失一些功能。特别地,plotOutput() 可以接受一些可选参数来设置宽度和高度等内容,或者允许你单击或刷过绘图(并存储该信息)。
要将选项从 renderXXX() 传递到 xxxOutput(),可以使用 outputArgs 参数(如果特定的 renderXXX() 函数可用)。 例如:假设你要绘制一张宽度为200px,高度为100px的图形时。 你可以设定为如下形式:
```{r, echo = FALSE}
renderPlot({
  plot(yourData)
}, outputArgs = list(width = "200px", height = "100px")
)
```无论你想设置多少个输出参数,outputArgs 总是设定为一个列表(默认是一个空列表,它不设置输出参数)。如果你试图传入一个不存在的参数,那么将得到以下的错误提示信息(在本例中,你试图设置一个名为 not_an_argument 的参数):
**Error**: Unused argument: in `outputArgs`, `not_an_argument`
is not an valid argument for the output function
要查看运行中的 outputArgs,请运行下面的 R Markdown 文档或访问在线版 https://gallery.shinyapps.io/output-args/。文档是交互式的:在图像上刷新一下,看到 xmin, xmax, ymin 和 ymax 值的变化(正好印在图片下方)。
---
title: Setting output args via render functions
runtime: shiny
output: html_document
---

This interactive Rmd document makes use of the `outputArgs`
argument now available to all Shiny `render` functions. To
give an example, this allows you to set arguments to
`imageOutput` through `renderImage`. This means that you
don't have to create a `ui` object just to be able to brush
over an image. Note that this only applies to snippets of
Shiny code during an interactive Rmd (and not to embedded
full apps -- the ones you need to call `shinyApp` to run).

## Brushing over an image (and storing the data)

```{r setup, echo=FALSE}
library(datasets)

generateImage = function() {
  outfile = tempfile(fileext = '.png')
  png(outfile)
  par(mar = c(0,0,0,0))
  image(volcano, axes = FALSE)
  contour(volcano, add = TRUE)
  dev.off()
  list(src = outfile)
}
```

```{r image}
renderImage({
  generateImage()
}, deleteFile = TRUE,
   outputArgs = list(brush = brushOpts(id = "plot_brush"),
                     width = "250",
                     height = "250px")
)
```

Here is some of the brushing info sent to the server:
(brush over the image to change the data)

```{r brush info}
renderText({
  print(input$plot_brush)
  brush = input$plot_brush
  paste0("xmin: ", brush$xmin, "; ",
         "xmax: ", brush$xmax, "; ",
         "ymin: ", brush$ymin, "; ",
         "ymax: ", brush$ymax)
})
```

---

### Resizing a plot

```{r plot}
renderPlot({
  plot(cars)
}, outputArgs = list(width = "75%",
                     height = "250px")
)
```
6.7.1 附加说明
我们要强调的是,你只能在一个 Shiny 的 R Markdown 文档中使用这个功能(也就是说,你必须在 YAML 元数据中设置 runtime: shiny )。但即使是这样,这也只适用于在 UI 中没有相应的显式输出元素的情况下呈现输出的 Shiny 代码片段。如果你在你的文档中嵌入一个完整的 Shiny 的应用程序,并尝试使用 outputArgs ,这时它将被忽略,并将以下警告打印到 R Markdown 控制台中(在这种情况下,你的 ui 函数将类似于 ui = plotOutput("plot") ):
Warning in `output$plot`(...) :
Unused argument: outputArgs. The argument outputArgs is only
meant to be used when embedding snippets of Shiny code in an
R Markdown code chunk (using runtime: shiny). When running a
full Shiny app, please set the output arguments directly in
the corresponding output function of your UI code.
如果你尝试在其他任何上下文中使用 outputArgs,例如:在常用的(即非嵌入式)Shiny 应用程序内部使用 outputArgs,也会发生同样的情况。 基本原理解释如下:如果你已经在所有输出对象都明确指定的情况下指定了 ui 函数,则应在此处直接设置其参数,而不要采用这种绕行方式。