Chapter 2 Tools of the Trade
So the bad news is that there is an enormous number of kitchen gadgets, utensils, dishes, bowls and table top appliances out there eager to drain your wallet. The good news? You don’t need most of them. Beyond the items found in every kitchen (stove, refrigerator, mixing bowls, etc.) there are only a few items that will make your life easier, and in fact you can cook perfectly adequately without them. Here are a few that I use on a regular basis.
2.1 In the Kitchen
In general, all you need here is a decent selection of pots, pans and bowls. However, I do recommend considering the following:
- An immersion blender. I never really thought about one of these until I heard an NPR piece on possible Christmas gifts for the cooks in one’s life. I immediately thought of my younger son John, so I got him one and he liked it. I subsequently purchased one for myself, a Braun, that is not only a blender but can also be a small chopper, useful for things like grating hard cheese and mincing garlic.
- A slow cooker. This is definitely a secondary priority, since most recipes that call for one can easily be adapted for the stove top or oven. However, it is nice to be able to throw a meal together and forget about it for a few hours. I’ve included some recipes that use it, but I’ve also made suggestions as to how to cook them conventionally.
- A convection toaster oven In the summer months, it’s nice to be able to cook in one of these and avoid heating up the house by using the oven.
- Only a few of these recipes call for using a microwave oven, but one is great to have, especially for thawing and warming leftovers.
- Finally, we finally broke down and bought an Instant Pot®, the six quart Pro model, and having had it for several months, I have no regrets. While it is basically a computerized pressure cooker at heart, its capabilities go beyond that - I’ve done sous vide cooking (nothing elaborate) and yogurt making with great success. And once you learn certain basic protocols for different kinds of dishes it is relatively easy to adapt other recipes to it. And there are at least as many recipes on the internet as there are cat videos, so the possibilities for exploration are limitless. One piece of advice that is ubiquitous - they are not especially good as slow cookers, since they heat only from the bottom, as opposed to from all sides in a dedicated device. We will have more to say about these devices below.
2.2 Bread
Bread making is, in a lot of ways, different from routine indoor cooking. It is a lengthy process, especially when sourdough is in play, and while I have been enjoying it for decades, others may want to avoid the hassle (especially if they live near a good bread bakery). Thus, it deserves its own category.
The following can be done without, but I consider them to be all but essential.
- A stand mixer. The two cookbooks I recommend in the Bread section have different takes on this. Reinhart calls for using one in almost every recipe, while I’m pretty sure that Robertson (Tartine Bread) doesn’t even mention them. I happen to use one wherever possible, even when the recipe doesn’t call for it (and will do do so throughout the recipes). Ours is a Viking that, as far as I can tell, is no longer being manufactured (although you may find a used one available on ebay or some similar site). The much more common ones, of course, are those of Kitchenaid, definitely fine machines. They come in two sizes , 4 qt. and 5.5 qt. I received one of the former as a wedding present 40 years ago, and it served all of my needs at the time just fine (indeed, it is now at my lakefront cottage in the Finger Lakes and still going strong). Were I to buy one today (or if our Viking dies), I would probably go with the larger one.
- A kitchen scale. Most breadmakers will recommend that weight be used to measure ingredients. This is particularly important for flour, since even different bags of the same brand can have different densities. It is also useful for weighing other ingredients as well. You can get a decent electronic one for around $25.
- For Essential Tartine Bread, proofing baskets are a must. I use oval ones, which were used to shape the loaves shown above.
- Also for tartine bread, a dutch oven or a covered roasting pan is required. By doing the inital bake in one with the cover on, you get the high humidity environment that commercial bakers get by injecting steam into the baking oven.
- A pizza stone or steel is useful for baking rolls and freestanding loaves in addition to pizza. Do get a heavy duty one - the more inexpensive round ones sold at grocery and department stores do not stand up to the high heat used in some of these recipes.
- For making essential tartine bread you will need a dutch oven or an oven roaster, one which can be inverted for cooking.
- You will need to cut the dough with a knife during the shaping process. If you have a large (8-10 inch) chef’s knife, that will work fine, however a bench knife is useful not only for cutting but also for manipulating dough pieces. We already had a pizza knife that serves these purposes well.
2.3 Outdoors
2.3.1 Basic Tools
Of course you need some kind of grill. I prefer charcoal, but others will appreciate the convenience of gas. In any event, you will first need some basics - spatula, fork, tongs and heavy oven mitts. And a cleaning brush. Beyond those I would recommend a grilling basket and a fish grilling mesh. In both cases, be sure you get ones with removable handles, since they won’t fit inside a closed kettle cooker with the handles on. An example of a grilling basket is this one from Williams Sonoma.
2.3.2 The Grill
I am a Big Green Egg addict. So what is it? A more generic name is a kamodo cooker - a heavy duty ceramic charcoal cooker, shaped like the ubiquitous Weber Cooker, but much heavier and more expensive. If your budget can afford it, I recommend spending the bucks for an Egg, especially if you anticipate doing a lot of low temperature barbecuing. It is much easier to control the temperature than in a Weber-style device, and a load of charcoal goes a lot longer (an 18 hour barbecue of pork butt or brisket can be completed on a single generous charcoal load). Also, with proper handling, one will last forever, so that while the upfront costs are a challenge, over time you may end up saving money - in my prior life, I found that metal cookers had a lifespan of something like 3-5 years.
With respect to what size to get, I strongly recommend the large (original) Egg. As I mentioned earlier, we started with a medium (recommended for cooking for 2) but quickly found it to be overly constraining - I could barely fit four ears of corn on the cob into it. Furthermore, you can forget grilling multiple different items at the same time.
Note that there is an extra large model, which is huge. If you have a big family or are a grilling fanatic, you might want to consider it, but is is far larger than anything I can foresee ever needing.
Finally, don’t look for a bargain online. They are sold only through authorized dealers. By buying from one, your Egg will come with a lifetime guarantee on the ceramic parts,
2.3.3 Charcoal and Lighting
There are two cardinal rules regarding what to use in a Green Egg:
- NEVER use lighter fluid. It will soak into the ceramic and ruin your investment.
- Only use lump charcoal, not briquets, essentially for the same reason, but also to improve the flavor of just about everything.
The instructions for you Egg will recommend that you only use “genuine Big Green Egg Charcoal”. Ignore that advice. Yes, BGE charcoal is high quality, but a) it is expensive, and b) it may be hard to find. I have been using supermarket-branded lump charcoal for years and have found it to be quite satisfactory.
With respect to lighting, most sources recommend using a chimney, in which you mix some charcoal and some paper. The paper is ignited, and when the charcoal is burning, the chimney is removed and more charcoal is added as needed. I’ll be honest - I’ve never tried this. Rather, I load the charcoal into the egg, insert 2-3 paraffin-saturated composite sticks into it, and then ignite them. With this method, I reliably get a nice bed of hot coals in 10-15 minutes.
2.3.4 Accessories
For grilling, it certainly is possible to use your new Big Green Egg “out of the box”, however a number of accessories, from the mundane to the sophisticated (and of course from cheap to expensive) help to greatly expand your grilling and barbecuing repertoire. Here are a few I find to be invaluable:
- An ash tool, something you should order when you purchase your Egg. It is absolutely necessary for removing ashes from the Egg through the lower vent.
- A garden trowel, which facilitates arranging the charcoal once it is in the egg.
- A ConvEGGtor. I hate the name, but it’s a great device if you want to use your egg more like an oven than a grill. I routinely use it with brisket and smoked pork, and also for bread, which I occasionally cook in the Egg.
- A Divided Fire Basket. Lots of recipes call for “indirect cooking”, with coals on only one side of a kettle cooker, thus allowing for both searing and slower cooking. The shape of the Green Egg by itself makes it difficult, and while one can use the ConvEGGtor for indirect cooking, that makes searing impossible. This device nicely solves the problem - one side of it can be filled with charcoal, and you’re set. It also improves airflow so that coals burn hotter. The only downside is that it does reduce total charcoal capacity; thus for long low and slow barbecuing I don’t use it.
There is, of course, a bunch of other stuff you will want to have, such as a grill brush, standard grilling tools, and some heavy duty oven mitts, but those are largely items of personal preference. I’ll now turn to the the critical issue of temperature control.
2.3.5 Temperature Control
One of the great advantages of the Big Green Egg is that, with a little practice, you can control the temperature when the lid is closed (which for me is most of the time). The question is how. They come with a dome thermometer, but they are notoriously inaccurate. So what to use in its place?
There are two temperatures that really matter, especially when barbecuing. The first is the grill temperature; the second is the internal temperature of what you are cooking. And because you don’t want to be opening and closing the lid any more than necessary, it is valuable to have a remote monitoring system for both.
For all matters of temperature and time, I am a big fan of Thermoworks. Not only do they make high quality devices, but their website is an excellent source of recipes, ones we will be referring to frequently. In addition, their customer service is outstanding. If you sign up for their newsletter, you will receive only one email a day. Some of them are purely promotional, but others contain links to recipes you may want to explore. These are their devices I’ve used over the past decade or so, ranging from the most basic to the most elaborate.
- The ChefAlarm Thermometer and Timer was my first device, and it is very useful for indoor cooking. It will monitor a single temperature and has both time monitoring and high and low temperature alarms. It comes with a single probe for monitoring internal temperatures, meaning that it can’t be used to monitor both internal and grill temperatures. In addition, it does not have remote monitoring (Bluetooth or WiFi) capabilities.
- If you don’t go with the previous device, you will need a standalone timer. While Thermoworks is in the business of selling temperature controlled devices, it also offers an excellent selection of time monitoring devices. My personal favorite is the Extra Big and Loud Timer - it is very simple and straightforward to use. Of course all kinds of timers can be had at grocery stores, kitchen stores, etc., so if you already have one of those (or wish to save money by buying one) that is a perfectly fine option.
- I strongly recommend an instant read thermometer. If you have an internal monitoring device, it only reads the temperature in one spot; other spots in the item cooking may be hotter or cooler. The best device on the market right now is the Thermopen One, which has a one second response time. The Classic Thermopen is also a fine option, having a response time of 2-3 seconds, and which is about $20 less expensive.
- Now we get into the heavy duty stuff - multiple channel devices with remote monitoring capabilities. I’ve already addressed why multiple channel monitoring is important (for both grill and internal monitoring); we sometimes can use one or two additional channels (such as grilling or barbecuing poultry, where keeping track of both thigh and breast temperatures are important). Thermoworks has two options to be considered. The first is the Smoke series of devices. The most inexpensive ($99 at time of writing) has two channels and basic bluetooth capabilities, and comes with one internal and one grill temperature probe. Moving up in sophistication (and price) are the Smoke X2 and Smoke X4, both of which use longer distance RF transmission and have 2 and 4 channels respectively. But the absolute best (and what I use exclusively) is the Signals bluetooth and WiFi device. It can be controlled by a reasonably functional smart phone app, and with it connected to your WiFi network, you can actually monitor temperatures from anywhere in the world. That may seem silly, but when you’re doing a 16 hour barbecue of a brisket or a pork butt, that may prove to be useful - you will not be tied to your home for the duration. Indeed, when you use a temperature control device (see below) you can actually make adjustments to the cooking temperature from afar.
- Of course, probes are an essential part of any temperature monitoring system. All of the above devices come with an adequate selection of probes, but there are a large number of different ones available. One I use a lot is a High Temperature Needle Probe, which is shorter, making it ideal for monitoring small or thin items like chicken wings or fish. Also, although I was skeptical at first, I have found Probe Spools to be an incredible convenience. They all but eliminate tangling and kinking, things that can greatly reduce probe lifetimes.
- So far we’ve dealt with temperature monitoring, but what about Temperature Control? We are now at the ultimate high end of sophistication. The device for doing so is the Billows Temperature Control Fan, a fan that attaches to the lower vent of a barbecue device and, in combination with a Smoke or a Signals device, does its best to control the chamber temperature. I always use it for low temperature cooking, and if I do so carefully, it is a godsend. BUT, a few caveats:
It requires electricity. I am fortunate enough to have an outdoor plug near my outdoor cooking area, but if you don’t, you’ll have to either rig up extension cords from the nearest outlet or spring for a 12 Volt Battery Pack, which actually costs more than the device itself ($99 vs. $79).
It is really good for bring your grill up to temperature, but it is largely ineffective in bringing it down. Thus, if you’re doing a low temperature cook, it is critical that you get it attached, set, and running well before the chamber has reached your desired temperature.
One further note - while shopping for a replacement probe, I ran across this little device, a damper that fits on the intake vent of a Billows device, and allows excellent control at low barbecue temperatures. I highly recommend it - indeed I consider it to be one of the best four dollar purchases I’ve ever made.
- Finally, how to store all this mess? While it’s not, in my opinion, Thermoworks’ finest product, their Extra Large Zippered Storage Case will hold all of my devices (which, just to review, are a Big and Loud Timer, a Thermopen, a Signals monitoring unit, a Billows control unit, and four probes on spools). I’ve also managed to add some metal skewers that I use on occasion.
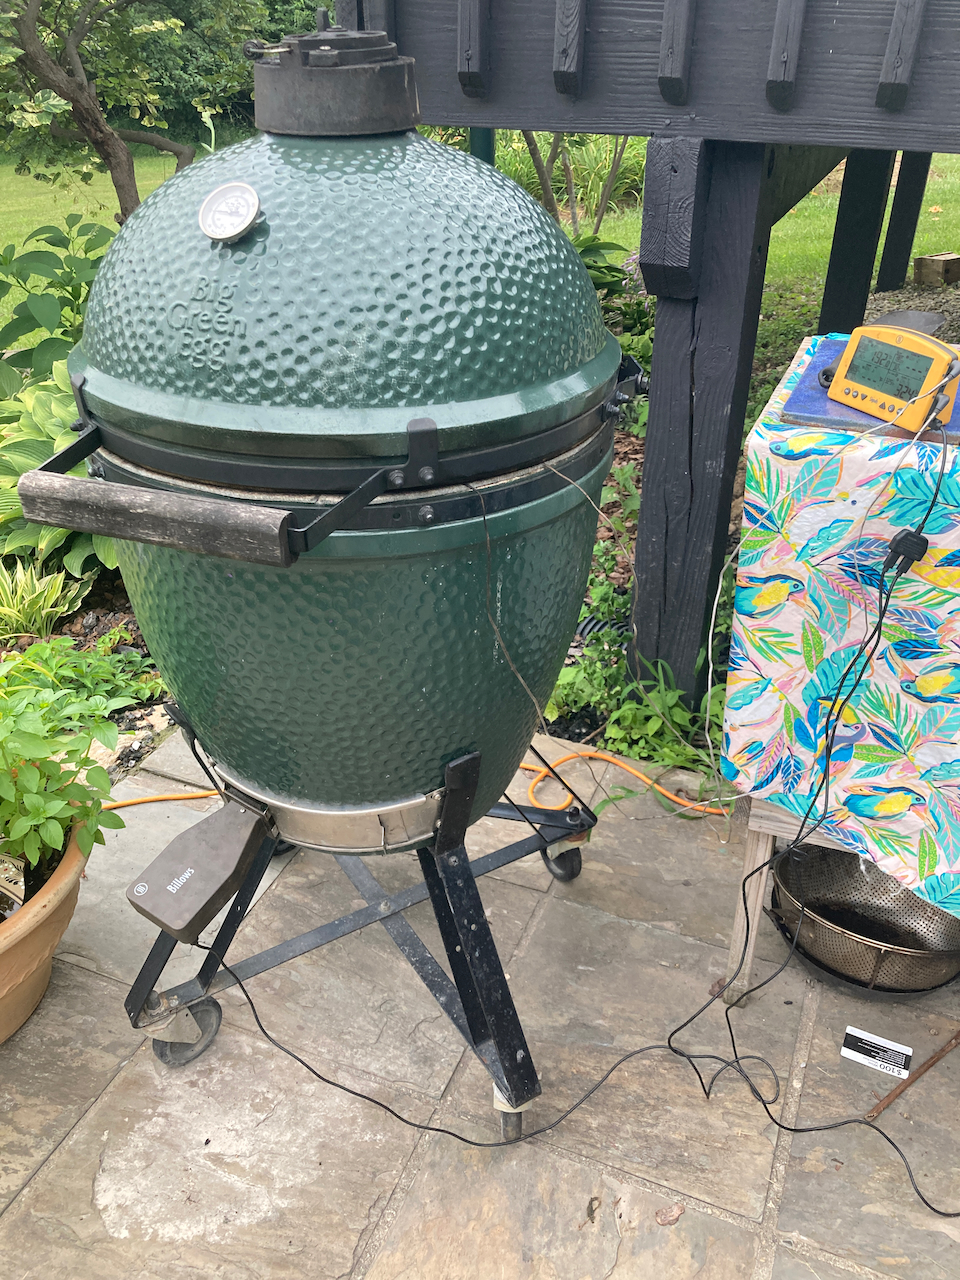
Big Green Egg with Billows and Signals attached.

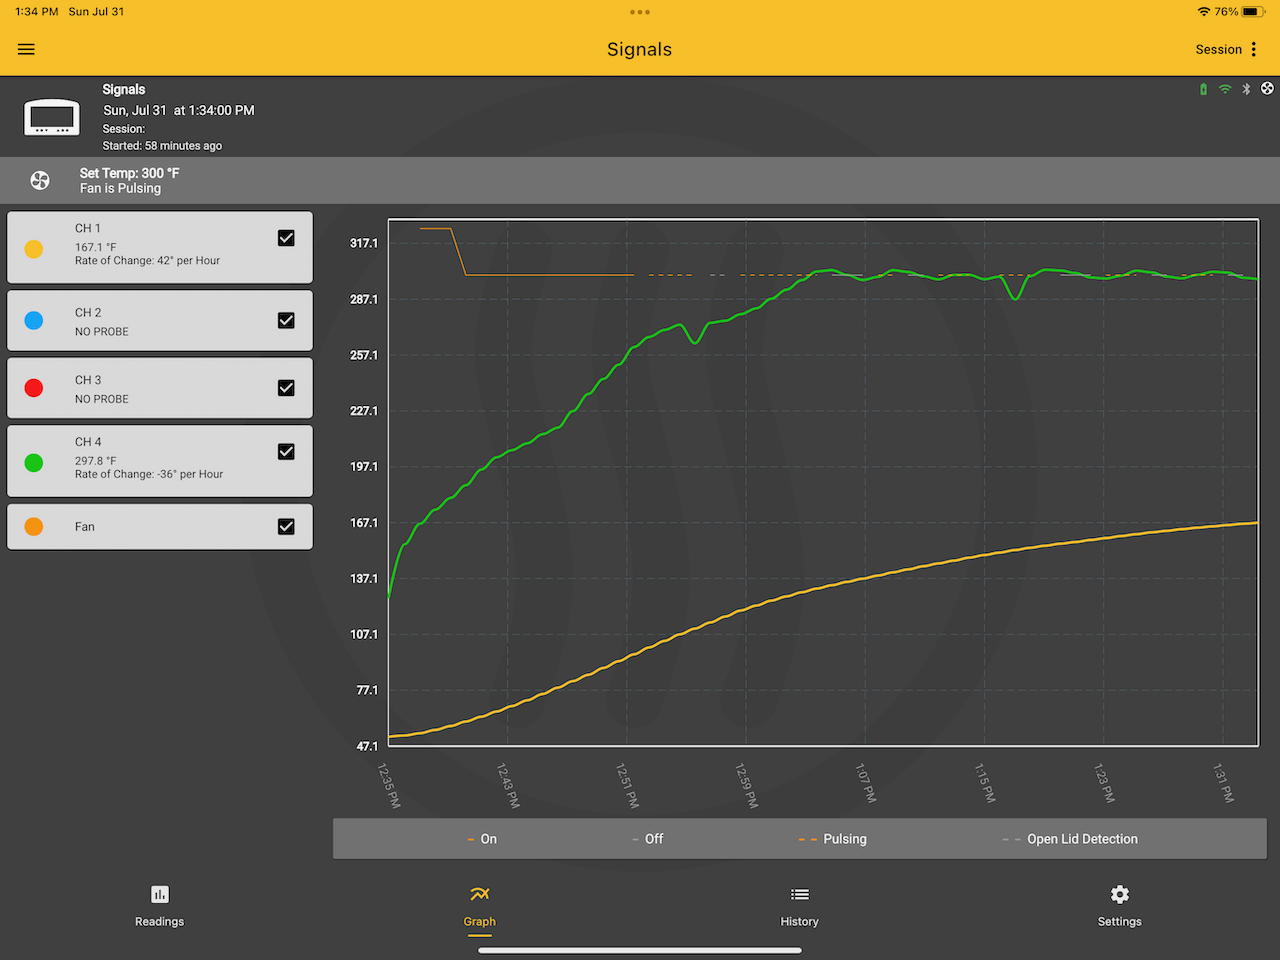
Screen shots of Thermoworks app display. Left: Readings screen, showing internal temperature (top) and grill temperature (bottom) at the beginning of a run. Right: Graph screen after one hour of cooking a tritip roast. Grill temperature is in green and internal temperature is in gold.
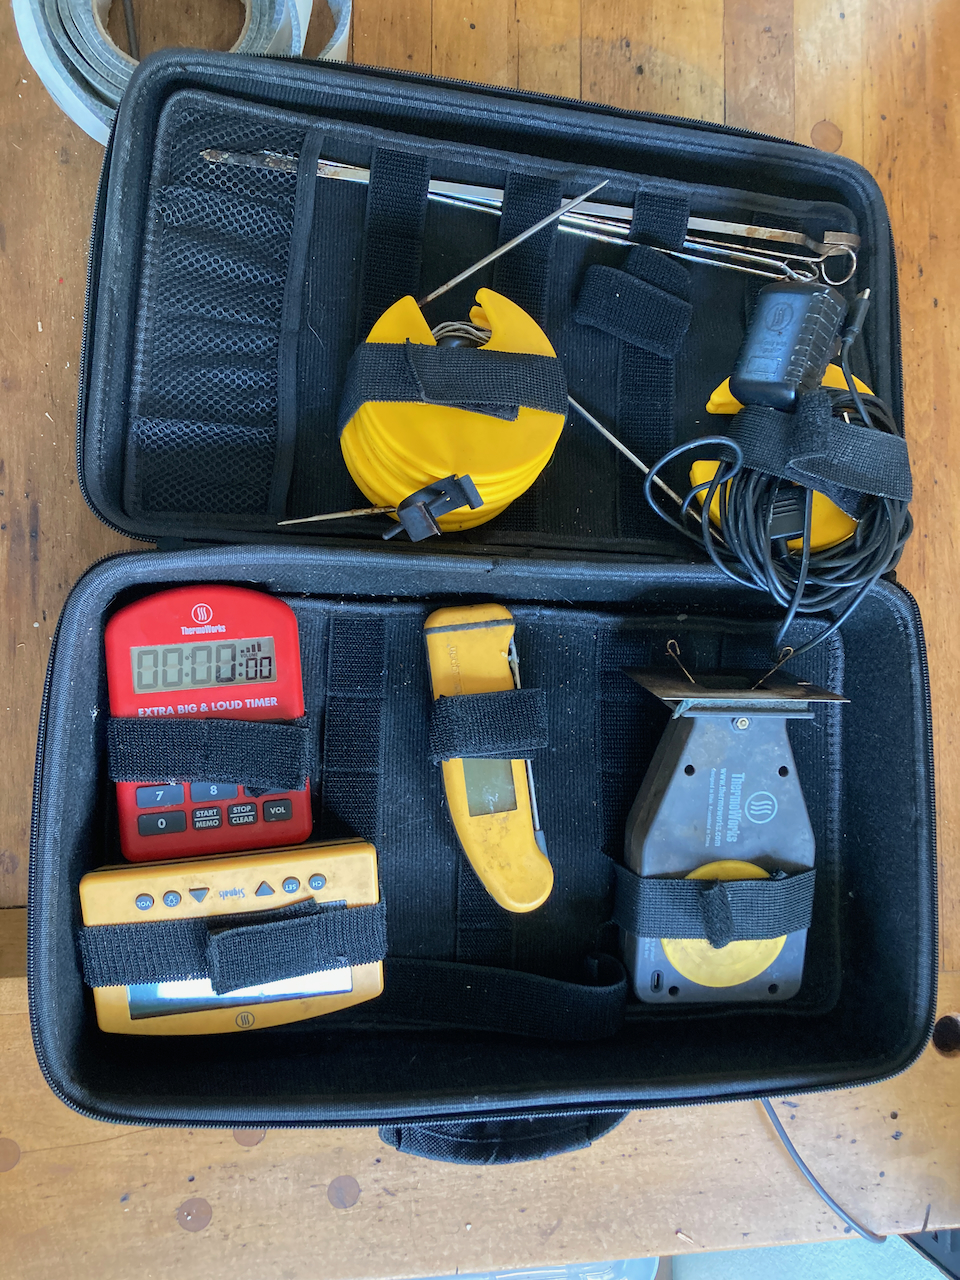
My temperature monitoring and control kit. Clockwise from top: Skewers, wiring for Billows, Billows device, Thermopen, Signals controller, Big and Loud timer.
2.3.6 Barbecuing Tips
So the predominant advice on most barbecue recipes is “low and slow”. This makes sense, since the original Caribbean *barbacoa” was performed in a charcoal filled pit in the ground. More importantly, it gives time for the meat to take up the smoke flavor. Accordingly, most of the recipes here call for maintaining a temperature between 200 and 250o F. But of course that also means that cook times can be quite long - as much as 18 hours for a packer brisket or a full Boston butt roast. So plan ahead!
With that in mind, here are a few points to consider:
- You’ve put your internal temperature monitor into your brisket or butt, the grill temperature is stable, and the internal temperature is rising steadily. UNTIL it reaches 160 or so. Then it just sits there, possibly for hours. This is the infamous “stall” that occurs when liquid in the meat starts evaporating, causing evaporative cooling. At that point, you have two choices - either wait it out, or wrap the meat in foil or “peach paper”, essentially unwaxed butcher paper. I prefer the latter for a couple of reasons. First of all, at this point the meat has absorbed all of the smoke it’s going to. Second, the meat is less likely to dry out as it rises to the magic end point of 203o F. And, of course, it saves time
- Even if you are cooking for a large family, it is doubtful that a full packer brisket will be devoured on the first sitting. So how to reheat leftovers? Thermoworks recommends a sous vide approach, in which frozen leftover barbecue is placed in a ziploc bag and immersed in a water bath maintained at 175o F. until the internal temperature reaches 165o F. This something that can easily be done with a sous vide wand or an InstantPot®, but the link above describes how it can be accomplished with a pot of water on the stove top.
2.4 Under Pressure
I well remember my mother’s stove top pressure cooker, replete with bouncing dongle, hissing steam, and generally scary operation. Today’s “multicookers” (of which Instant Pots are the most known) are really just automated and computerized pressure cookers, with a bunch of bells and whistles added to increase their versatility. Thus, ost of the recipes below employ the basic pressure cooking function of the device. A few general thoughts:
- They are incredibly safe - not like the stove top pressure cookers of bygone days.
- Pressure cookers require steam, and steam requires water. Thus, be sure what you’re cooking has at least 3/4 cups of clear liquid prior to starting. Otherwise, you run the risk of getting the dreaded “burn” notice.
- Pay attention to the instructions in recipes for the steam release. During a natural release, the food will go on cooking. Sometimes this is fine, but otherwise it can be disastrous (for example slow release of a pasta dish will result in mush).
- There is a large and active Instant Pot® facebook group, and the books and recipes of Jeffrey Eisner are a common subject. I’ve looked at some of his stuff, and while the basics (preparation, cook times, etc.) are well covered, in general I find the recipes themselves to be rather plain. And as you should recognize by now, plain food is not my specialty.