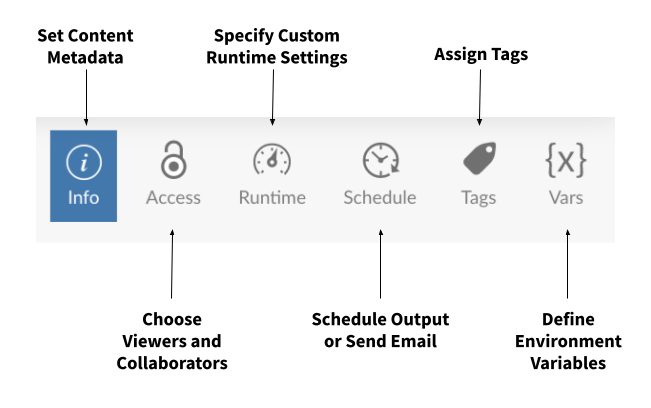
Content Settings Panel
This chapter contains an overview of the Content Settings panel available to publishers and administrators. Content settings are available for each content item and can be accessed by opening a piece of content through the Posit Connect user interface. The Settings panel opens to the Access tab by default.
To toggle the Settings panel open and closed, click on the Settings icon (shaped like a gear) in the upper right Toolbar menu. To hide access to the content controls altogether, share content in Open Solo mode (also located in the Toolbar menu, or under the More icon on narrow screens.)
Info & Content Metadata
After your Posit Connect content has been published, you can change its title, add a description, and upload a content image to make it easier for others to find your content.
First, open the content and click on the Info tab.
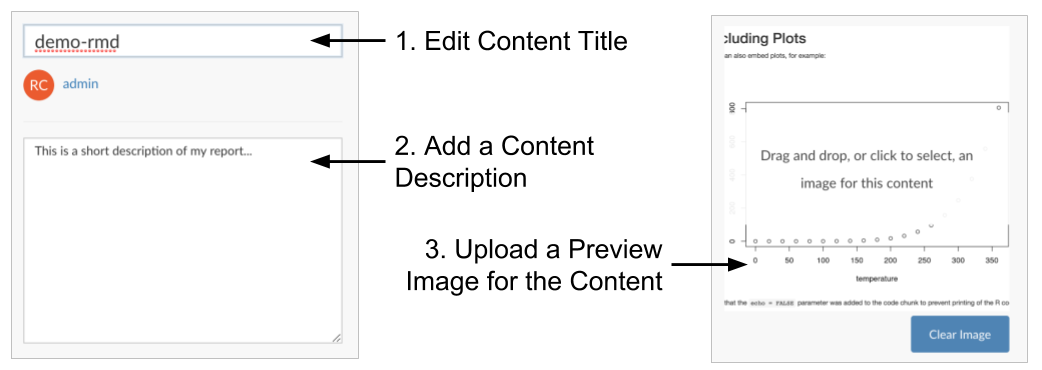
The top text field is the application title. This defaults to the application name if it was given. Other users will not be able to edit this field unless they are collaborators or administrators.
The large text area is the application description. You can describe the content in this field, or add other information that you feel is important. Other users will not be able to edit this field unless they are collaborators or administrators.
The area that displays a prompt to select an image for this content is the content image field. You can upload a JPEG, PNG, GIF, or SVG image that represents the content. Unlike title or description, users who cannot view the content (including administrators) will also be unable to view the image you have uploaded. This way, if you wish to upload a screenshot of the content, any information contained in that screenshot will not leak to users who would not otherwise be able to access it.
Usage Data
Applications and document-based content types also have basic usage data displayed in the Info panel (visible to the content owner and Posit Connect admins only).
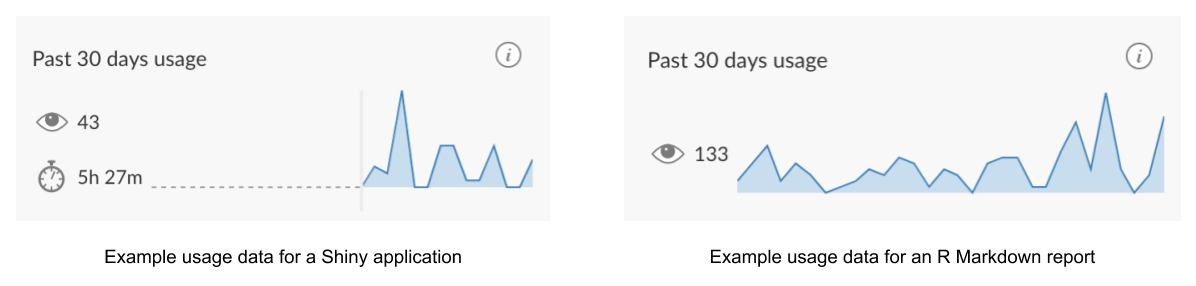
Usage data for the content item is summarized to show the last 30 days of activity across all associated versions and variants. Shiny applications will display the total number of visits and the total user interaction time in the past 30-day period, plus a plot of the daily visit count. Other content items have the same statistics displayed, except for user interaction time.
This data can also be accessed via the instrumentation endpoints in the Posit Connect Server API. If you’re interested in performing custom usage metrics analysis, check out the API Cookbook which contains example R code snippets for retrieving Shiny application usage and content visits.
Note that content usage data is written to disk periodically, so very recent usage may not be reflected in the returned data. The default interval is 2 seconds, though this may be changed by your system administrator.
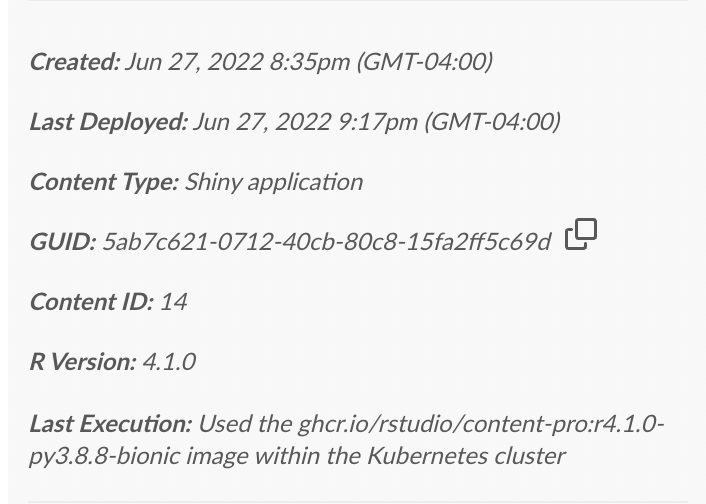
Execution Image
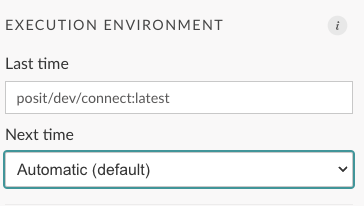
If your Posit Connect installation uses off-host content execution with Kubernetes, the Info panel will also display which image was used the last time your content was deployed.
By default, an image is selected automatically by Posit Connect, but you can also specify which image you want to be used at deploy time. See instructions for R and instructions for the command line. You can see a list of all available images by clicking the Environments button at the top of the page.
Alternatively, you can modify the execution image through the Access panel.
Access
After publishing a piece of content to Posit Connect, the Connect user interface will open to show the Access panel.
There are three types of user interaction settings available to publishers in this panel:
- Sharing Settings (who can see this content)
- Access List (who can view or change this content)
- Execution User (which server user will run the content)
The final setting for creating a custom URL is reserved for administrators by default.
To enable this feature for publishers, have your administrator refer to the Authorization configuration section of the Posit Connect Admin Guide: PublishersCanManageVanities.
The PublishersCanManageVanities setting is available in Posit Connect version 1.7.6 and later. Instructions for upgrading Posit Connect can be found in the Admin Guide.
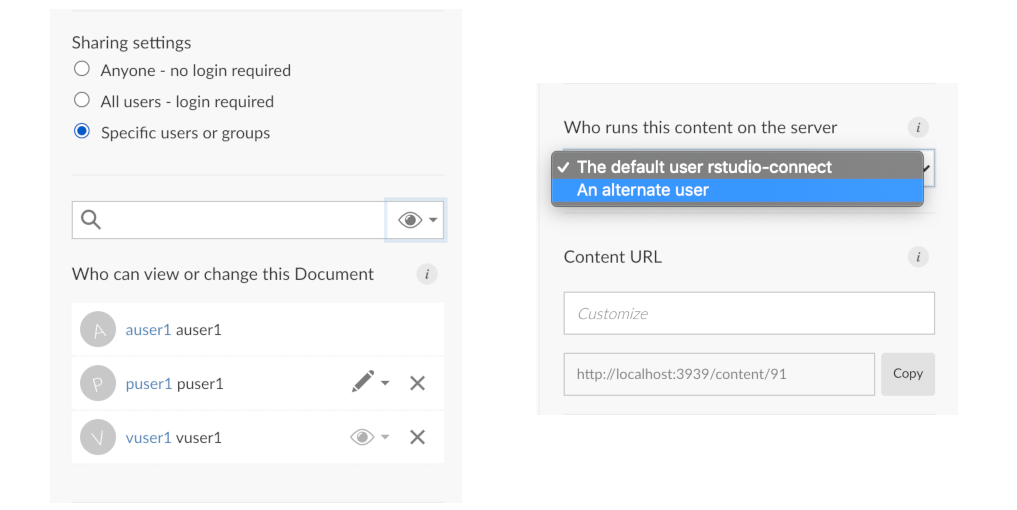
Sharing Settings
The default access settings are setup such that only the publisher will be able to view this new piece of content. This means that the content will not be visible to other users on your Posit Connect server until you change the access settings here.
There are several visibility options, arranged from most open to least:
- Anyone - no login required
- All users - login required
- Specific users or groups
Choosing Specific users or groups will allow you to specify individual named user accounts or groups registered on the Posit Connect server with help from auto-complete text lookup.
It is not possible to change the content owner through the dashboard settings available here. To transfer content ownership between users, an administrator can use the Posit Connect Server API for single content items, or the usermanager utility for all of a user’s content.
Access List Settings
To enable multiple users to maintain and update a single piece of content on Posit Connect, all users should be listed as collaborators on the content. You can control which users are collaborators and which are viewers with the dropdown at the end of the searchbox. After adding a user, you can also change the user’s permission from viewer to collaborator using the icon dropdown on the user’s row.
For more information about the best practices for collaborative development and data project management on Posit Connect, see the Publishing with Collaborators section.
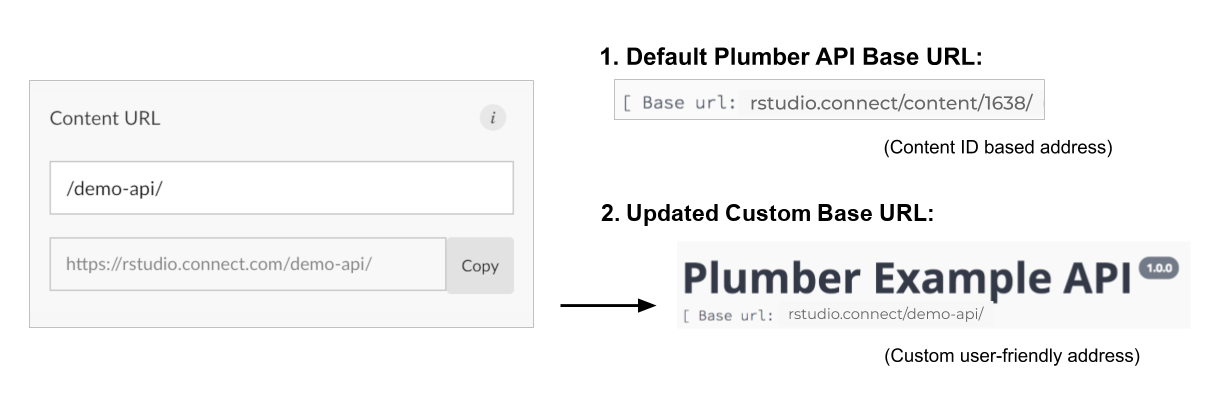
Custom Content URL
Administrators and publishers (if allowed) can create a custom vanity URL for a piece of content. The vanity URL is appended to the server address to form the complete path to the content.
Vanity URLs can be useful for all published content types. The example below demonstrates how creating a custom content URL for a plumber API will update the base URL to a cleaner, more user-friendly address:
Only administrators can manage vanity paths by default. To allow publishers to create vanity paths for content items they own and collaborate on, a server administrator must enable the Authorization.PublishersCanManageVanities configuration setting.
Content URL restrictions
Vanity URLs can not be nested inside of one another. So if a vanity URL /finance/ already exists, you would not be able to create a new vanity URL at /finance/budget/. Sibling paths, such as: /finance/budget/ and /finance/quarterly/ may both exist concurrently.
Posit Connect performs a case-sensitive match against vanity URLs when determining what piece of content is requested. If you create a vanity URL like this, /vanityURLexample/, but try to navigate to the content here /vanityurlexample/, Connect will return a 404 page not found response.
A case-insensitive match is performed when determining if a new vanity URL is permitted. If you try to apply /vanityURLexample/ to one piece of content, and /vanityurlexample/ to another, Connect considers them to be in conflict and will not allow the action.
Vanity URLs may include only alphanumeric characters, hyphens, underscores, and slashes.
The following path prefixes are prohibited in vanity URLs:
/__/favicon.ico/connect/apps/users/groups/setpassword/user-completion/confirm/recent/reports/plots/unpublished/settings/metrics/tokens/help/login/welcome/register/resetpassword/content- The custom location for the Connect dashboard, configured by
Server.DashboardPath.
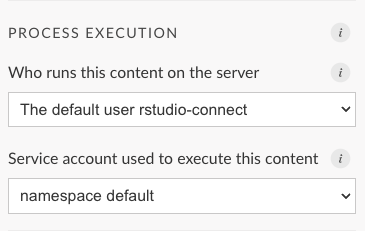
Process Execution
Content is initially configured to run on the server as a Unix user configured by your Posit Connect administrator, defaulting to the rstudio-connect user. Your content may need to run as a different Unix user due to resource permissions and constraints. If you specify an alternate user, the target user must be a member of a shared Unix group which is configured by your administrator. The default shared group is also called rstudio-connect.
Your Connect administrator can adjust the default Unix user and shared group by modifying the Applications.RunAs and Applications.SharedRunAsUnixGroup settings.
If you are running Connect in off-host execution mode, there is no guarantee that there is a mapping between the RunAs user’s uid and the SharedRunAsUnixGroup’s gid inside of the execution environment image.
Off-Host Execution
If you are running Posit Connect in off-host execution mode, additional configuration options are available in the Access panel.
Service Accounts
In off-host execution mode, the Process Execution section of the Access panel provides an additional dropdown which configures the Kubernetes service account used to execute content.
Only administrators can modify the service account assigned to a piece of content. Publishers can view the configured service account but cannot modify it.
The list of available Kubernetes service accounts is populated during Connect startup. Therefore, the actual service accounts available in Kubernetes can diverge from the service accounts available to Connect. De-synchronized service accounts can lead to undesirable behavior, such as: (a) the content failing to execute with an error message indicating that the service account was not found, or (b) a valid service account not being available to the content.
If you encounter service account de-synchronization, your Connect administrator can restart Connect to refresh its list of available service accounts.
Default Service Accounts
If your Connect administrator has set a default service account for the server, it appears in the dropdown with a (default) postfix. Published content defaults to using this service account to execute content.
The Kubernetes namespace’s default service account appears as namespace default. If no default service account is specified by your Connect administrator, published content defaults to using this service account to execute content.
Your Connect administrator can adjust the default service account for the server by modifying the Launcher.KubernetesDefaultServiceAccount settings.
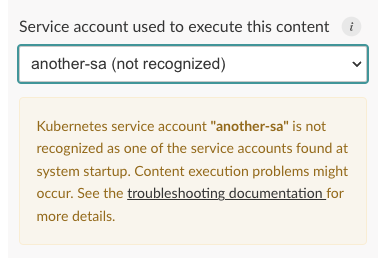
Validation
If your content is configured to use a service account that is not identified at startup, Connect alerts you beneath the dropdown. The configured service account is also be annotated with a (not recognized) postfix.
Execution Environment
In off-host execution mode, the Access panel allows you to specify the image used to create the content execution container.
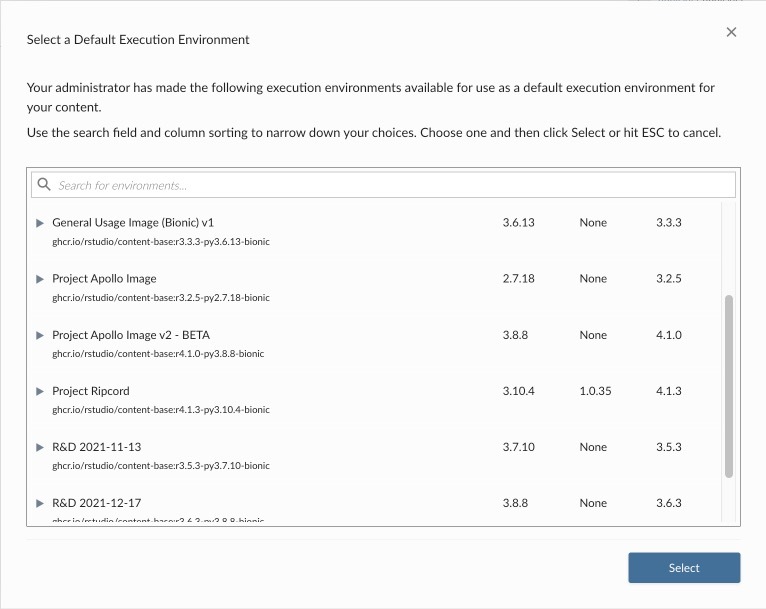
By default, the most appropriate execution environment for your content is selected automatically by Connect.
Alternatively, you can specify the execution environment manually. Selecting the Use a specific environment option from the dropdown directs you to a list of available execution environments. Here, you can manually set the execution environment for your content.
Runtime
Posit Connect is built to scale content. Publishers and administrators have access to runtime settings to help tune and scale their applications and APIs. The primary concern for scaling content in Posit Connect is understanding when and how R or Python code will be executed on the server.
A powerful component of Posit Connect is the ability to host data products that require backend processes during a user’s visit. Examples include Shiny applications, R Markdown documents with runtime: shiny and Quarto documents with server: shiny, Flask, FastAPI and Plumber APIs, and Dash and Streamlit applications. In the case of applications, an end user’s browser (the client) is connected with a process running on the server. When a user changes an input, the client sends a message to the server and a portion of code is re-run. The server sends back the result as output. In the case of APIs, a client makes a request which is sent to a running process, and the results are sent back to the client.
If the runtime controls do not apply to the content type (e.g. static/batch content including: documents, plots and HTML files), you will see limited settings or a message stating that there are no runtime settings to configure.
Changes to min/max processes take effect immediately, but existing processes in use are not terminated until they are no longer serving any connections. Connections to new processes use updated timeout values, while existing connections are not modified or disconnected. Changes to memory or CPU constraints apply to new processes but not existing ones.
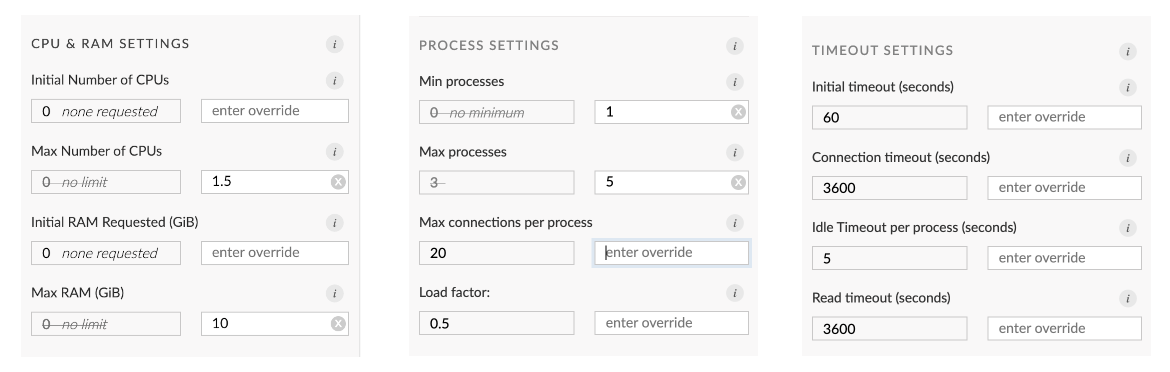
CPU & RAM Configurations
Initial and Max CPU and Initial RAM settings are only available when Posit Connect is configured for off-host execution with Kubernetes. Check with your server administrator if you’re not sure whether this applies to you. See Resource Management for Pods and Containers for more details about how CPU and RAM constraints are used by Kubernetes. In particular, if you set Limits but not Requests, Request is automatically set equal to Limit.
Initial Number of CPUs
Number of CPU units requested for your process. This indicates the minimum amount of CPU your content needs to render or execute, and is used by Kubernetes to determine which node should run your content. Fractional values are allowed.
0indicates that no request should be made.Max Number of CPUs
Limits the number of CPU units your process are allowed to use. Fractional values are allowed.
0indicates no limit (this may be disabled by your administrator.) Processes that use more CPU than allowed are throttled.Initial RAM Requested
Amount of RAM (in GiB) requested for your process. This indicates the minimum amount of RAM your content needs to render or execute, and is used by Kubernetes to determine which node should run your content.
0indicates that no request should be made.Max RAM
Limits the amount of RAM (in GiB) your process is allowed to use.
0indicates no limit (this can be disabled by your administrator.) Processes that use more RAM than allowed are terminated.
Your administrator can set defaults or upper limits for some or all of these values. Note that setting Max CPUs or Max RAM to 0 means the process is allowed unlimited resources. However, if your administrator has set an upper limit for one of these settings, you will not be able to set it to 0/unlimited.
These requests and limits are applied to any process involved in rendering or executing your content. For example, if you have interactive content with a prerendered component, these settings will apply both to the prerender process and the runtime interactive process.
When a process is terminated due to exceeding allowed RAM, it is terminated by the operating system. The error message will depend on the specific OS, language, packages, and user code involved. Therefore, it is not possible to give a list of possible error codes, or for Posit Connect to detect that this is the reason for termination. If your content is failing to render or execute and the reason is ambiguous, try increasing or removing any RAM limits. Similarly, requests for initial CPU or RAM that cannot be fulfilled by Kubernetes can cause errors that appear in Kubernetes logs but not Posit Connect logs. If your content process is failing to start, try increasing or removing initial CPU and RAM requests.
Process Configurations
References to per node configurations refer to Posit Connect instantiations which are configured for High Availability. Check with your server administrator if you’re not sure whether this applies to you.
Max processes
The maximum number of processes that will be simultaneously running for this content per Posit Connect node, regardless of load.
Min processes
The minimum number of processes that will be kept running for this content per Posit Connect node, regardless of load.
Max connections per process
The maximum number of client connections allowed to an individual process. Incoming connections which will exceed this limit are routed to a new process or rejected.
Load factor
A value between 0 and 1 which determines how lazily additional processes will be spawned to handle incoming load for this process. At the highest setting, Connect will only spawn additional processes when existing processes are not allowed to accept an additional connection. At the lowest setting, Connect will create many new processes as new users arrive to handle the load.
Errors such as connection timeouts or HTTP 503 status codes indicate insufficient process resources to serve the incoming requests. This can be caused by sudden bursts of requests to this piece of content. If this occurs, some possible solutions are:
Increase
Min processesso that one or more worker processes will be kept running. Those processes will begin handling requests while additional processes are starting up. Keep in mind that processes that are kept running when not needed will still consume system memory.Increase
Max processesand/orMax connections per processto provide enough total connections to hold all incoming requests while processes are starting up.
Applications that take significant time to start up might also benefit from setting Min processes. Users visiting the application can then be served quickly by a process that is already running, rather than waiting for an application process to start up. Connect configurations that use off-host execution might see somewhat longer application startup times and can also use Min processes to keep workers running if needed.
For more information, see Scaling and Performance Tuning in Posit Connect.
Timeout Configurations
Idle timeout per process
The minimum number of seconds a worker process remains alive after it goes idle (no active connections).
Initial timeout
The maximum number of seconds to wait for an app to start.
Connection timeout
The maximum number of seconds allowed without data sent or received across a client connection. A value of 0 means connections will never time-out (not recommended).
Read timeout
Maximum number of seconds allowed without data received from a client connection. A value of 0 means a lack of browser interaction will never cause the connection to close. This is useful when deploying dashboard applications which send regular updates but have no need for interactivity.
Schedule & Emailing
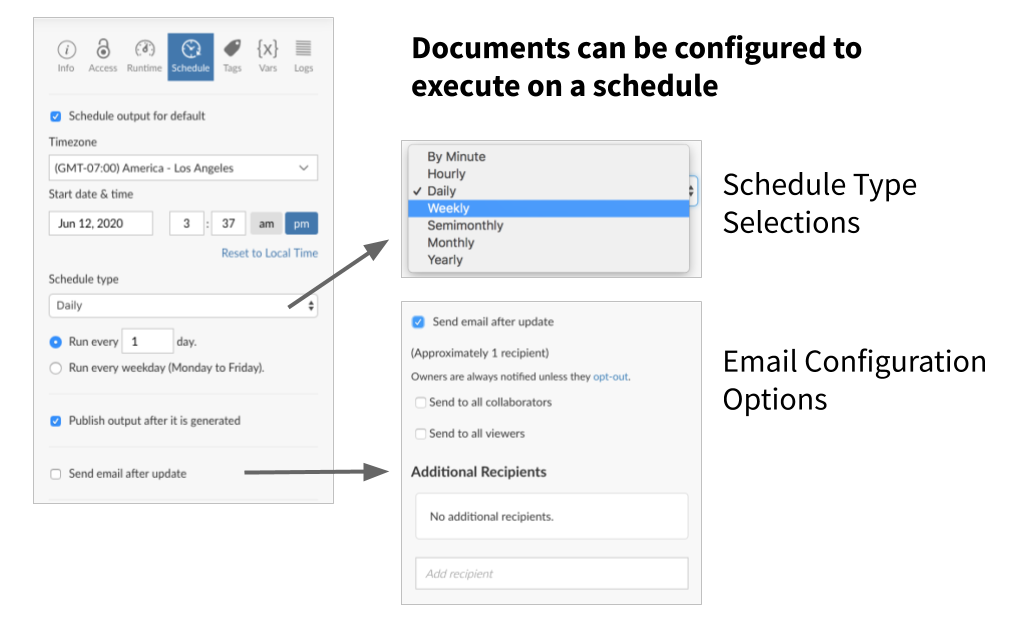
The Schedule panel is available for content types that can be rendered on a schedule. If scheduling is not applicable to the content, you will see a message stating that there are no settings to configure.
The scheduling customization options available depend on which “schedule type” you choose. For example, selecting the daily schedule type allows a choice between running the report every x number of days or every weekday.
By default, Posit Connect’s email functionality is disabled until it is properly configured. Instructions are available in the Admin Guide.
Scheduled reports can be configured to send an email to targeted recipients upon successful completion. When a scheduled report fails to run, the content owner (and all collaborators unless otherwise configured) will get an email indicating that there has been rendering error.
A full description of all scheduling features is available in the Scheduling chapter.
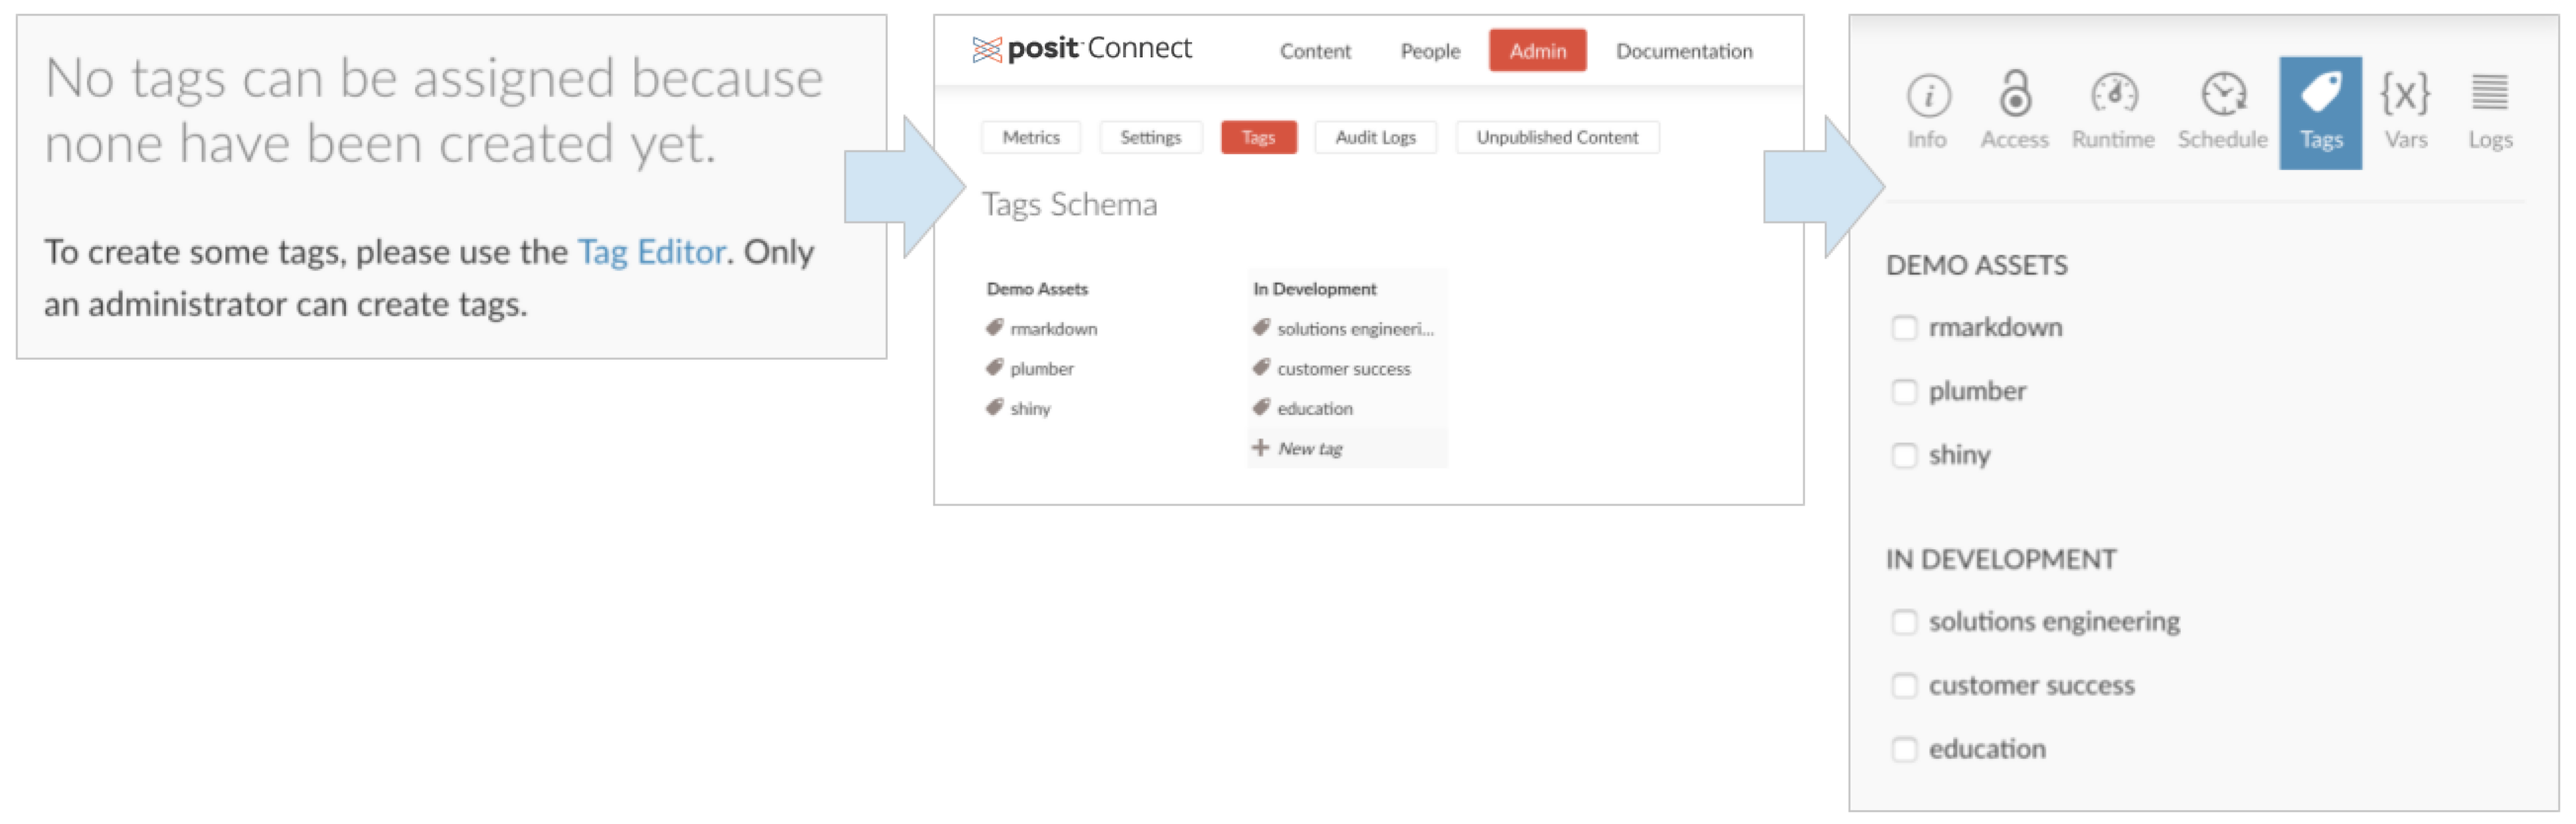
Tags
Posit Connect administrators can create tags and a tag schema using the Tag Editor. If no tags have been created, you will see a message in this panel stating that no tags can be assigned (shown below).
Once an administrator has created tags, use the checkboxes to apply them to your content. Tags make content organization, discovery and filtering easier across the Posit Connect dashboard.
Vars (Environment Variables)
When developing content for Posit Connect, you should never place secrets (keys, tokens, passwords, etc.) in the code itself. Best practices dictate that this kind of sensitive information should be protected through the use of environment variables or another method of configuration such as the config package.
Posit Connect automatically provides a number of environment variables when running your content:
RSTUDIO_PRODUCTis assigned the valueCONNECT.The
RSTUDIO_PRODUCTenvironment variable cannot be customized.CONNECT_SERVERcontains the public URL of the Posit Connect server. This URL was specified by theServer.Addressserver configuration setting.Content owners may overwrite this value in the Vars pane or with the Posit Connect Server API.
The automatic addition of
CONNECT_SERVERmay be disabled for security reasons using theApplications.DefaultServerEnvserver configuration setting. Reach out to your Posit Connect server administrator for additional details.CONNECT_API_KEYis owned by the content owner and is ephemeral (only exists for the duration of the underlying content process).Content owners may overwrite this value in the Vars pane or with the Posit Connect Server API.
The automatic addition of
CONNECT_API_KEYmay be disabled for security reasons using theApplications.DefaultAPIKeyEnvserver configuration setting. Reach out to your Posit Connect server administrator for additional details.CONNECT_CONTENT_GUIDcontains the GUID for the content.Content owners may overwrite this value in the Vars pane or with the Posit Connect Server API.
R_CONFIG_ACTIVEidentifies the active configuration for use with theconfigR package. The default value isrsconnect, but administrators can change this value globally with theR.ConfigActiveserver configuration setting.The
R_CONFIG_ACTIVEenvironment variable is automatically configured only for content using R.Content owners may overwrite the default value for
R_CONFIG_ACTIVEin the Vars pane or with the Posit Connect Server API. Some installations may prohibit this adjustment.
Environment variables can be set prior to deploying a content bundle with the Posit Connect API. Follow the Deploying Content workflow in the Server API Cookbook. This workflow requires Posit Connect version 1.8.6 or later.
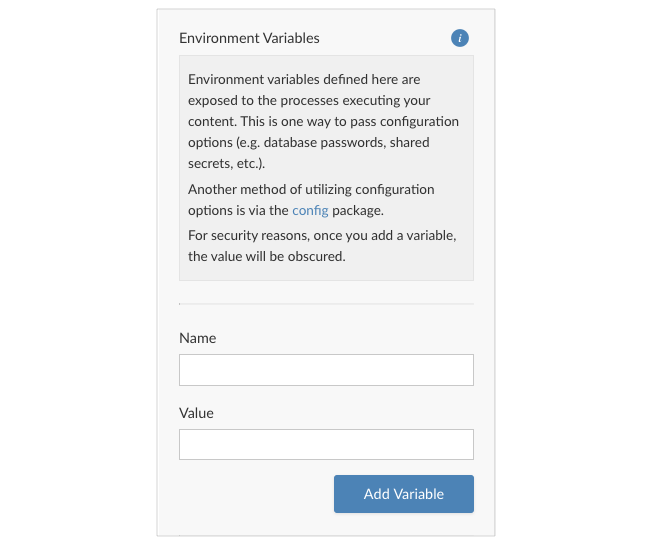
To set environment variables after initial deployment in the Posit Connect dashboard, navigate to the Vars pane. Enter a name and value for your environment variable, then click on the Add Variable button.
Once a variable is added, the value will be obscured. Environment variables are encrypted on-disk and in-memory. They are decrypted only when a process is about to be started.
Documents must be published with source code to be executable. Static content (HTML) is served as-is; it is not rendered by the server and does not receive these environment variables.
Logs
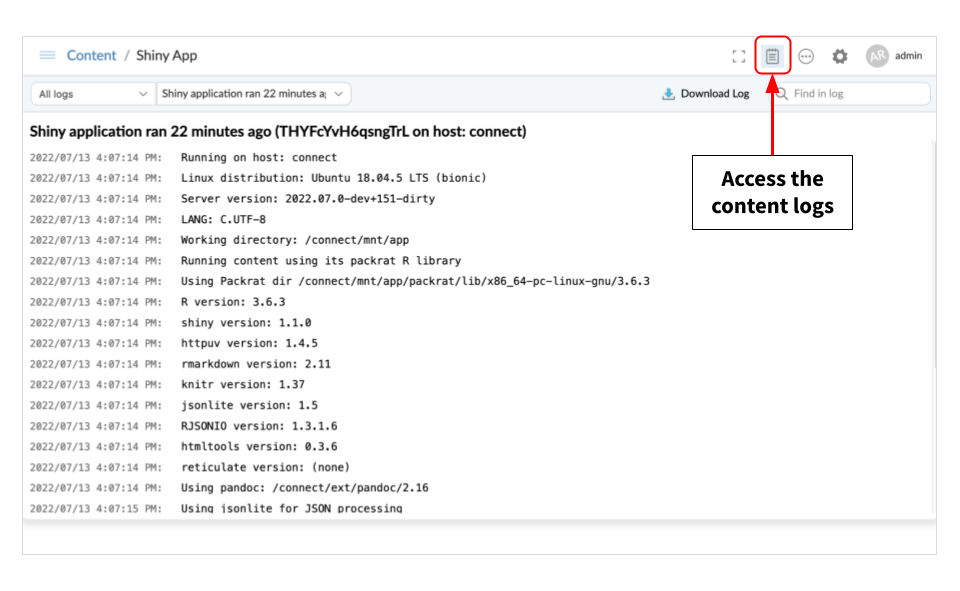
The logs viewer contains execution details for each launched process associated with the piece of content. Standard output and standard error are captured and streaming log entries will appear in real time.
The logs viewer can be opened from the Connect dashboard Toolbar menu by clicking the Show Logs icon. For smaller windows and mobile, this icon is consolidated into the More option. The logs can also be opened and closed with a keyboard shortcut (~).
Search and download functionality is scoped to the log file you currently have selected and displayed in the logs viewer.
Switching between logs
Use the Logs Selection drop-down (located in the upper left) to view the available logs and switch between them in the viewer. Logs are organized by content bundle. Each time you publish an update to a content item, a new content bundle is created. The current bundle is denoted as “Active.”
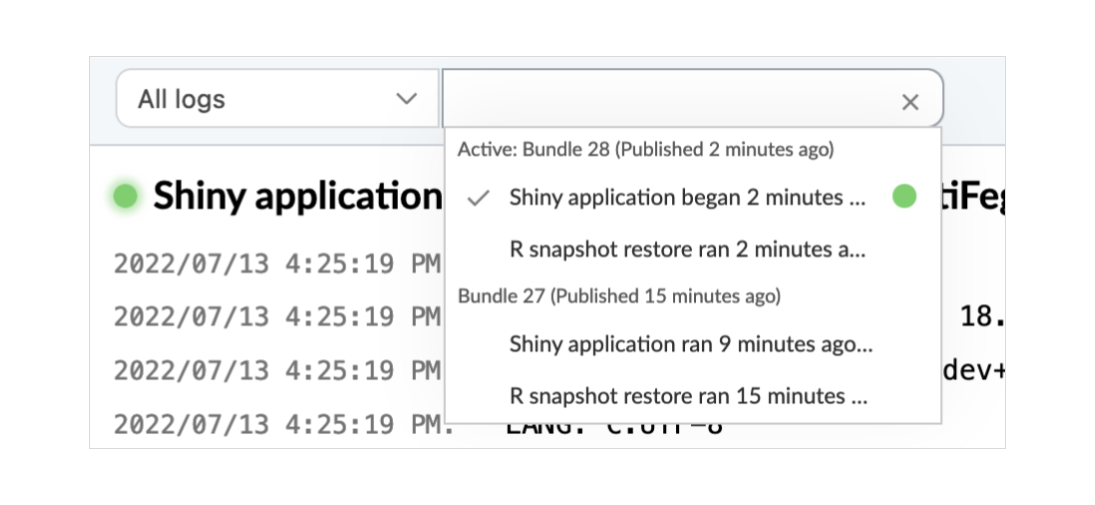
Currently running process logs are indicated by a green “live” symbol. The log currently shown in the viewer is indicated by a check mark symbol.
Use the filter to narrow the type of logs shown in the Logs Selection drop-down. There are several types of logs available to filter depending on the type of content you are inspecting. Documents published with source code will have environment restore logs and render logs. Applications will have environment restore logs and process logs.
Truncation
The viewer output may be truncated for log line length (at 4096 characters) and lines shown (at 5000 lines). Truncation prevents performance issues in the browser.
To retrieve the full output of the log file, use the Download button located in the upper right corner of the viewer.